Query or Join Data in Hadoop
Introduction

Use queries to group rows based on the values in one
or more columns and then summarize selected numeric columns. The summary
data appears in new columns in the target table.
Use joins to combine
source tables. The join is based on a comparison of values in “join-on”
columns that are selected for each of the source tables. The result
of the join depends on matching values in the join-on columns, and
on the selected type of the join. Four types of joins are available:
inner, left, right, and full.
The Query or Join Data
in Hadoop directive enables you to create jobs that combine multiple
joins and queries, and then customize the target table to remove unwanted
rows and columns, remove duplicate rows, and rearrange columns. Before
you execute the job you can edit the Hive SQL code and paste-in additional
Hive SQL code. The process of the directive is defined as follows:
-
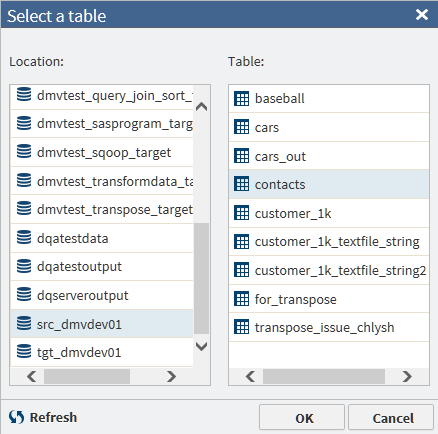
Select a source table.
-
Join tables to the initial table as needed.
-
Define queries that group columns and aggregate numeric values, again as needed.
-
For jobs that do not include queries, use rules to filter unwanted rows from the target. (Queries require all rows.)
-
For join-only jobs, select, arrange, and rename target columns.
-
For join-only jobs, apply Hive SQL expressions in new or existing target columns.
-
Sort target rows based on specified target columns.
Example
Follow these steps to
use the Query or Join Data In Hadoop directive.
-
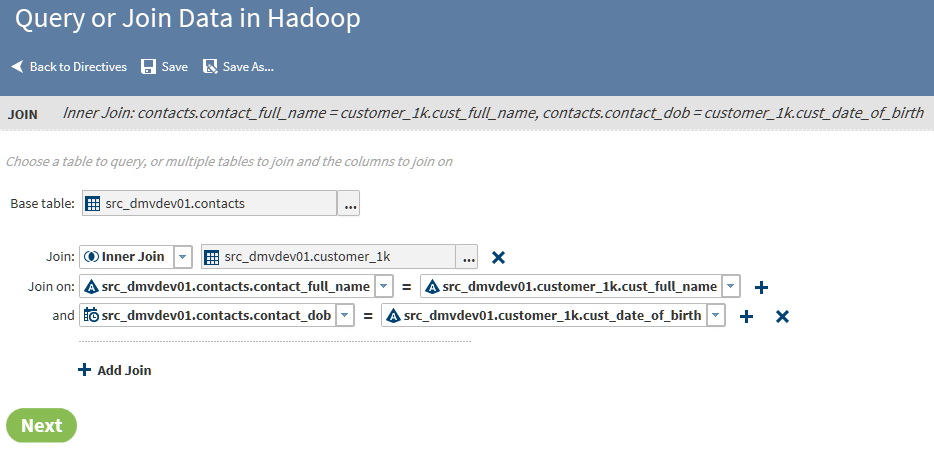
As needed, click the Join field and select a join type other than the default join type Inner.InnerThe inner join finds matching values in the join-on columns and writes one row to the target. The target row contains all columns from both source tables. A row from either source table is not written to the target if it contains a null value in the join-on column. A row is also not written to the target if the value in the join-on column does not match a value in the join-on column in the other source table.LeftThe left or left-full join writes to the target all rows from the left table of the join statement. If a match does not exist between the join-on columns, null values are written to the target for the columns of the right table in the join.RightThe right or right-full join reverses the definition of the left join. All rows from the right table appear in the target. If no values match between the join-on columns, then null values are written to the target for the columns of the table on the left side of the join statement.FullThe full join combines the left and right joins. If a match exists between the join-on columns, then a single row is written to the target to represent those two source rows. If the left or right table has a value in the join-on column that does not match, then the data for that row is written to the target and null values are written into the columns from the other source table.
-
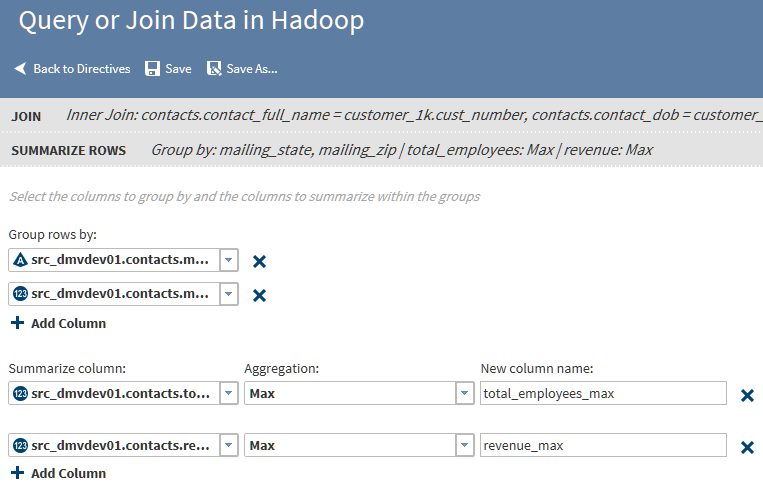
To add summarizations, click the Group rows by field, and then click the column that you want to use as the primary grouping in your target table. For example, if you are querying a table of product sales data, then you could group rows by the product type column.Note:
-
If your job includes joins, note that the Group rows by list includes all columns from your source tables.
-
If you intend to paste a Hive SQL query into this directive, then you can click Next two times, to bypass the pages for summaries and filters and reach the Code page.
-
-
To generate multiple aggregations, you can add additional groups. The additional groups will appear in the target table as nested subgroups. Each group that you define will receive its own aggregations.To add a group, click Add Column, and then repeat the previous step to select a different column than the first group. In a table of product sales data, you could choose a second group by selecting the column product_code.
-
In Aggregations, select one of the following:Countspecifies the number of rows that contain values in each group.Count Distinctspecifies the number of rows that contain distinct (or unique) values in each group.Maxspecifies the largest value in each group.Minspecifies the smallest value in each group.Sumspecifies the total of the values in each group.
-
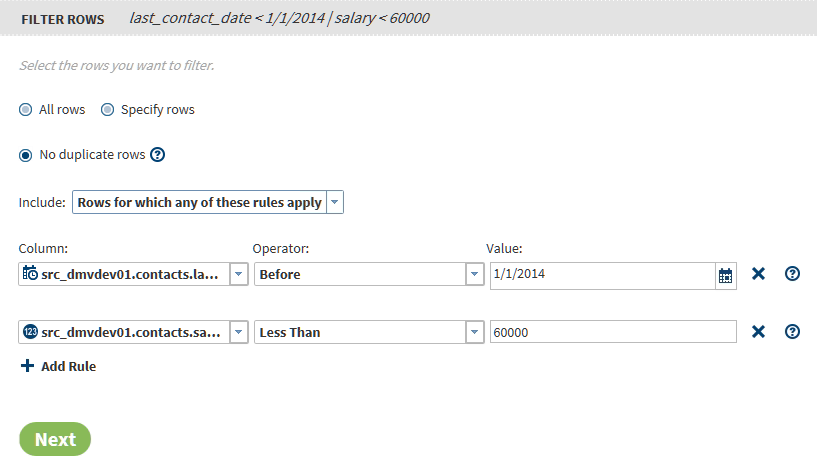
The field Include rows where applies when you specify multiple rules. The default value Rows for which all of these rules apply writes rows to the target only if all of the rules apply. When you select Rows for which any of these rules apply, rows are written to the target only if one or more of the rules apply.
-
Click Operator to specify a logical operator for your rule. The logical operators that are available for your rules depend on the data type of your column. Columns can be numeric
 , character
  , or datetime
  . To learn about the available logical operators, see Logical Operators in the Filter Transformation.
 -
Click Next to open the Columns page. Use the Columns page to select, order, and rename the columns that will be written into the target table. Also use the Columns page to apply Hive SQL expressions to new or existing columns.The Columns page is available only if your job does not contain summaries. If your job does contain summaries, then click Next to display the Sort page, and then click Next again to open the Target Table page.
-
Use the Columns page to do the following:
-
Select and order the columns in the target, using the arrow icons to select all
 , select one
  , remove one
 (or
(or  ), and remove all
  .
.
-
Replace the suggested column names as needed by clicking in the Target Name column.
-
Reorder columns by clicking a column and clicking
 (move to first column),
  (move column left one position),
  (move column right one position), and
  (move column to last position).
-
Add new columns for Hive SQL expressions. Click the Add icon
 , and then specify the column name.
-
Add new column and open the Advanced Editor to develop a Hive SQL expression. Click
 .
.
-
Add a Hive SQL expression to an existing column using the Advanced Editor. Click
 .
.
-
-
To display your target data as a temporary view, click
 . Saving as a view displays your target data in the Sample Data Viewer without saving
the results to a target table on disk.
When your target selection is complete, click Next to open the Code page
. Saving as a view displays your target data in the Sample Data Viewer without saving
the results to a target table on disk.
When your target selection is complete, click Next to open the Code page -
In the Code page, click Edit HiveQL Code to edit the generated code. Click Reset Code to restore the original generated code. Click Next to open the Result page.Note: Edit your Hive SQL code with care. The code in the editor is the exact code that will be executed by your job, regardless of previous selections.
-
Click Start querying data to execute your directive. To monitor the progress of your job, see the Run Statusdirective.


Copyright © SAS Institute Inc. All rights reserved.