Sort and De-Duplicate Data in Hadoop

Introduction

Sort and De-Duplicate Icon in SAS Data Loader Window
Use the Sort and De-Duplicate Data in Hadoop directive to create jobs that include some or all of the following steps:
  1. If needed, group rows based on selected columns and then summarize selected numeric columns for each group.
  2. If not summarizing, specify the removal of duplicate rows.
  3. Filter rows into the target table by applying rules to selected columns.
  4. Remove, reposition, and rename the columns in the target table. Add columns for HiveQL expressions as needed.
  5. Sort target rows by selecting one or more columns for ascending or descending values.

Example

Follow these steps to use the Sort and De-Duplicate directive:
  1. Open SAS Data Loader, as described in Get Started.
  2. In the Source Table page, click a schema, and then, when it appears, click a source table.
  3. In the Summarize Rows page, if you do not want to generate summary values for groups of rows, click Next. Otherwise, click Group rows by and select a column. To generate nested groups with additional summary values, click Add Column.
    Group Rows for Summary Values
  4. Click Summarize column and select a column that will be used to generate summary values for each group.
  5. Click Aggregation and select the summary type.
  6. Click New column name to change the default column name. The new column will contain a summary value for each group.
  7. Click Add Column to specify a second summary and new column.
    Summarizations example
  8. Click Next to filter rows into the target table. By default, all source rows are filtered into the target. If you don not need filters, click Next again.
  9. ln the Filter Rows page, click Specify rows. You can also select No duplicate rows if your job does not include summaries.
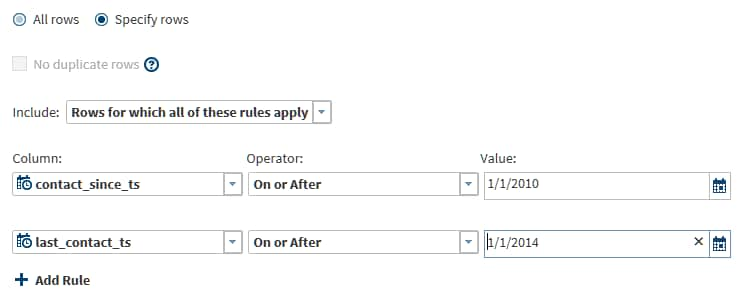
  10. Filter rules are simple expressions that evaluate the values in specified columns. If the expression evaluates to true, then the source row can be written to the target. You can define multiple rules. If you have multiple rules, and if all rules must evaluate to true to write a row to the target, then accept the default value for the Include field.
    If rows are to be written to the target when one or more rules are true, then select the value Rows for which any of these rules apply. Click Add rule as needed.
    Filter Rows Page in the Sort and De-Duplicate Directive
  11. Click Next to display the Manage Columns page. If you defined summaries in the Summarize Rows page, or if you do not need to remove, reorder, rename, or add HiveQL expressions to the columns in the target table, click Next again.
  12. In the Manage Columns page, click Specify Columns.
  13. To remove columns from the target, click the left and right arrow icons between Available columns and Selected columns.
    Arrow Icons for Column Selection
  14. To reorder the selected columns, use the vertical arrows.
    Column order icons
  15. To rename selected columns, click and enter or paste a new name in the Target Name column.
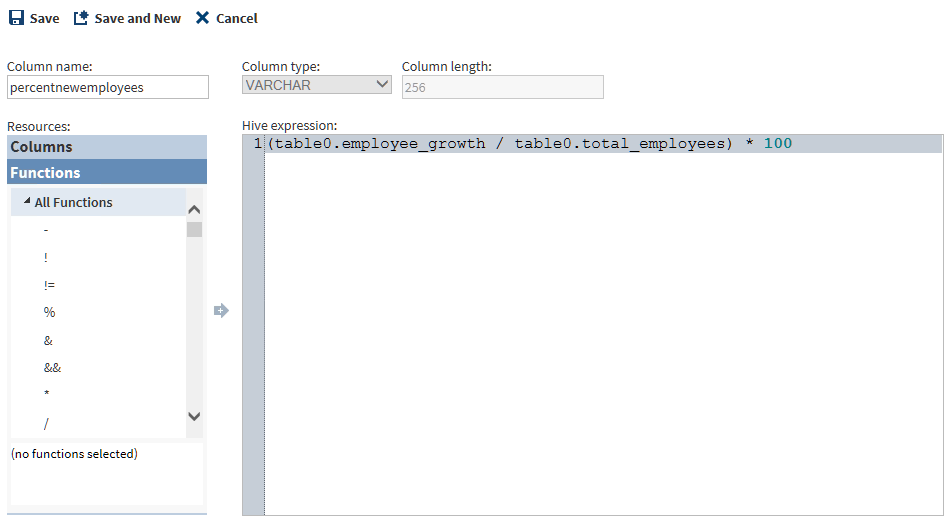
  16. You can generate values for the target table using HiveQL expressions. The values of those expressions can go into existing columns (replacing the source data in those columns,) or the values can go into new columns. You can create the HiveQL expressions by entering or pasting them directly into the Hive Expression column. You can also use the Advanced Editor to generate HiveQL expressions for new or existing target columns. To generate a new column that will contain a HiveQL expression that you create in the Advanced Editor, click Add column using Advanced Editor icon.
  17. In the Advanced Editor, in the Column Name field, enter a name for a new column or rename an existing column.
  18. Click the column names and functions in Resources to build your expression. When you select a function, syntax help is displayed at the bottom of Resources.
  19. To save your expression and return to the Columns page, click Save. To save and create another new column and expression, click Save and New. In the Columns page, the new columns are displayed at the bottom of Selected Columns.
    Advanced Editor for HiveQL Expressions
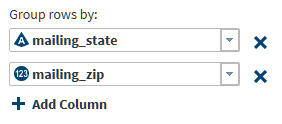
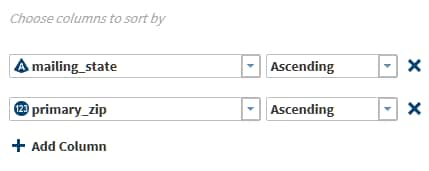
  20. When the target columns are complete, click Next. If you have not defined any summaries in the Summarize Rows page, then the Sort page enables you to group rows based on ascending or descending values in specified columns. If you defined summaries, then the Target Table page enables you to select an existing target table or create a new target table.
  21. In the Sort page, select one or more columns and a sort order of Ascending or Descending for each column. Sorts are nested in the target in the order in which they are defined. Click Next to open the Target Table page.
    Sorting Rows
  22. In the Target Table page, select a location for the target table. When the table list appears, either select an existing target or click New Table. To generate a temporary table that is not saved to disk, select Save as a View. Click Next.
  23. In the Code page, review and edit the generated HiveQL code. Note that your edits might not be reflected in the preceding pages of the directive. Click Next.
  24. In the Result page, click Save or Save As to save your job and list it in Saved Directives. Click Start querying data to run your job.