Establishing Connectivity to a Composite Information Server

Overview of Establishing Connectivity to a Composite Information Server

SAS has partnered with Composite Software to provide customers with access to enterprise resource planning (ERP) and customer relationship management (CRM) data. Composite Software provides the Composite Information Server and Application Data Services that optimize the Composite Information Server's access to the ERP or CRM data source. For this detailed example, the Composite Application Data Service to Salesforce.com is used. Detailed information about the data services is available from Composite Software.
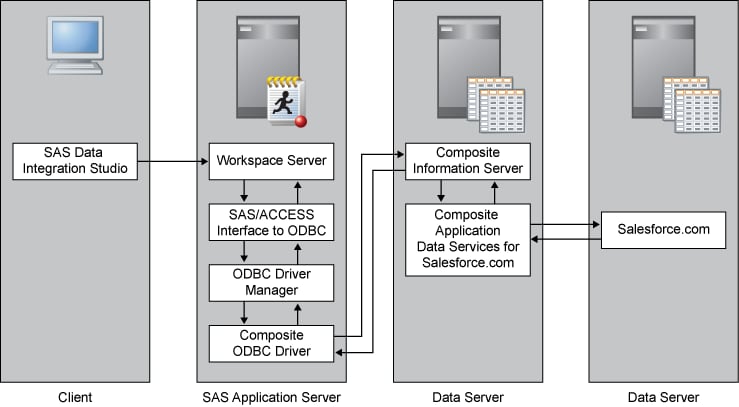
The following figure provides a logical view of how SAS accesses CRM data from Salesforce.com through a SAS/ACCESS ODBC interface to a Composite Information Server.
Establishing Connectivity to a Composite Information Server
SAS supports setting up a connection to a Composite Information Server with ODBC. Configuring this connection is a four-stage process:
  1. Configure the Composite Information Server to communicate with the data source. (This is described in the Composite Software documentation, but the high-level steps are covered here to show the relationships between data sources and user accounts.)
  2. Define an ODBC data source.
  3. Register the database server.
  4. Register the database library.

Prerequisites

This example assumes that the following configuration tasks are complete before beginning the configuration of SAS software:
  1. configuration of a user account and password for the data source, Salesforce.com, that will be used by the Composite Application Data Service for communicating with the data source.
  2. installation of a Composite Information Server and the Composite Application Data Services for Salesforce.com.
  3. installation of SAS/ACCESS Interface to ODBC. For configuration information, go to the Install Center at http://support.sas.com/documentation/installcenter/93 and use the operating system and SAS version to locate the appropriate SAS Foundation Configuration Guide.
  4. (UNIX only) configuration of SAS/ACCESS environmental variables. For more information, see Setting UNIX Environment Variables for SAS/ACCESS.

Stage 1: Configuring the Composite Information Server

The following tasks are documented in detail in the Composite Information Server Administration Guide. The high-level steps are presented here to provide a complete walk through. At the completion of this stage the Composite Information Server can access the data at Salesforce.com.
To add Salesforce.com as a data source to Composite, perform the following steps:
  1. Use Composite Studio to add a new data source to the Shared folder. Choose Salesforce.com as the data source driver. Set option Pass-Through Login to Enabled. The values in the user name and password fields are used to test and confirm connectivity. Deselect the Save Password check box. This step adds the physical data source.
    Data Source Wizard Properties
    Field
    Sample Value
    Data Source Driver
    Salesforce.com
    Datasource Name
    Salesforce.com
    Username
    Salesforce.com user name
    Password
    account password. If the connection fails, follow the instruction to reset the security token at Salesforce.com and append the security token value to the account password.
    Save Password
    Cleared
    Pass-Through Login
    Enabled
  2. If the security token was used, then restart the Composite Information Server before continuing.
  3. Right-click the Salesforce.com data source and select Open.
  4. Click the Re-Introspection tab at the bottom of the right side pane. Either schedule Re-introspection on this pane, or periodically navigate to this pane and click the Re-Introspect Now button. Re-introspection is necessary when tables or columns are added, removed, or altered.
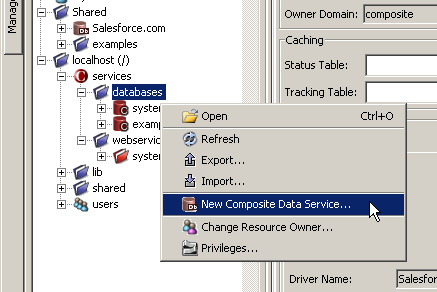
  5. Use Composite Studio to add a new data service that uses the data source. Right-click host name/services/databases and select New Composite Data Service.
    Figure showing the location of the New Data Service menu choice that is available by right clicking localhost > services > databases.
    Enter the following configuration settings on the Add Composite Data Service dialog box:
    Add Composite Data Service Wizard Properties
    Field
    Sample Value
    Data Service Name
    Salesforce
    Data Service Type
    Composite Database
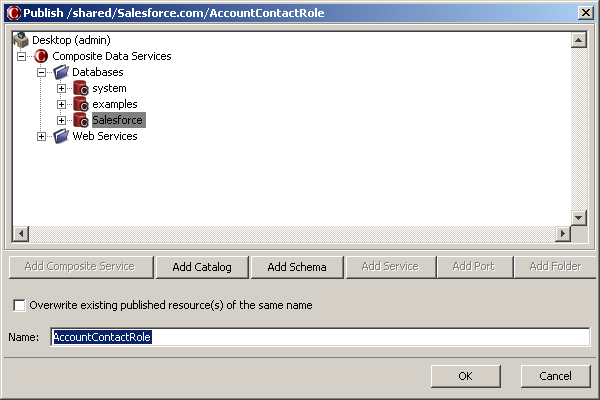
  6. Right-click each table and procedure from the Salesforce.com data source and select Publish. On the Publish window, be sure to select the Salesforce data service and to remove spaces from the table name. For example, change Account Contact Role to AccountContactRole.
    Figure showing spaces removed from table name on the Publish window.
  7. Enable the dynamic domain. For more information, see “Enabling the Dynamic Domain” in the Composite Information Server Administration Guide.
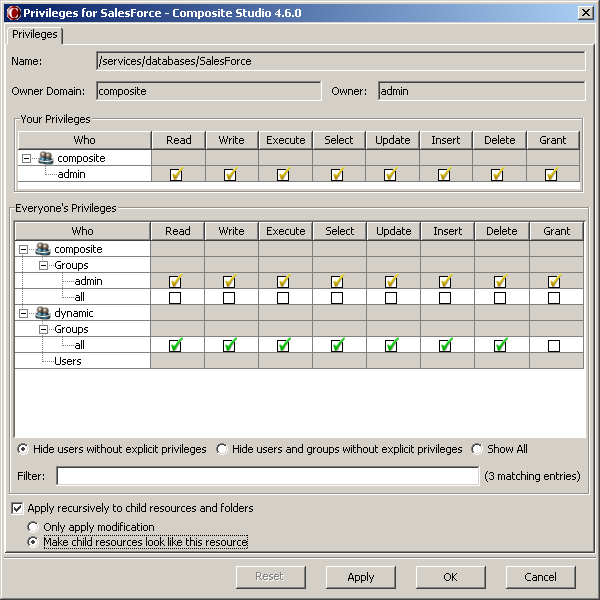
  8. Use Composite Studio to set privileges on the data service (shown in the following figure) and the data source (not shown, but similar). Right-click host name/services/databases/Salesforce and set permissions for dynamicthen selectGroupsthen selectall. You must set permissions for Read and Select to make the data available to users. You might choose to set additional permissions for your site. Afterward, right-click Shared/Salesforce.com and set the same permissions.
    Figure of Privileges window showing Read, Write, Execute, Select, Update, Insert, and Delete privileges for odbcgroup.
    Note: Make sure that the Apply changes recursively to child resources and folders check box is selected.

Stage 2: Configuring the Composite ODBC Driver

After the Composite Information Server is configured to transfer data with the data source, Salesforce.com, then the Composite ODBC Driver must be configured. This driver is configured on the SAS server host machine that is used to transfer data with the Composite Information Server. The driver is used by SAS to open a connection to the Composite Information Server, pass credentials for the data source to Composite, and transfer data.
To configure the Composite ODBC driver, perform the following steps:
  1. On the SAS server host machine, start an installation of Composite Information Server. When you choose the Composite software components to install, select only the ODBC check box.
  2. Open the Windows Control Panel. Then, double-click Administrative Tools. Then, double-click Data Sources (ODBC) to access the ODBC Data Source Administrator dialog box.
  3. Click the System DSN tab, and then click Add to access the Create New Data Source dialog box.
  4. Select Composite from the list, and click Finish to access the Composite Software ODBC Driver Configuration dialog box.
  5. Enter the following configuration settings:
    Configuration Settings
    Field
    Sample Value
    DSN Name
    SalesforceDSN
    Composite Host
    Enter the host name for the Composite Information Server
    Port
    Use the default value of 9401
    User Name
    demo (This is a dummy value. Setting the domain to dynamic enables passing each users' credentials to the data source, Salesforce.com, instead of using demo.)
    Password
    Leave this field blank
    Domain
    dynamic
    Datasource
    Salesforce (Enter the name of the Data Service that was published during the first stage.)
    Catalog
    Leave this field blank
  6. Click OK to save the configuration settings and return to the ODBC Data Source Administrator dialog box. Then, click OK to save the data source.

Stage 3: Register the ODBC Database Server

To register an ODBC database server, perform the following steps:
  1. Open the SAS Management Console application.
  2. Right-click Server Manager and select the New Server option to access the New Server wizard.
  3. Select ODBC Server from the Database Servers list. Click Next.
  4. Enter an appropriate server name in the Name field (for example, Composite Server). You can supply an optional description. One server is required for each DSN. Click Next.
  5. Enter the following server properties:
    Server Properties
    Field
    Sample Value
    Major Version Number
    3
    Minor Version Number
    7
    Data Source Type
    ODBC - Other Database
    Software Version
    3.70
    Vendor
    Data Direct
    Associated Machine
    Select the Composite Information Server host machine value from the drop-down list. If the value that you need is not available, click New to access the New Machine dialog box. Then enter the appropriate value in the Host Name field.
    Click Next.
  6. Enter the following connection properties:
    Connection Properties
    Field
    Sample Value
    Datasrc
    SalesforceDSN (Use the value entered in the DSN Name field in the Composite Software ODBC Driver Configuration dialog box.)
    Authentication type
    User/Password
    Authentication Domain
    CompositeAuth (You might need to create a new authentication domain. For more information, see How to Store Passwords for a Third-Party Server in SAS Intelligence Platform: Security Administration Guide.) Click New to access the New Authentication Domain dialog box. Then enter the appropriate value in the Name field and click OK to save the setting.
    Click Next.
  7. Examine the final page of the wizard to ensure that the proper values have been entered. Click Finish to save the wizard settings.

Stage 4: Register the ODBC Database Library

Important: Before tables can be registered, you must use the User Manager plug-in to SAS Management Console and edit each user that accesses Salesforce.com. On the Accounts tab, add a new account. For the account, set the User ID to be the Salesforce.com user name, set password to be the Salesforce.com security token, and set authentication domain to CompositeAuth.
After you have registered the database server, you register the database library. To register the database library, perform the following steps:
  1. In SAS Management Console, expand the Data Library Manager node. Right-click Libraries and select the New Library option to access the New Library wizard.
  2. Select ODBC Library from the Database Data list. Click Next.
  3. Enter an appropriate library name in the Name field. For example, Salesforce. You can supply an optional description. Click Next.
  4. Select the SAS server from the list that was configured with the Composite Software ODBC Driver and use the right arrow to assign the library to the SAS server. Click Next.
  5. Enter the following library properties:
    Library Properties
    Field
    Sample Value
    Libref
    sfref
    Engine
    ODBC
  6. Important: Click Advanced Options. On the Advanced Options dialog box, click the Input/Output tab and set Preserve DBMS table names to YES. Click OK.
  7. Enter the following settings:
    Server and Connection Information
    Field
    Sample Value
    Database Server
    Composite Server (Use the database server that you selected in the New Server wizard.)
    Database Schema Name
    This field is not used.
    Connection
    Use the default value of Connection: server-name.
    Default Login
    Use the default value of (None).
    Click Next.
  8. Examine the final page of the wizard to ensure that the proper values have been entered. Click Finish to save the library settings. At this point, register tables as explained in Registering and Verifying Tables.