Establishing Connectivity to a Flat File

You can connect to a flat file using the External File
Source Designer in SAS Data Integration Studio.
Assume that the SAS
software has already been loaded by using the standard installation
wizard, and that the flat file is stored in a location that can be
accessed. This example focuses on a comma-delimited flat file. A similar
process is used for other types of flat files, but some steps are
different.
-
-
Click Auto Fill to access the Auto Fill Columns dialog box. Change the value entered in the Start record field in the Guessing records group box to
2. This setting is based on the assumption that the first data record of the flat file contains header information and that the record is unique because it holds the column names for the file. Therefore, excluding the first data record from the guessing process yields more accurate preliminary data because it is excluded when the guessing algorithm is run.
-
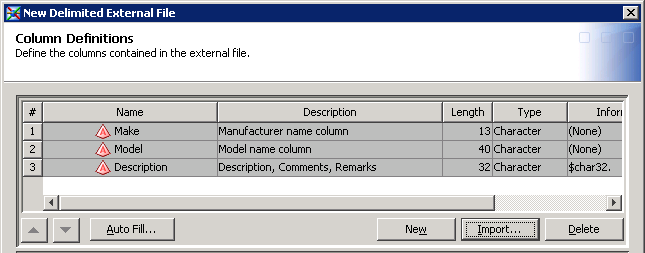
Click Import to access the Import Column Definitions dialog box. The following four methods are provided for importing column definitions:In most cases, you get the column definitions from an external format file or from the column headings in the external file. Here is an example of a format file:
# Header follows
Name,SASColumnType,SASColumnName,SASColumnLength,SASInformat,SASFormat,Desc,ReadFlag
# Column definition records records follow
Make,C,Make,13,,$char13.,Manufacturer name column,y
Model,C,Model,40,,$char40.,Model name column,y
# Comma within quotation marks below is not a delimiter
Description,C,Description,32,$char32.,,'Description, Comments, Remarks',y
For this example, select the Get the column names from column headings in the file radio button. Keep the default settings for the fields underneath it.Note: If you select Get the column names from column headings in the file, the value in the Starting record field in the Data tab of the view pane in the Column Definitions dialog box is automatically changed. The new value is one greater than the value in the The column headings are in file record field in the Import Column Definitions dialog box. -
The preliminary data for the external file object is displayed in the columns table at the top of the page. The Informat and Format columns for the rows in the table are based on the values that are included in the sample data that is processed by the guessing function. The results are accurate for this particular set of records, but you should still examine them to make sure that they are representative of the data in the rest of the flat file. Edit the values by clicking directly on the cells in the column table and making the necessary changes.
-
Click the Data tab at the bottom of the Column Definitions page. Then, click Refresh. The data should be properly formatted. If not, edit the cells in the column table and check the results by refreshing the Data tab. You can repeat this process until you are satisfied. You can review the SAS log for more details.