Establishing Connectivity to an SAP Server

Overview to Establishing Connectivity to an SAP Server

The following figure provides a logical view of connecting to an SAP Server as a data source.
Establishing Connectivity to an SAP Server
Setting up a connection from SAS to an SAP server is a three-stage process:
  1. Register the server.
  2. Register the library.
  3. Extract SAP metadata, if SAS Data Surveyor for SAP is installed.
This example shows the process for establishing a SAS connection to SAP. It assumes that the following software has already been loaded by using the standard installation wizard:
  • SAP RFC library. This is required for communication with SAP.
  • SAS/ACCESS Interface to R/3. For z/OS hosts, this installs the SAS RFC server. For these z/OS hosts, this server must be started each time you start the SAS servers such as the Object Spawner.

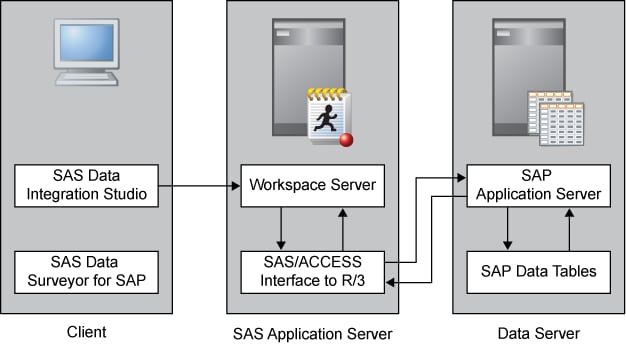
Stage 1: Register the Server

To register the SAP server, perform the following steps:
  1. Open the SAS Management Console application.
  2. Right-click Server Manager and select the New Server option to access the New Server wizard.
  3. Select SAP Server from the Enterprise Applications Servers list. Then, click Next.
  4. Enter an appropriate server name in the Name field (for example, SAPServer). Note that you can supply an optional description if you want. Click Next.
  5. Enter the following server properties. An SAP 4.6 installation is used as the example:
    Server Properties
    Field
    Sample Value
    Major Version Number
    4
    Minor Version Number
    6
    Software Version
    4.6
    Vendor
    SAP AG
    Click Next.
  6. Enter the following connection properties:
    Connection Properties
    Field
    Sample Value
    Authentication Domain
    SAPAuth (You might need to create a new authentication domain. For more information, see How to Store Passwords for a Third-Party Server in SAS Intelligence Platform: Security Administration Guide.) Click New to access the New Authentication Domain dialog box. Then enter the appropriate value in the Name field and click OK to save the setting.
    Client
    800 (This value is obtained from your SAP administrator.)
    Language
    EN (This value is obtained from your SAP administrator.)
    Note: An embedded RFC server is not available for z/OS. For z/OS, click the Advanced Options button and enter “host=rfc-server port=rfc-port” in the Other option(s) to be appended text field. Also, select the Batch Mode check box.
  7. Select Application Server and click Options to access the Application Server Host dialog box.
    Tip
    Instead of the Application Server, you might choose other options, as well, including: SAPGUI Logical Name, SAPRFC.INI Logical Name, and Message Servers
  8. Enter the fully qualified name of the server host that was supplied by the SAP administrator (for example, sapsrv.na.sas.com) in the Application Server Host field. Enter the system number that was supplied by the SAP administrator (for example, 12) in the System Number field. The default access mode is direct access. In order to run in batch mode, click the Advanced Options tab, select the Batch Mode check box, and enter into the Other options field a value for destgroup such as destgroup="SDSTEST". For batch mode on z/OS, follow the instructions in Installation Instructions for SAS/ACCESS Interface to R/3 Software. Then, click OK to return to the New Server wizard.
  9. Click Next.
  10. Examine the final page of the wizard to ensure that the proper values have been entered. Click Finish to save the wizard settings.

Stage 2: Register the Library

After you have registered the server, you can register the library. To register the library, perform the following steps:
  1. In SAS Management Console, expand Data Library Manager. Right-click Libraries. Then, select the New Library option to access the New Library wizard.
  2. Select SAP Library from the Enterprise Applications Data list. Click Next.
  3. Enter an appropriate library name in the Name field (for example, SAP Library). You can supply an optional description. Click Next.
  4. Select an application server from the list and use the right arrow to assign the application server. This step makes the library available to the server and makes the library visible to users of the server. Click Next.
  5. Enter the following library properties:
    Library Properties
    Field
    Sample Value
    Libref
    SAPLib
    Engine
    SASIOSR3 (Accept the value that is populated automatically.)
    Click Next.
  6. Select the SAP server that you entered in the Name field of the New Server wizard (for example, SAP Server) by using the Database Server drop-down list. Then, click Next.
  7. Examine the final page of the wizard to ensure that the proper values have been entered. Click Finish to save the library settings.

Stage 3: Extract SAP Metadata

If SAS Data Surveyor for SAP is installed, then you can extract metadata about your SAP objects to SAS data sets. Once you have created the SAS data sets, then the tables in your SAP System are available for use in jobs with clients like SAS Data Integration Studio and SAS Enterprise Guide.
The tools for extracting the SAP metadata are provided as a plug-in to SAS Management Console and access to the tool is controlled with role-based access. To enable the extraction tool for role-based access and to extract the SAP metadata, perform the following steps:
  1. Using an unrestricted account such as sasadm@saspw, select Toolsthen selectPlug-in Manager from SAS Management Console.
  2. On the Plug-in Manager window, select the ExtractionTool check box. Click OK.
  3. Assign the ExtractionTool capability to a role with the User Manager plug-in to SAS Management Console, and then associate users or groups with the role. The following list provides two choices:
    • Assign the ExtractionTool capability to an existing role such as Management Console: Advanced.
    • Create a new role, assign the ExtractTool capability to it, and then associate users and groups with the new role.
    For more information about roles, see Change a Role's Capabilities in SAS Management Console: Guide to Users and Permissions.
  4. Important: Log on to SAS Management Console with an account that has access to the Foundation repository and that is not an unrestricted account.
  5. Select Toolsthen selectExtract from BW or Toolsthen selectExtract from R/3. For information about using the tools, click Help.

Special Considerations for SAP

For z/OS operating environments, when you specify the language value on the New Server wizard, use uppercase letters and enclose the value in quotation marks (for example, “EN”).