Establishing Connectivity to Hadoop

Overview of Establishing Connectivity to Hadoop

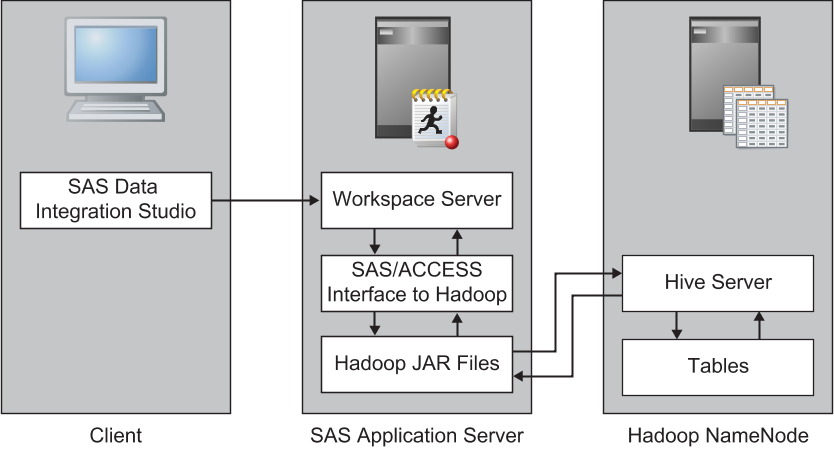
The following figure provides a logical view of using the SAS/ACCESS Interface to Hadoop to access a Hive Server. The Hive Server is shown running on the same machine as the Hadoop NameNode.
Establishing Connectivity to Hadoop Servers
Topology graphic for Hadoop via Hive Library
Setting up a connection from SAS to a Hadoop Server is a two-stage process:
  1. Register the Hadoop Server.
  2. Register the Hadoop via Hive library.
This example shows the process for establishing a SAS connection to a Hive Server. In order for the SAS/ACCESS Interface to connect with the Hive Server, the machine that is used for the SAS Workspace Server must be configured with several JAR files. These JAR files are used to make a JDBC connection to the Hive Server. The following prerequisites have been satisfied:
  • installation of SAS/ACCESS Interface to Hadoop. For configuration information, see the Install Center at http://support.sas.com/documentation/installcenter/93 and use the operating system and SAS version to locate the appropriate SAS Foundation Configuration Guide.
  • installation of the Hadoop JAR files required by SAS.
  • setting the SAS_HADOOP_JAR_PATH environment variable.
This section describes the steps that are used to access data in Hadoop as tables through a Hive Server. SAS Data Integration Studio offers a series of transformations that can be used to access the Hadoop Distributed File System (HDFS), submit Pig code, and submit MapReduce jobs.

Stage 1: Register the Hadoop Server

To register the Hadoop Server, perform the following steps:
  1. Open the SAS Management Console application.
  2. Right-click Server Manager and select the New Server option to access the New Server wizard.
  3. Select Hadoop Server from the Cloud Servers list. Then, click Next.
  4. Enter an appropriate server name in the Name field (for example, Hadoop Server). Note that you can supply an optional description if you want. Click Next.
  5. Enter the following server properties:
    Server Properties
    Field
    Sample Value
    Major Version Number
    0
    Minor Version Number
    20
    Software Version
    204
    Vendor
    Apache
    Associated Machine
    Select the host name for the Hadoop NameNode from the menu or click New and specify the host name.
    Click Next.
  6. Enter the following connection properties:
    Connection Properties
    Field
    Sample Value
    Hadoop NameNode
    Specify the host name of the machine that is running the Hadoop NameNode.
    Install Location
    For deployments that use SAS Visual Analytics Hadoop, specify the path to TKGrid on the machines in the cluster.
    Database
    Use the default value of DEFAULT.
    Port Number
    Specify the network port number for the Hive Server.
    Authentication type
    User/Password
    Authentication domain
    HadoopAuth (You might need to create a new authentication domain. For more information, see How to Store Passwords for a Third-Party Server in SAS Intelligence Platform: Security Administration Guide.) Click New to access the New Authentication Domain dialog box. Then enter the appropriate value in the Name field and click OK to save the setting.
    Configuration
    Specify the values for the fs.default.name and mapred.job.tracker properties that are used in the Hadoop cluster.
    DFS Http Address
    Specify the host name and port for the Hadoop NameNode HTTP address.
    DFS Secondary Http Address
    Specify the host name and port for the Hadoop SeconaryNameNode HTTP address.
    Job Tracker Http Address
    Specify the host name and port for the Job Tracker HTTP address.
  7. Examine the final page of the wizard to ensure that the proper values have been entered. Click Finish to save the wizard settings.

Stage 2: Register the Hadoop via Hive Library

After you have registered the Hadoop Server, register the library. To register the Hadoop via Hive library, perform the following steps:
  1. In SAS Management Console, expand Data Library Manager. Right-click Libraries. Then, select the New Library option to access the New Library wizard.
  2. Select Hadoop via Hive Library from the Database Data list. Click Next.
  3. Enter an appropriate library name in the Name field (for example, Hive Library). You can supply an optional description. Click Next.
  4. Select a SAS server from the list and use the right arrow to assign the SAS server. This step makes the library available to the server and makes the library visible to users of the server. Click Next.
  5. Enter the following library properties:
    Library Properties
    Field
    Sample Value
    Libref
    HIVEREF
    Engine
    HADOOP
    You can also click Advanced Options to perform tasks such as pre-assignment and optimization. Click Next to access the next page of the wizard.
  6. Enter the following settings:
    Server and Connection Information
    Field
    Sample Value
    Database Server
    Hadoop Server (Use the Hadoop Server that you created in the New Server wizard.)
    Database Schema Name
    See your Hadoop administrator for the correct value.
    Connection
    Use the default value of Connection: server_name.
    Default Login
    Use the default value of (None).
    Click Next.
  7. Examine the final page of the wizard to ensure that the proper values have been entered. Click Finish to save the library settings. At this point, register tables as explained in Registering and Verifying Tables.

Special Considerations for Hadoop via Hive Tables

Hadoop via Hive tables can be registered in metadata with clients such as SAS Management Console and SAS Data Integration Studio. However, table metadata cannot be updated after the table is registered in metadata.