Establishing Connectivity to a Scalable Performance Data Server

Overview of Establishing Connectivity to a Scalable Performance Data Server

The following figure provides a logical view of using SPD Server tables as a data source.
Establishing Connectivity to an SPD Server
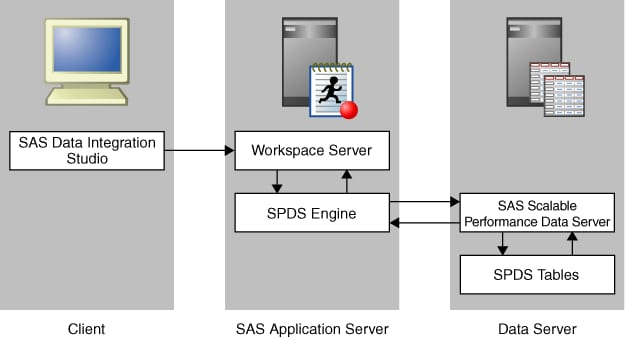
Configuring a connection from SAS to a Scalable Performance Data Server (SPD Server) is a three-stage process:
  1. Configure the libnames.parm file.
  2. Register the SPD server.
  3. Register the SPD server library.
This example shows the process for establishing a SAS connection to SPD Server. It assumes that the software for the database has already been loaded by using the standard installation wizard for the database client. The SPD Server client and server software must be installed before the connection can be established.

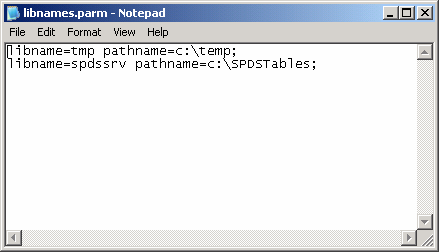
Stage 1: Configure the libnames.parm File

When you install the SPD Server software on Windows, a libnames.parm file is created in the C:\Program Files\SAS Institute Inc\SPDS-version\Site directory. You must specify at least a LIBNAME and a pathname for the directory to use for the SPD Server tables (for example, C:\SPDSTables). For the LIBNAME, use the LIBNAME domain that you created earlier for the library (in this case, spdsrv).
A sample libnames.parm file is shown in the following figure:
Figure showing sample contents for a libnams.parm file

Stage 2: Register the Server

To register the database server, perform the following steps:
  1. Open the SAS Management Console application.
  2. Right-click Server Manager and select the New Server option to access the New Server wizard.
  3. Select SAS Scalable Performance Data Server from the SAS Servers list. Then, click Next.
  4. Enter an appropriate server name in the Name field (for example, SPDServer). You can supply an optional description. Click Next.
  5. Enter the following server properties:
    Server Properties
    Field
    Sample Value
    Major Version Number
    4
    Minor Version Number
    3
    Vendor
    SAS Institute
    SAS Compatibility
    SAS 9
    Click Next.
  6. Enter the following connection properties:
    Connection Properties
    Field
    Sample Value
    Host
    D1234
    Port Number or Name
    5200 (Enter the port number for the SPD Server name server.)
    Communication Protocol
    TCP
    Authentication Domain
    SPDSAuth (You might need to create a new authentication domain. For more information, see How to Store Passwords for a Third-Party Server in SAS Intelligence Platform: Security Administration Guide.) Click New to access the New Authentication Domain dialog box. Then enter the appropriate value in the Name field and click OK to save the setting.
  7. Examine the final page of the wizard to ensure that the proper values have been entered. Click Finish to save the wizard settings.

Stage 3: Register the Library

After you have registered the server, you can register the library. To register the library, perform the following steps:
  1. In SAS Management Console, expand Data Library Manager. Right-click Libraries. Then, select the New Library option to access the New Library wizard.
  2. Select SAS Scalable Performance Data Server V4 Library from the SAS Data list. Click Next.
  3. Enter an appropriate library name in the Name field (for example, SPDServerLibrary). You can supply an optional description. Click Next.
  4. Select a SAS server from the list and use the right arrow to assign the SAS server. This step makes the library available to the server and makes the library visible to users of the server. Click Next.
  5. Enter the following library properties:
    Library Properties
    Field
    Sample Value
    Libref
    spdsrv
    Engine
    SASSPDS
    You can also click Advanced Options to perform tasks such as pre-assignment and optimization. Click Next to access the next page of the wizard.
  6. Enter the following settings:
    Server and Connection Information
    Field
    Sample Value
    SAS SPD Server
    SPDSServer (Use the database server that you selected in the New Server wizard.)
    LIBNAME Domain
    spdsrv (Select the domain name that you entered in the libname.parms file.)
    Default Login
    (None) (Keep this default value.)
    Click Next.
  7. Examine the final page of the wizard to ensure that the proper values have been entered. Click Finish to save the library settings.
At this point, register tables as explained in Registering and Verifying Tables.