Defining Multiple Application Servers
Overview of Adding an Additional SAS Application Server
When you deploy SAS, the SAS Deployment Wizard creates
an initial SAS Application Server using the inputs that you supply.
Later, you can re-run the SAS Deployment Wizard to create additional
application servers on new machines. For more information, see Adding SAS Products in SAS Intelligence Platform: Installation and Configuration Guide.
Follow these guidelines
when running the SAS Deployment Wizard to add a new SAS Application
Server:
-
The machine on which you want to add the new logical server should have a network connection to your site's SAS Software Depot. If it does not, then you must find a way to get the depot to the machine on which you want to create the new SAS Application Server.For more information, see Overview of SAS Software Depots in SAS Intelligence Platform: Installation and Configuration Guide.
-
Note: There are standard deployment plans that contain a SAS Application Server machine. For more information, see About Deployment Plans in SAS Intelligence Platform: Installation and Configuration Guide.
-
If you are adding logical servers that require an object spawner (one of the workspace servers and the stored process server), then when you deploy your SAS Application Server, the wizard also deploys an object spawner to start the servers. If the machine on which you are adding the SAS Application Server already contains an object spawner, then the wizard updates the pre-existing spawner definition for you to include the new servers that you want your spawner to manage.
-
After the server is registered in metadata and running, make sure that Job Execution Service is configured to use the newly registered server. For more information, see Job Execution Services in SAS Intelligence Platform: Middle-Tier Administration Guide.
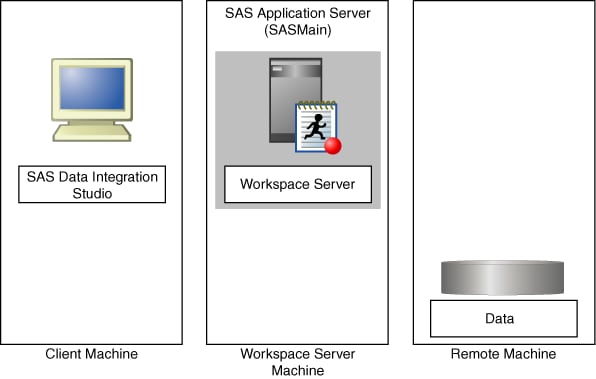
Scenario 1: Using SAS Data Integration Studio to Access Remote Data
Suppose that you are using SAS
Data Integration Studio to process a large amount of data that resides
on a machine different from the workspace server to which the application
submits its code, as shown in the following figure.
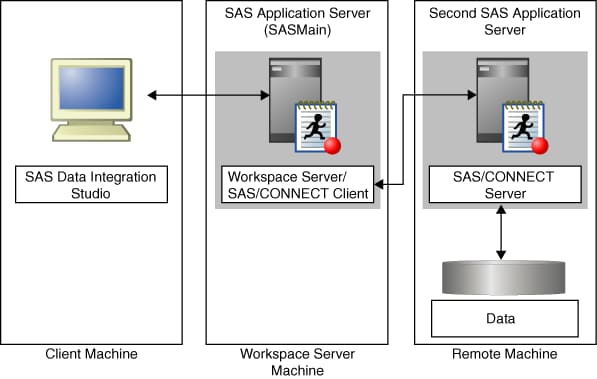
One way to execute such
a job efficiently is to define two application servers. One is the
default application server for SAS Data Integration Studio and contains
the workspace server to which the application submits its generated
code. The other application server contains a SAS/CONNECT server (which
is collocated with the data), and the library of data to be processed
is assigned to this application server. See the following figure.
If you choose for the
transformations in the job to be executed on the remote host, then
SAS Data Integration Studio generates the code that is necessary for
the transformations to be executed by the SAS/CONNECT server. The
overall job is submitted to the workspace server. However, the workspace
server then submits the code for each transformation to the remote
server.
The generation of this
type of code is made possible by the definitions of the two application
servers, one of which is the default application server for SAS Data
Integration Studio and the other the application server to which the
data library is assigned.
Note: For more information, see Setting Up Multi-Tier Environments in SAS Intelligence Platform: Desktop Application Adminstration Guide.
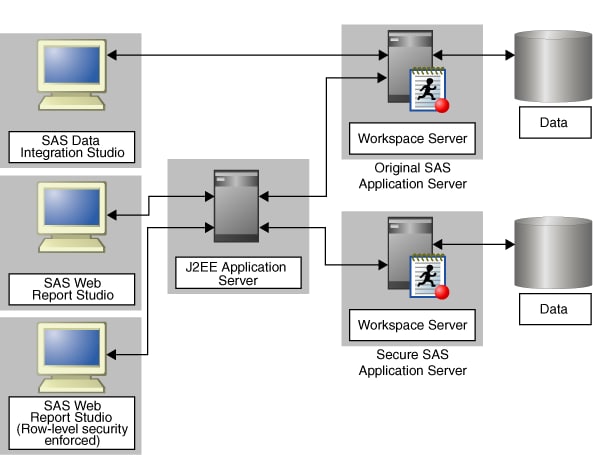
Scenario 2: Using Multiple Application Servers with SAS Web Report Studio
Suppose that
you want to create an environment in which row-level security can
be strictly enforced for a set of SAS Web Report Studio users. (For
a detailed description of this feature, see Overview of BI Row-Level Permissions in SAS Guide to BI Row-Level Permissions.)
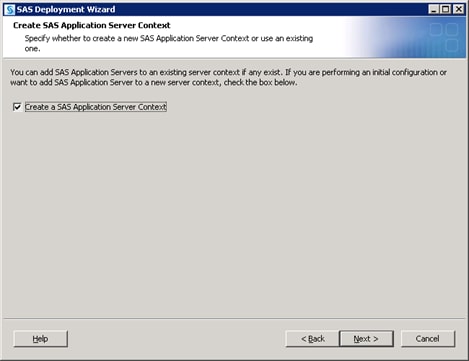
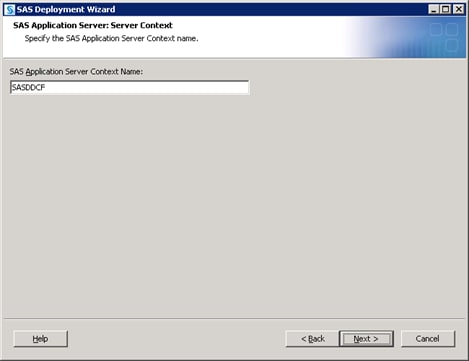
Create a SAS Application Server for a SAS Solution
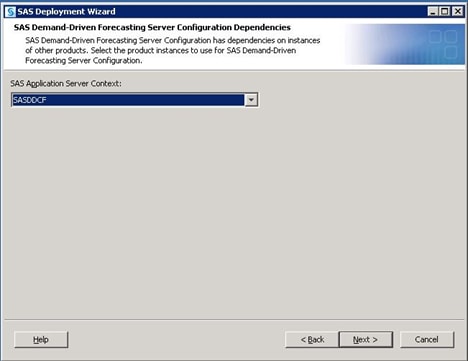
SAS solutions such as
SAS Demand-Driven Forecasting require unique SAS Application Servers
in order to properly function.
If you are deploying
your SAS solution on a system without any pre-existing SAS software,
you can proceed normally making sure to name the SAS Application Server
Context for your solution. For more information, see the SAS Intelligence Platform: Installation and Configuration Guide and any installation documentation for your particular
solution.
If your system already
has SAS software and you are adding a SAS solution, this topic steps
you through using the SAS Deployment Wizard to create a SAS Application
Server for a SAS solution. (SAS Demand-Driven Forecasting is the solution
used to illustrate this procedure. However, the process is similar
for most SAS solutions.)
-
For more information, see Operating Your Servers in SAS Intelligence Platform: System Administration Guide.
-
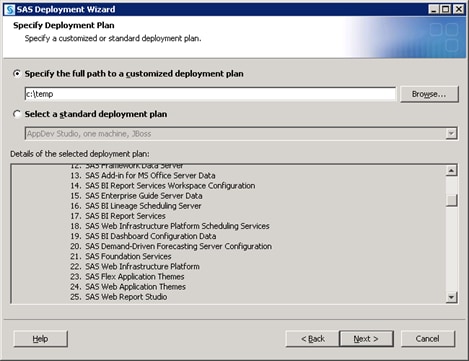
Start the SAS Deployment Wizard from the highest-level directory in your SAS Software Depot using the command appropriate for your operating system:
-
In this example, the server machine is used. Continue through the wizard. When you reach the Deployment Summary, click Start to begin the installation process. When the SAS Deployment Wizard finishes, your SAS solution and its dependent components are installed on the selected Server machine, and are ready to be configured. Restart all SAS servers and spawners, and then invoke the SAS Deployment Wizard a second time.
-
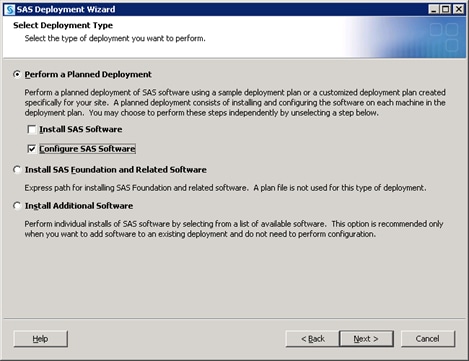
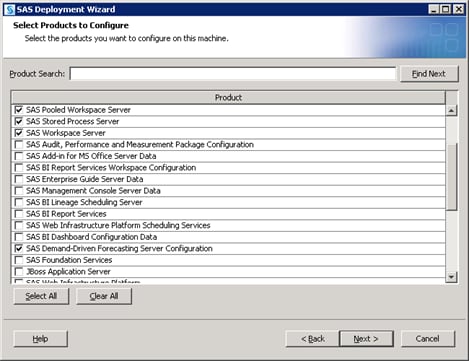
By default, the SAS Deployment Wizard presents only products that have not been configured. Any products required by your solution but not yet configured are automatically selected. However, since the deployment wizard is creating a new SAS Application Server, the SAS servers required and used by your solution remain to be configured.
-
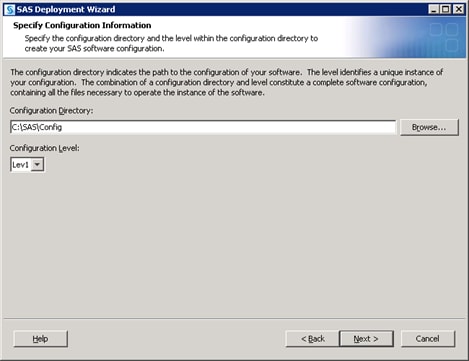
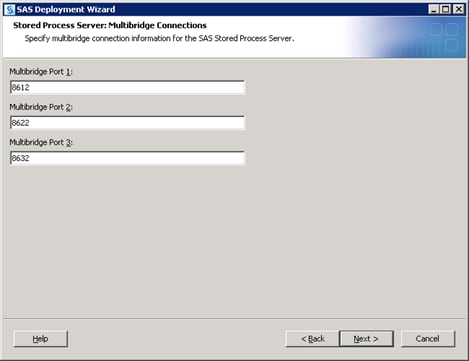
The deployment wizard prompts you for a main port for each server that you add. The SAS Workspace Server and SAS Pooled Workspace Server being added to your server context can use whatever port you want, including the same port the previous configuration might have used for them (provided that no other conflicts exist). The SAS 9.3 object spawner manages these workspace servers to avoid port conflicts when it spawns them. However, the SAS Stored Process Server requires unique port values for its multi-bridge connections.
-
For more information, see Using Scripts to Operate SAS Servers Individually in SAS Intelligence Platform: System Administration Guide.