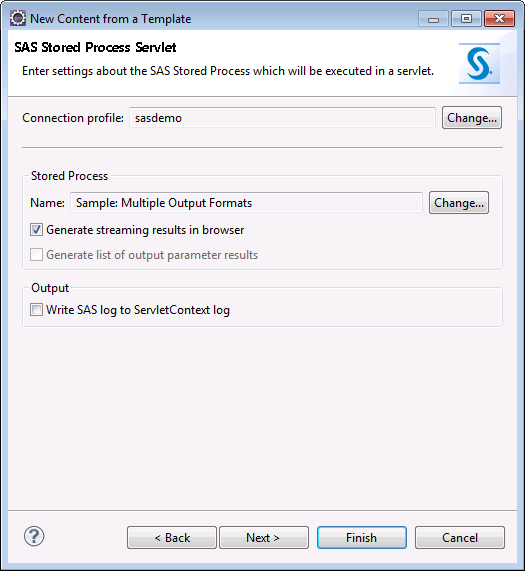
Add a SAS Stored Process Servlet Template to the Project

Add the SAS Stored Process Servlet Template

In this section, as you did earlier in the walk-through, you are adding a template to an existing project. The server is already configured for testing.
  1. Select Filethen selectNewthen selectOther.
  2. Expand SAS Appdev Studio, select Add Template Content to Project, and click Next.
  3. Expand SAS Java Web Application and then SAS Web Application Examples.
  4. Select SAS Stored Process Servlet (uses SAS WIP), and click Next.
  5. Click Next to accept the Template Configuration Parameters.
  6. Accept the BI Server Profile by clicking Next. The BI Server that you plan to develop for should already be selected.
  7. Select a stored process by clicking Change, selecting Sample: Multiple Output Formats, and then clicking OK.
    Click Next.
    Select the Stored Process
  8. Click Next to accept the Servlet Class Parameters, and then click Next again to accept the Servlet Deployment Descriptor Parameters.
  9. Click Finish.
    The StoredProcessWebApp project is now created and the SAS Stored Process Servlet template is added. leave open the Java file containing the servlet (StoredProcessDriverServlet.java).

Replace a Value in the Servlet Code

The generated servlet code lacks a value for one of the stored process input parameters. The default value was not defined in the metadata for the stored process, and therefore could not be included in the generated code. You must edit the code and provide a valid value before the servlet can compile and run.
  1. Display the Markers view if it is not visible.
    Toggle the Markers view by selecting Windowthen selectShow Viewthen selectOtherthen selectGeneralthen selectMarkers.
  2. Look in the Markers view under Java Problems for this error: REPLACE_WITH_ACTUAL_VALUE_FOR_PROMPT__DEBUG.
    If the error is not in the Markers view, ensure that automatic building is enabled (Projectthen selectBuild Automatically).
    Servlet Code Problem List
  3. Double-click the error in the Markers view to go to the error in the Java file.
    Servlet Code Problem
  4. Replace the problem value with “log”, including the quotation marks.
    Corrected value
  5. Save the file.
    The error disappears, assuming that automatic building is enabled.
    For more information about input parameters, including how to see what input parameter values and data types are valid in the code, see Input and Output Parameters.

Restart the Server and Run the Application

  1. Stop and then start the server from the Servers View (do not use Restart). Wait until the server State is Stopped.
    For why you should avoid the Restart command, see the Tomcat Shutdown Issue.
  2. Right-click the project and select Run Asthen selectRun on Server.
  3. Ensure that the correct server is selected and click Finish.
  4. Log in.
  5. The Welcome Page is displayed with all three templates listed.
    Welcome Page with Three Examples
  6. Click the Stored Process Servlet. The output is HTML, the default for this stored process.
    Stored Process Results in Default HTML

Change a Stored Process Input Parameter

One of the advantages of using a stored process is that you can use input parameters in the Java code to change the behavior of the servlet. 
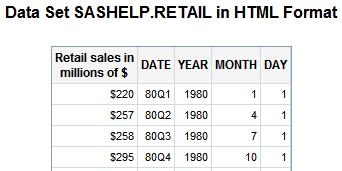
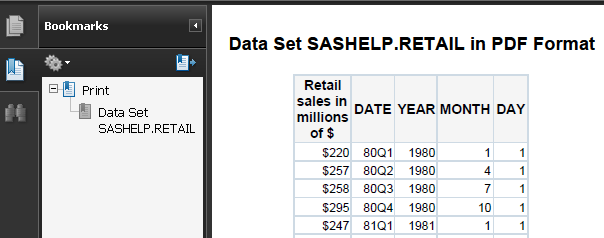
For example, to change the output type of the “Sample: Multiple Output Formats” stored process used in this walk-through to PDF or XML, follow these steps:
  1. In the project, open the folders Java Resources and then servlets. Open StoredProcessDriverServlet.java.
  2. Search for _ODSDEST_VALUE =, and then set that variable to PDF or XML.
  3. Save the file.
  4. Stop and then start the server (do not use Restart), and then run the application by right-clicking the project and selecting Run Asthen selectRun on Server.
    For why you should avoid using the Restart command, see the Tomcat Shutdown Issue.
  5. On the Welcome Page, click the Stored Process Servlet. The output is a PDF (or XML).
    Stored Process Results in PDF
You can also change the data set used by the servlet by changing the DATASET_VALUE.
Note that the input parameters changed in this walk-through are specific to the “Sample: Multiple Output Formats” stored process. Other stored processes will have different input parameters.
To see how drill-down functionality works, add another SAS Stored Process Servlet template to the project, and use the European Demographic Data stored process.