Creating a SAS Web Application That Does Not Use the Web Infrastructure Platform

Introduction

In AppDev Studio 4.4, a standard SAS Web Application Project contains both the “SAS Java Components” facet and the “SAS Web Infrastructure Platform” facet. The SAS Web Application Project wizard always adds both facets when creating a new SAS Web Application Project. Once added, neither SAS facet can be removed from the project. Consequently, the SAS Web Application Project wizard cannot be used to create a SAS Web Application Project that does not include the “SAS Web Infrastructure Platform” facet.
However, you can create a SAS Web Application Project without the Web Infrastructure Platform facet. Such a project deploys Local Services using "Local Platform Services," which is in all SAS 9.4 BI Server installations. You can choose a different Local Services deployment if you have one available.
Note that because the project does not use the Web Infrastructure Platform, it cannot integrate with the Logon Manager application.

Create a Dynamic Web Project

Create a new SAS Web Application Project that contains only the SAS Java Components facet by following these steps:
  1. From Eclipse, select Filethen selectNew then selectProject.
  2. Expand the Web folder.
  3. Select Dynamic Web Project and click Next.
  4. Specify a project name.
    This name is used as the context name. The name must not contain spaces.
  5. Select the Target Runtime to match the server that you plan to use.
    The default target run time is ADS Apache Tomcat v7.0.
  6. For the Dynamic Web Module version, select 2.4.
  7. For the Configuration, click Modify, select SAS 9.4m1 Java Components Configuration, and then click OK.
    For AppDev Studio 4.4 that has not had a maintenance update applied, select SAS 9.4 Java Components Configuration.

Add a Context Listener

The last step in creating a SAS Web Application Project that does not use the Web Infrastructure Platform is to add a context listener that deploys the Local Services.
However, if you are using one of the SAS Java Web Application example templates provided with AppDev Studio 4.4, a Local Services context listener is automatically added to the project on a successful build. In such a case, you must add a context listener only if you are changing which BI Server Profile or Local Services deployment the project is using.
To add or update the context listener, follow these steps:
  1. From Eclipse, select Filethen selectNew then selectOther.
  2. Expand the SAS AppDev Studio folder.
  3. Select Add Template Content to Project, and then click Next.
  4. For the Project, select the host project that was created earlier.
  5. Expand the SAS Java Web Application and then SAS Foundation Services Support folders.
  6. Select Context Listener For Local Services.
  7. Click Next.
  8. Click Next to accept the default Template Configuration Parameters.
  9. Select the BI Server Profile for the BI installation that you want to target. If you want to change the Local Services deployment from the current or default "Local Platform Services," ensure the SAS Metadata Server in the BI installation is running.
    1. Click Advanced.
    2. In the Local Services Deployment section, select Other.
    3. Click Browse and select the service deployment.
    4. Click OK.
  10. If the SAS Metadata Server for the BI installation is running, you can click Test Configuration to verify that the service deployment can be read from the metadata server.
  11. Click Finish.

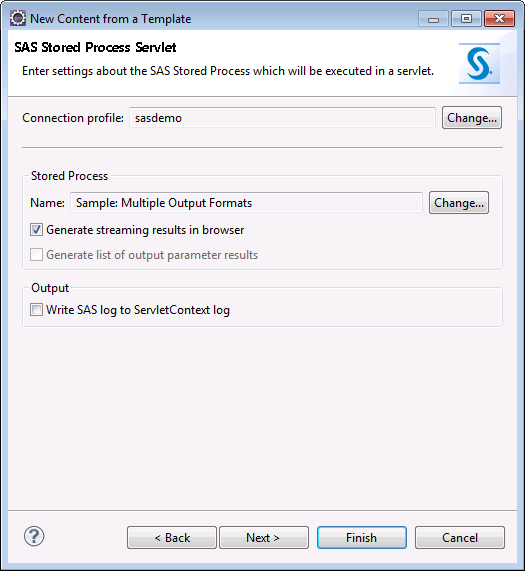
Adding a Stored Process Servlet to a Foundation Services Application

Before starting this process, ensure that if a Metadata Server Connection profile is currently open, it targets the BI installation whose metadata server contains the stored process that you want to add. If it does not, you must disconnect that Connection profile before starting this process. Switching Connection profiles (and hence, metadata server connections) within the wizard is not currently supported.
To add a Stored Process Servlet, follow these steps:
  1. From Eclipse, select Filethen selectNew then selectOther.
  2. Expand the SAS AppDev Studio folder.
  3. Select Add Template Content to Project, and then click Next.
  4. For the Project, select the host project that was created earlier.
  5. Expand the SAS Java Web Application and then SAS Web Application Examples folders.
  6. Select SAS Stored Process Servlet (uses SAS FS).
  7. Click Next.
  8. Click Next to accept the default Template Configuration Parameters.
  9. Select the BI Server Profile for the BI installation that contains the stored process that you want to add.
    If you want to change the Local Services deployment from the current or default "Local Platform Services," ensure the SAS Metadata Server in the BI installation is running.
    1. Click Advanced.
    2. In the Local Services Deployment section, select Other.
    3. Click Browse and select the service deployment.
    4. Click OK.
  10. If the SAS Metadata Server for the BI installation is running, you can click Test Configuration to verify that the service deployment can be read from the metadata server.
  11. If you do not have an open metadata connection, click the "Connection profile" Change button and log on before selecting a stored process.
    Choose a stored process by clicking Change, selecting the stored process, and then clicking OK.
    Click Next.
    Select the Stored Process
    Note: If the Connection profile displays “Invalid connection,” the currently open metadata connection is to a different BI installation than the one targeted by the BI Server profile. Because changing the metadata connection in the wizard is not supported, you must click Cancel, disconnect from the metadata server, and then restart this process.
  12. Click Next to accept the Servlet Class Parameters, and then click Next again to accept the Servlet Deployment Descriptor Parameters.
  13. Click Finish.
    The StoredProcessWebApp project is now created and the SAS Stored Process Servlet template is added. leave open the Java file containing the servlet (StoredProcessDriverServlet.java).

Replace Required Values in the Servlet Code

The generated servlet code might lack a value for one or more of the stored process input parameters. This occurs when a default value was not defined for the parameter in the metadata for the stored process, and therefore could not be included in the generated code. You must edit the code and provide valid values before the servlet can compile and run.
  1. Display the Markers view if it is not visible.
    Toggle the Markers view by selecting Windowthen selectShow Viewthen selectOtherthen selectGeneralthen selectMarkers.
  2. Look in the Markers view under Java Problems for errors that start with REPLACE_WITH_ACTUAL_VALUE_FOR_PROMPT_.
    If the error is not in the Markers view, ensure that automatic building is enabled (Projectthen selectBuild Automatically).
  3. Double-click the error in the Markers view to go to the error in the Java file.
  4. Replace the problem value with an appropriate constant for that particular input parameter. The input parameter is indicated in the comment above the declaration and by the portion of the variable name that precedes “_VALUE”.
  5. Save the file.
    The error disappears, assuming that automatic building is enabled.
    For more information about input parameters, including how to see what input parameter values and data types are valid in the code, see Input and Output Parameters.

Restart the Server and Run the Application

  1. Stop and then start the server from the Servers View (do not use Restart). Wait until the server State is Stopped.
    For why you should avoid the Restart command, see the Tomcat Shutdown Issue.
  2. Right-click the servlet’s StoredProcessDriverServlet.java file and select Run Asthen selectRun on Server.
  3. Ensure that the correct server is selected and click Finish.