|
|
Security
Setting Access Permissions for an Object
You can use the IT Administrator application to set permissions for
objects in directories which reside on Sun ONE and Netscape directory servers. Using these permissions, you can allow or
deny access to objects or groups of objects by users or classes of users.
A well-planned security strategy allows users to access
objects that they need to use (for example, personal subscriptions) while restricting
access to sensitive information (for example, a SAS table that contains
salary information).
See Sun ONE and Netscape Directory Server Access Control Overview for
more information on authentication and access control.
The SAS Integration Technologies Administrator provides a graphical user interface that allows you
to set permissions for an object in the directory. For general instructions, see Using IT Administrator.
To set permissions for an object in the directory using IT Administrator:
Open IT Administrator. In the tree view, select an object or a folder whose permissions
you want to set. If you set permissions on a folder, you are also
setting permissions for all objects in that folder. Select the Set Access Permissions tool  on the toolbar.
If the tool is grayed out, you cannot set permissions for the selected
object. on the toolbar.
If the tool is grayed out, you cannot set permissions for the selected
object.
When you select the tool, the main Administrator window disappears and the
Set Access Permissions window appears.
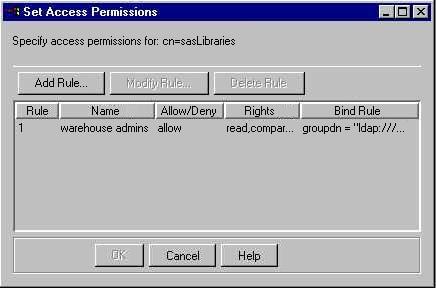 The Set Access Permissions window lists all of the existing access rules for
the selected object.
To create a new access rule, select the Add Rule button.
To modify an existing rule, select the rule and then select the
Modify Rule button.
To delete a rule, select the rule and select the Delete Rule button. If you selected Add Rule or Modify Rule, the Specify ACI Rule window
appears.
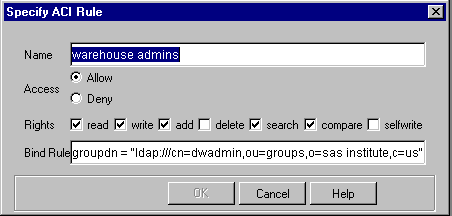
Enter or specify the following:
- Name
- is the name of the rule.
- Access
- specifies whether the rule is to allow permissions or deny permissions.
- Rights
- indicates the specific actions that are to be allowed or denied.
The rights available are
| Right |
Description |
| Read |
Directory data may be read. |
| Write |
Directory data may be changed, created, or deleted. |
| Add |
Child objects may be created under the specified object. |
| Delete |
The selected object may be deleted. |
| Search |
Directory data may be searched. For example,
denying search rights for a user login object prevents users from
searching for a particular user login name.
|
| Compare |
Directory data may be used for comparisons. Unlike
searches, the information is not displayed as a result of the comparison; only
an indication as to whether the search was successful is returned. |
| Selfwrite |
Specifies whether users can add or delete themselves from a group. |
- Bind Rule
- specifies the condition that must be met for the rule to take effect. For example,
you could specify that the rule be applied if users log on to their own
entry in the LDAP directory. See Specifying
Bind Rules for details about what information to enter in this field.
Select OK to create the rule and close the Specify ACI Rule window. When you finish creating or modifying the access permissions,
select OK from the Set Access Permissions window. The Set Access Permissions window disappears and the main Administrator
window reappears.
NOTE: If any items in the tree view were expanded when you opened
the Set Access Permissions window, they are all collapsed when you return
to the main Administrator window.
|