Deploying a Process Job as a Real-Time Service
Overview
You can deploy a process job outside of DataFlux Data Management Studio so other users can run it with a Web client or another application. You can deploy the process job to a DataFlux Data Management Server. Then, the job can be executed with a Web client or another application as a real-time service.
- Prerequisites
- Create a Process Job That Can Be Deployed as a Real-Time Service
- Deploy a Process Job as a Real-Time Service
Prerequisites
The following prerequisites must be met:
- You must have a connection to the SAS Metadata Server that contains the SAS Data Management Server where the jobs will be deployed.
- The DataFlux Data Management Server must have all resources that are required by the deployed job, such as data connections, business rules, or a quality knowledge base.
Create a Process Job That Can Be Deployed as a Real-Time Service
Any process job can be deployed as a real-time service. However, real-time service jobs typically capture input from or return output to the person who is using the service. To capture input in a process job, add input and output variables to the Variables tab for the job. Then have the nodes in the job refer to these variables.
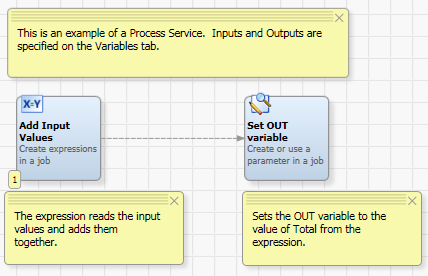
In the example job described in this section (service_Add2Numbers), you can enter two numbers. These numbers are passed to the job, which adds them and displays the result. Three variables are specified in the Variables tab for the process job: two input variables and one output variable. The nodes in the job refer to these variables. The following display shows the process flow for the example job:
Perform the following steps to create a process job that can be deployed as a real-time service:
- Create a new process job. For information about creating process jobs, see Creating a Process Job.
- Give the job an appropriate name. The example job could be called service_Add2Numbers.
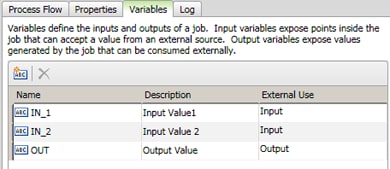
- Click the Variables tab in the open process job to add variables to the job. For the example job, you would add two input variables and one output variable, as shown in the following display:
- Add an appropriate node to the flow. For the example job, an Expression node would be added because the job will use an expression to perform a calculation.
- Open the properties dialog for the node that you just added.
- (Optional) Rename the node to reflect the function of the node in the current job. The Expression node in the example job enables the user to enter two numbers to be added, so this node could be renamed to Add Input Values.
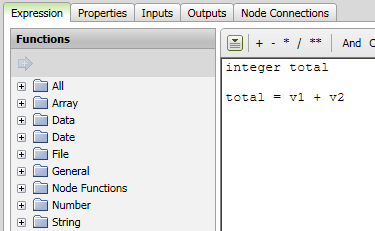
- Configure the node. In the example job, you would specify an expression that adds two numbers, as shown in the following display:
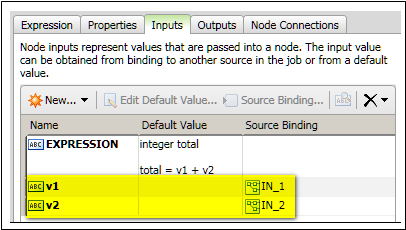
- In the example job, the next step is to specify inputs for the Expression node. The inputs are obtained by binding the node input variables (v1 and v2 from the expression) to the job input variables (IN_1 and IN_2 from Step 3). Click the Inputs tab to specify these bindings, as shown in the following display:
- Click Output and review the outputs for the node. In the example job, the output for the Expression node is contained in the total variable, as specified in the expression: total = v1 + v2.
- Click OK to save your changes to the node.
- Add the next node in the flow. The example job requires a terminal output node at this point, a Global Get/Set node that sets the output variable for the entire job.
- Open the properties dialog for the node that you just added.
- (Optional) Rename the node to reflect the function of the node in the current job. The Global Get/Set node in the example job sets the OUT variable that was specified in Step 3. Accordingly, this node could be renamed to Set OUT Variable.
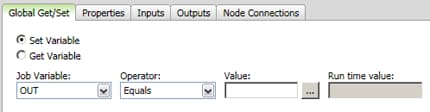
- Configure the node. Start by clicking the Global/Get Set tab in the Set OUT Variable node. Then, click and set the OUT variable, as shown in the following display:
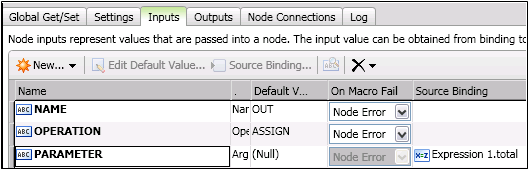
- Now, click Inputs. Set a source binding in the Parameters input that binds it to the expression that you created in the Add Input Values node. This source binding is shown in the following display:
- Click OK to save your changes to the node. At this point you have configured the example job.
Note that when your job ends with more than one output node, you can specify one node as the default target node. Right click the node and select Advanced Properties. Select the Set as default target node checkbox. A small decoration will appear at upper right of the node's icon in the job.
This designation can be necessary because only one target node in a job can pass back data to the service call. If a job does not specify a single node at the end of the flow, then you must specify one node as the default target node. Suppose that you job has a flow which ends in a branch. In one branch a node writes an error log, and in the other branch a node passes data back to the service call. In this situation, you should specify the appropriate node as the default target node.
Deploy a Process Job as a Real-Time Service
Perform the following steps to deploy a process job to a DataFlux Data Management Server:
- Click the Data Management Servers riser.
- Select the server where the jobs will be deployed. Enter any required credentials.
- Navigate to the Real-Time Process Services folder and right-click it to access pop-up menu. Click Import to display the Import From Repository wizard.
- Navigate to the process job that you just created and select it.
- Click Next to access the Import Location step of the wizard.
- Select the Real-Time Process Services folder.
- Click Import.
- Click Close to close the wizard. You should verify that the deployed job will execute properly as a real-time service. Perform steps similar to the following.
- Right-click the deployed job, and then click Test in the pop-up menu.
- Enter appropriate input, such two numbers in the Values field, in this example.
- Click Test to test the inputs that you entered. The results of a test for the example job are shown in the following display:
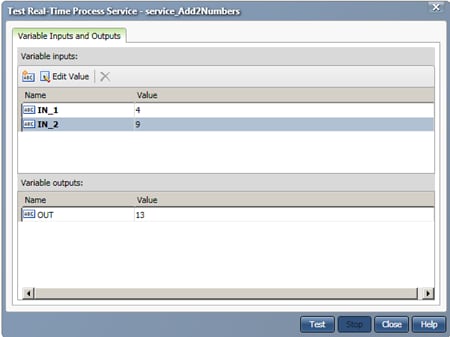
The service has now been deployed and tested. It can be accessed and run with a Web client or another application. If you need to make your service readily available to other users, you can create a Web Services Description Language (WSDL) document for it. Then you can tell your users to copy the WSDL document so that they can consume it as a service. For more information, see Creating a WSDL Document for a Real-Time Service.