DataFlux Data Management Studio 2.8: User Guide
the Address Update Add-On with Data Management Server
Overview
DataFlux Data Management Servers provide a scalable server environment for your jobs, profiles, and real-time services. After you upload your jobs and real-time services to the server, authorized users across your enterprise execute them using the server’s HTTP/SOAP interface.
One approach would be to run test jobs and small jobs on the DataFlux Data Management Studio computer, and to upload larger jobs to the DataFlux Data Management Server. Under this approach, both DataFlux Data Management Studio and DataFlux Data Management Server must have all of the software, licenses, DSN connections, and other resources that are required to execute address update jobs and reports.
If you are using both DataFlux Data Management Studio and the DataFlux Data Management Server to execute Address Update jobs, a typical approach is as follows:
- Verify that you can run address update jobs and reports on the DataFlux Data Management Studio computer. This is important because you will copy some resources from the DataFlux Data Management Studio computer to the DataFlux Data Management Server computer, and these resources should be validated before they are copied.
- Verify that you can connect to the SAS Metadata Server that contains the DataFlux Data Management Server that will be used to execute Address Update jobs.
- Install a version of the CI Quality Knowledge Base from 2011 or later on the server. Follow the QKB installation instructions that came with the QKB software.
- Run the Address Update installer on the server, which updates DataFlux Data Management Server to support the Address Update add-on.
- Install NCOALINK Data from the United States Post Office (USPS) on the server. Follow the instructions in the "Installing the Address Update Add-On" topic of the DataFlux Data Management Studio Installation and Configuration Guide.
- Install USPS test data (CASS, DPV, and LACS) on the server. Follow the instructions in the "Installing the Address Update Add-On" topic of the DataFlux Data Management Studio Installation and Configuration Guide.
- Update paths to data in the ncoa.cfg and app.cfg files on the server. Follow the instructions in the "Installing the Address Update Add-On" topic of the DataFlux Data Management Studio Installation and Configuration Guide.
- If DataFlux Data Management Studio and DataFlux Data Management Server are running on different operating systems, create a separate PAF for the DataFlux Data Management Server. For more information, see Work with PAFs.
- Enable jobs on DataFlux Data Management Server to access an address update repository. For more information, see Enable Jobs on a Data Management Server to Access an Address Update Repository.
- Import the Address Update Lookup jobs from DataFlux Data Management Studio to the Batch Jobs folder on the DataFlux Data Management Server. Then, you can execute the jobs on the server. These tasks are described in Deploy an Address Update Job to a Data Management Server.
- Troubleshoot the jobs as needed. Keep in mind that DataFlux Data Management Server must have all of the software, licenses, DSN connections, and other resources that are required to execute address update jobs and reports.
Enable Jobs on a Data Management Server to Access an Address Update Repository
Address update jobs must be able to access an address update repository from the computer where the jobs are executed. Accordingly, if you deploy address update jobs to a Data Management Server, these jobs must be able to an address update repository from the server.
The first task is to view the properties of the DSN that was used to create the address update repository in DataFlux Data Management Studio.
- In DataFlux Data Management Studio, select Tools > Address Update: NCOALINK PAF Administration.
- In the PAF administration dialog, choose Select address update repository from the action menu.
- Select the DSN of the address update repository that you want to make available to jobs on the DataFlux Data Management Server. Make note of the DSN name.
- Go to the Data riser and expand the Data Connections folder.
- Right-click the DSN that you identified above and select Properties to view a properties dialog for the DSN.
- Use this dialog to view the connection type, the path to the address update repository, and other connection attributes that are required to access the address update repository.
If an address update repository has a DSN that points to a DBMS such as Oracle, DB2, Teradata, or SQL Server, then you can create the same DSN with the same DSN name on the Data Management Server. This address update repository should now be available to any address update jobs that are deployed to the Data Management Server.
If an address update repository has a DSN that points to a path, such as an SQLite file, then you can perform the following steps.
Create the same DSN with the same DSN name on the Data Management Server. If the file path to the address update repository is accessible from the Data Management Server, then the address update repository should now be available to any address update jobs that are deployed to the Data Management Server.
If the file path to the address update repository is not accessible from the Data Management Server, you could copy the address update repository file to the Data Management Server or make it available on a shared drive. Create the same DSN with the same DSN name on the Data Management Server, except update the path for the server. This address update repository should now be available to any Address Update jobs that are deployed to the Data Management Server.
Deploy an Address Update Job to a Data Management Server
It is assumed that you have met the prerequisites that are described in Overview above. Perform the following steps to deploy an address update job to a DataFlux Data Management Server:
- Open the Data Management Servers riser.
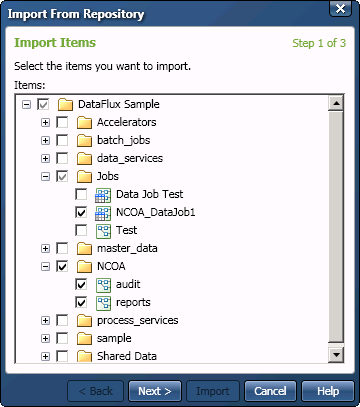
- Navigate to the jobs folder and right-click it to access a pop-up menu. Click Import to display the Import From Repository wizard.
- Navigate to the data or process job that you just created and select it. For example, you could select a data job that runs the Address Update Lookup and two process jobs that contain report nodes, as shown in the following display:
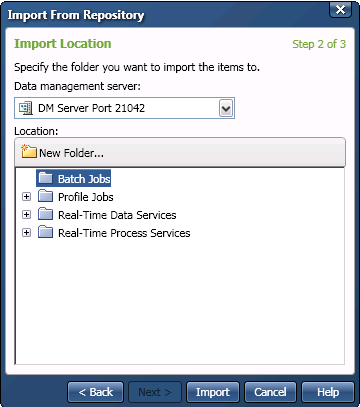
- Click Next to access the Import Location step of the wizard.
- Select the Batch folder, where the DataFlux Data Management Server expects to find data jobs and process jobs. This selection is shown in the following display:
- Click Import. Review the log to verify that the import operation completed successfully.
- Click Close to close the wizard. The job has been deployed to the server. The next task is to verify that the deployed job will execute properly.
- To run the imported jobs, right-click each job and click Run in the pop-up menu.
|
Documentation Feedback: yourturn@sas.com
|
Doc ID: dfDMStd_T_NCOA_DManServ.html |