Post-Installation Tasks for New Installations
After the SAS Deployment
Wizard has finished the installation, you can complete post-installation
tasks.
Note: On Windows systems, you might
need to modify file directory security options to display some of
the locations where SAS MDM content
is stored.
Here are the post-installation
tasks:
-
Verify that DSNs have been created for the SAS MDM target database. By default, these are set to SASMDM.
-
For Data Management Studio, open Data Management Studio and verify through the Data riser that you have access to your database. Your data source should be listed under Data Connections.
-
For Data Management Server:
-
Add a server under the Data Management Servers riser.
-
Open the server and locate the Data Connections tab.
-
Open the Manage ODBC Connections dialog box. Your data source should be listed.
-
-
-
For Data Management Studio, determine the host and port values for your metadata server. Then set the Host and Port values for the Metadata Server in Options.
-
Ensure that the connections in Data Management Studio are saved for both Data Management Studio and for Data Management Server.
-
Verify that the mdm_macros.cfg file for Data Management Studio and for Data Management Server contains the correct information for the following macros: MDM_HUB_DB, MDM_DSN, MDM_SCHEMA, and MDM_PACKAGE. See Setting SAS MDM Macros for details.
-
Because a SAS Quality Knowledge Base (QKB) was installed by the SAS Deployment Wizard, you must take the following actions:
-
Verify that the mdm_macros.cfg file for Data Management Studio and for Data Management Server contains the correct QKB location information for the MDM_QKB macro. This was set during installation.
-
If you do not want to use the latest QKB supplied by the SAS MDM installation process, you must manually change the MDM_QKB macros for Data Management Studio and Data Management Server and point to your original QKB location.
-
If you edit the mdm_macros.cfg file, you must restart Data Management Server.
If you need to download another version of the QKB, see this web page: http://support.sas.com/qkbdownload. -
-
To use Data Remediation functionality for Data Management Studio and for Data Management Server, review the mdm_macros.cfg file and mdm_remediation_macros.cfg macro files. Ensure that the correct information has been set by the installation process for the following macros: MDM_REMEDIATION_URL, and MDM_REMEDIATION_LIBS.See Macro Descriptions for more information about macros.
-
(Optional) Download and install address verification data from http://support.sas.com/downloads/browse.htm?fil=3&cat=16.
-
Start the Data Management Server service or process from the machine on which it was installed.
-
Add an administrative user to the SAS Administrators group and add users to the default Data Management groups in the SAS Management Console. For setup and configuration, ensure that the user identity for administrative and configuration tasks is a member of the SAS Administrators and Data Management Administrators groups. See Security Considerations for SAS MDM for complete information.
-
Log on to Data Management Server from Data Management Studio as a member of the SAS Administrators group. Assign access privileges to other groups that need to access the Master Data Management application. See Security Considerations for SAS MDM for complete information.
-
(Optional) Configure Workflow as follows:
-
As a system administrator, add the Data Management Administrators group to the ROLE_WORKFLOW_ADMINISTRATOR role using the SAS Web Administration Console. The default URL is http://<host>:<port>/SASAdmin. The default port for Windows systems is 80. The default port for UNIX systems is 7980.
-
Open SAS Workflow Studio and connect to the default SAS environment.
-
Log on to the server as a member of the Data Management Administrators group and upload MDM Tag and MDM Lifecycle workflows to the SAS Workflow server. Ensure that you activate the workflows. The workflow template files are located in the repository (
<SAS MDM Install Directory>/workflows) created during installation. -
Enable email notifications through Preferences found on the top right side in the SAS Web Administration Console.
-
-
If the SAS Deployment Wizard was not able to determine the location of the Data Management Server instance that supports SAS MDM, you must set it in SAS Management Console. Navigate to Application Management
 Configuration
ManagerSAS Application Infrastructure and right-click MDM. Select PropertiesSettingsApplicationSAS Data Management Server and enter the correct information.
SAS Management Console
Configuration
ManagerSAS Application Infrastructure and right-click MDM. Select PropertiesSettingsApplicationSAS Data Management Server and enter the correct information.
SAS Management Console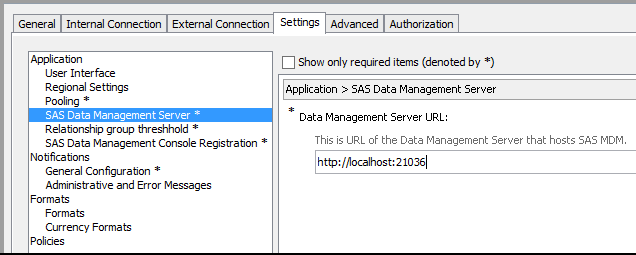 Note: You might need to restart your application server for this change to take effect. If you have trouble getting the SAS MDM web application to connect to Data Management Server, verify that Data Management Server is accessible via the network. See Data Management Server Communication for more information.
 -
Verify the default connection information in the Data Management Studio install_schema.djf job and modify it if necessary.
-
Open this job with Data Management Studio. The Inputs tab for the Echo node contains the defaults.
-
Follow the instructions in install_schema.djf to make the necessary changes for Oracle and SQL Server. Other values, such as the database DSN and schema information, are taken from the appropriate, previously defined macro variables. See Setting SAS MDM Macros for more information.
-
After verifying the information, execute install_schema.djf to install the schema.
-
If the scripts do not run, you might need to edit the command line used to call the database. Open install_schema.djf in Data Management Studio and follow the instructions in the Expression nodes for your specific database.
-
If your Data Management Studio installation does not have access to SQL*Plus or sqlcmd, you must install the schema without using Data Management Studio. You can use a database management tool such as PL/SQL Developer or SQL Developer. For example, if you are using an Oracle database, you can use SQL*Plus to execute the DDL for your database. If you do not have the correct database command-line access from your environment, an administrator using the correct user name or schema defined for SAS MDM must run the following scripts:
Scripts DatabaseScriptsOraclemdm_oracle_ddl.sqlmdm_oracle_procs.sqlSQL Servermdm_sql_server_procs.sqlmdm_sql_server_ddl.sql
-
-
Run the add_default_meta.djf job to install the metadata. This job is located in the
<SAS
                              MDM Install Directory>\batch_jobs\sasmdm
directory. -
(Optional) Run the add_ui_language_meta_<locale>.djf job to install the translatable metadata. For example, to load the English metadata, use add_ui_language_meta_enusa.djf. These jobs are located in the
<SAS
                              MDM Install Directory>\batch_jobs\sasmdm
directory. -
(Optional) If you want to load sample entities and data into your SAS MDM database, run the add_sample_meta.djf job. These jobs are located in the
<SAS MDM Install Directory>\batch_jobs\sasmdmdirectory. -
(Optional) To load translatable metadata for the sample entity types, run the add_ui_language_sample_<locale>.djf job. For example, to load the English sample metadata, use add_ui_language_sample_enusa.djf. These jobs are located in the
<SAS MDM Install Directory>\batch_jobs\sasmdmdirectory. -
To access SAS MDM and associated applications, open the SAS Data Management Console at http://<host>:<port>/SASDataManagement. The default port for Windows systems is 80. The default port for UNIX systems is 7980.
-
(Optional) To generate jobs that you can use to load and interact with sample data, perform the following tasks:Note: See the SAS MDM: User’s Guide for instructions about using the SAS MDM user interface.
-
Open SAS Data Management Console.
-
Click Data Model.
-
On the Data Model tab, select the sample entity types into which you want to load data.
-
Generate the associated jobs and services. Omit the generation of the
_stndjobs and mdm_extract_individual.ddf and mdm_push_individual.ddf jobs as they exist already and contain pre-defined data quality transformations necessary to support the sample entities. -
On the Data Model tab, select all the relationship types.
-
Generate the associated jobs and services.
-
From the SAS Data Management Console, click Source Systems.
-
On the Source Systems tab, expand a source system, select an entity, and then invoke the Add/Update tool for that entity.
-
-
For multi-machine deployments to use SAS Data Remediation in conjunction with SAS MDM, you must copy several configuration files from your Data Management Studio client computer to your Data Management Server computer. These files enable SAS MDM to SAS Data Remediation communication.
File Locations Files to be CopiedDestination LocationDMSTUDIOHOME\etc\macros\mdm_remediation_macros.cfgDMSERVERHOME\etc\macros\mdm_remediation_macros.cfgDMSTUDIOHOME\lib\mdm\sas.dm.mdm.dataremediation.xmlDMSERVERHOME\lib\mdm\sas.dm.mdm.dataremediation.xmlDMSTUDIOHOME\lib\mdm\sas.dm.mdm.migrateremediation.xmlDMSERVERHOME\lib\mdm\sas.dm.mdm.migrateremediation.xml -
(Optional) Add links to the SAS Data Management Console Home Page.
-
Log on to SAS Management Console as an administrator.
-
Expand the following folders on the Plugins tab: Application Management ⇒ Configuration Manager ⇒ Data Management Cnsle Home Page.
-
Right-click Data Management Cnsle Home Page and select Properties.
-
Click the Settings tab.
-
Select Home Page Settings in the panel on the left.
-
Use the Home Page Settings panel to add the URL for the desired web page.
-
Click OK to save your changes.
-
Restart the SAS Web Application Server in order for the new URL to show up on the home page for SAS Data Management Console.
-
Copyright © SAS Institute Inc. All Rights Reserved.
Last updated: April 19, 2017