User-Specified Information Map Transformations
Overview of Specifying an Information Map Transformation
Using the Adapter
Setup wizard (or the Add Domain Category wizard)
is the most convenient way to create Information Map transformations
and information maps for supported adapters. However, you can also
specify Information Map transformations manually.
An Information Map transformation
requires that you specify the following information:
-
the name of the Information Map transformation
-
the name of the information map that it creates
-
the location where the information map is to be storedNote: If you do not specify the location, and it is left blank, the information map is created in the same folder as the job.
-
the filter specification (if filtering is needed)
-
the data items that are to be included in the information map
Create an Information Map Transformation
To create an Information
Map transformation, perform the following steps:
-
Navigate to the job that is to contain the new Information Map transformation. Double-click the job to open it on the Diagram tab of the Job Editor window.Note: If you want to create an Information Map transformation in a new job that does not already exist, you must first create the job using the New Job wizard. For information about how to do so, see Jobs That Process IT Data.
-
Click the General tab to enter the name and description for the Information Map transformation. The name and description that you specify here are for the Information Map transformation, not for the information map that the transformation creates.The name of the Information Map transformation can contain no more than 60 characters.Note: For best results, use the same naming convention that the Adapter Setup wizard uses for Information Map transformations. For information about the naming conventions that are used by the Adapter Setup wizard, see About Naming Standards for SAS IT Resource Management Objects.
-
On that screen, perform the following tasks:
-
Specify the name of the information map that is to be created and the location where the information map is to be saved.Note: For best results, use the same naming convention that the Adapter Setup wizard uses for information maps. For information about the naming conventions that are used by the Adapter Setup wizard, see How the Adapter Setup Wizard Names Information Map Objects.
-
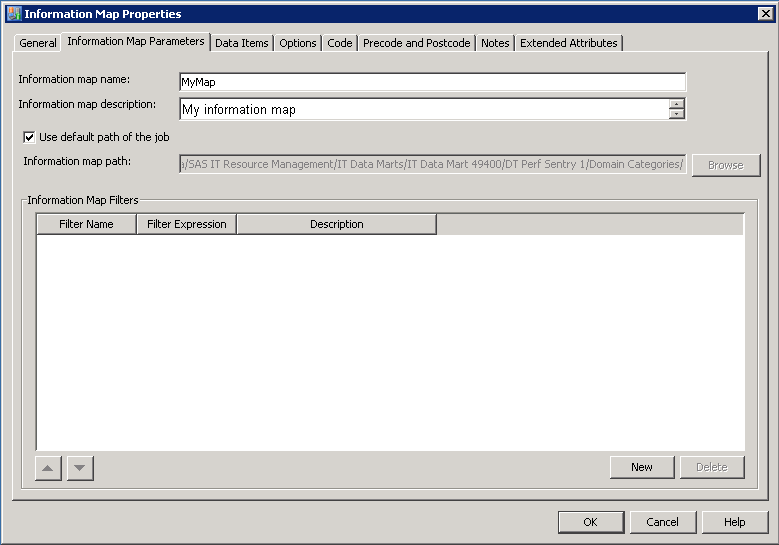
Specify the path to the information map. For best results, use the same information map path that the Adapter Setup wizard uses for information maps. To do so, check the Use default path of the job. The default path appears in the Information map path field. (It is grayed and cannot be changed.) For more information, see Where the Adapter Setup or Add Domain Category Wizard Stores Information Map Objects.However, you can change where the information map is stored. To do so, uncheck the Use default path of the job box and enter a path in the Information map path field. Alternatively, you can click Browse to select a path to the information map from the Select a Location dialog box that displays the metadata directory structure.
-
-
Specify the filters for the information map. Use the Information Map Filters section of the Information Map Parameters tab if you want to specify filters for the information map. This section displays a grid that contains the name, expression, and description of filters that are defined for the information map that this transformation creates. (When you are creating a new Information Map transformation, the grid is empty.) For information about how to add a filter to an Information Map transformation, see Add a Filter to an Information Map.
-
Specify data items that you want to include in your information map. To do so, click the Data Items tab to specify the data items that you want to include in the information map that will be created by this Information Map transformation. Data items that are class columns will be available in SAS Web Report Studio for selection as filters.Note: In order to use or reuse the reports that are supplied by SAS IT Resource Management, specify the data items according to the standards that are in effect for the solution. For information about the standards used by SAS IT Resource Management, see About Naming Standards for SAS IT Resource Management Objects.The grid that appears on this tab contains columns for Column Name, Data Item Name, Description, Expression, and Format for each data item. When a map is being created, the grid is empty.
-
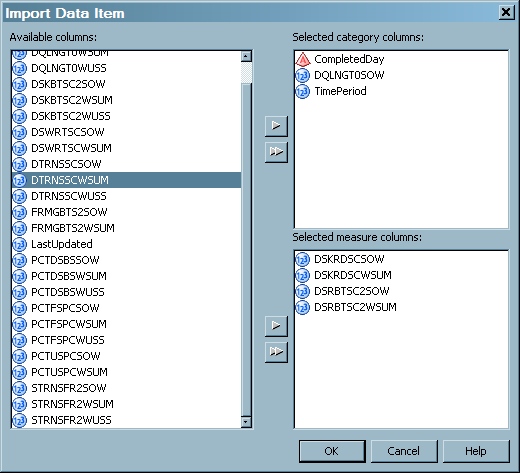
Click Import to display the list of Available columns. The columns that are listed here are columns that exist in the Information Map transformation's source table. Highlight the columns that you want to include as categories in the information map and use the right arrow to transfer them to the Selected category columns. Highlight the columns (numeric only) that you want to include as measures in the information map and use the right arrow to transfer them to the Selected measure columns.In the following display, two data items are selected as category columns, and three data items are selected as measure columns.Then click OK to display the selected category and measure columns on the Data Items grid where you can modify the name of the data item or its description.
-
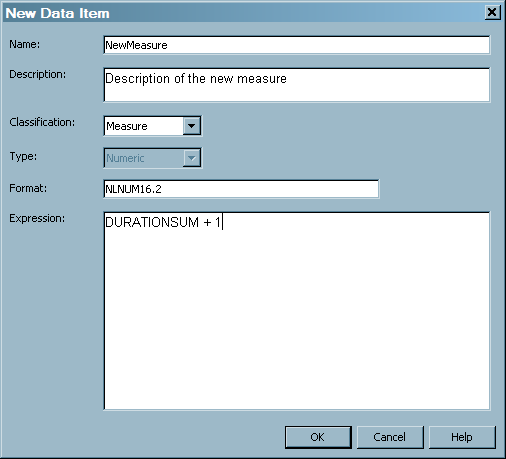
Click New to open the New Data Item window where you can add a new data item to the grid. Enter the Data Item Name, Description, Classification (Category or Measure), Type (Character or Numeric), Format, and Expression fields for the new data item.Note: The Expression field of a data item can contain 1024 characters. Do not enter double quotation marks in the Expression field.In the following display, a new data item called NewMeasure is defined and ready to be added to the Data Items grid.Click OK to display the new data item on the Data Items grid where it can be modified if needed.Note: In the case of data items that are added from the New Data Item window, the Column Name of the added item is blank.
-
To remove a data item from the information map, highlight the data item and click Delete.
-
Modify an Information Map Transformation
Editing an Information
Map transformation can cause errors in reporting if the information
map is used for reports. For example, do not remove or rename any
data items or filters that are used in a report. If you do so, the
report will fail. However, you can add anything or rename anything
that is not used in a report.
To modify an Information
Map transformation, perform the following steps:
-
From the menu list, select Properties to open the Information Map Properties dialog box. From this dialog box, you can access the General, Information Map Parameters, and Data Items tabs that serve as the primary locations for the information map parameters and metadata. These tabs enable you to view and modify the following items:
-
the name of the transformation
-
the name of the generated information map
-
the location of the information map
-
the filters for the information map
-
the data items that make up the information map
-
-
On the General tab, you can modify the name and description of the Information Map transformation by changing the text in the Name field and the Description field.Note: The name and description that you specify here are for the Information Map transformation, not for the information map that the transformation creates. For best results, use the same naming convention that the Adapter Setup wizard uses for Information Map transformations. For information about the naming conventions that are used by the Adapter Setup wizard, see How the Adapter Setup Wizard Names Information Map Objects.
-
On the Information Map Parameters tab, you can make the following changes:
-
Change the name of the information map that the transformation creates by changing the text in the Information Map Name field. Changing the name of an information map that was already created does not delete the map that was created with the old name.Note: For best results, use the same naming convention that the Adapter Setup wizard uses for information maps. Furthermore, to facilitate the association of the table with the information map, the name of the information map should be the same as the name of the source table. For information about the naming conventions that are used by the Adapter Setup wizard, see How the Adapter Setup Wizard Names Information Map Objects.
-
Change the location where the transformation saves the information map that it creates. Information maps can be stored wherever you specify. To change the location, uncheck the Use default path of the job. Then you can manually enter the new path in the Information map path field. You can also click Browse to navigate to the new location in the metadata structure.If Use default path of the job is checked, you cannot change the Information map path field.Note: For best results, use the same storage path that the Adapter Setup wizard uses for information maps. To do so, make sure the Use default path of the job box is checked. The information map is saved in the same folder as the information map job. For more information, see Where the Adapter Setup or Add Domain Category Wizard Stores Information Map Objects.
-
Change the filters for the information map that appear on the filter grid.
-
For information about adding filters to information maps, see Add a Filter to an Information Map.
-
For information about modifying filters on information maps, see Modify a Filter on an Information Map.
-
For information about deleting filters from information maps, see Delete a Filter from an Information Map.
-
-
-
On the Data Items tab, you can make the following changes:
-
Select additional category or measure data items from the source table to add to the information map by clicking Import. Highlight the columns in the Available columns of the source table that you want to add. Then use the arrow to transfer them to the Selected category columns or Selected measure columns panels. Click OK to include these data items in the information map.
-
Define an additional data item for the information map by clicking New, which opens the New Data Item window. Then enter the Data Item Name, Description, Classification (Category or Measure), Type (Character or Numeric), Format, and Expression fields for the new data item.Note: The Expression field of a data item can contain 1024 characters. Do not enter double quotation marks in the Expression field.Click OK to add the new data item to the information map.
-
Delete a data item from the information map by highlighting it and clicking Delete.
-
-
Click OK to save the parameters for the Information Map transformation and the information map that it will generate. You can see the new information map that the modified transformation creates after the corresponding job has run. To see the results of the job in the tree view, right-click in the hierarchy view and select Refresh.
Note: SAS Information Map Studio
can also be used to modify the information maps that are generated
by Information Map transformations in SAS IT Resource Management.
However, the information maps that are generated by Information Map
transformations in an information map job are regenerated each time
that job is run. Therefore, any modifications that are made to an
information map using SAS Information Map Studio might be overwritten
and lost when the ETL job is rerun. To avoid this situation, modify
a copied version of the automatically generated information map. Then
save that modified version under a different name so that it is not
overwritten by the ETL processes.
Delete an Information Map Transformation from a Job
If you delete an Information
Map transformation from a job, the information map itself is not deleted
and your reports should continue to run correctly. However, if you
later change a table, you must regenerate the associated information
map in order to reflect the table changes in the report. Do this to
avoid errors in the report. Do not delete an Information Map transformation
unless you are certain that this action will not affect your reporting
needs.
If you choose to delete
an Information Map transformation from a job, perform the following
steps:
Note: If you delete an Information
Map transformation, the information maps that it created previously
are not deleted.
Delete an Information Map
Deleting an information
map can create errors in reporting if your reports use the information
map that you delete. Do not delete an information map unless you are
certain that this action will not affect your reporting needs.
If you choose to delete
an information map, perform the following steps:
Note: If you delete an information
map and not the Information Map transformation that created it, a
new information map with the same name will be created the next time
the corresponding job runs.
Update an Information Map from a Template
The following steps
enable you to update the Information Map transformation for a table
so that the information map’s filters and data items conform
to the supplied template. (If an information map template exists for
the source table, you can use that template to automatically update
the filters and data items of an information map instead of manually
specifying them from the Information Map Parameters and Data
Items tabs of the Properties dialog box.)
Note: You can add the Information
Map transformation to an Information Map job. Alternatively, you
can place the Information Map transformation in a new or in another
existing job.
-
Right-click the box that represents the Information Map transformation and select Update map definition from template.Note: If an aggregation table that was created from a template is not connected to the Information Map transformation, an error message appears. Similarly, if an information map template does not exist for the current source table, an error message appears.
Note: The information map transformation
might have a source table that is not an aggregation table. Similarly,
it might have a source aggregation table that was not constructed
from a supplied template. In these cases, no information map template
is available. Likewise, an aggregation table that was constructed
from an aggregation template, but which has been modified by the user
to have a different name, might not be recognized as having an information
map template.
Copyright © SAS Institute Inc. All rights reserved.


