Investments
Loan Tasks
Suppose you want to buy a home that costs $100,000. You can make a down payment of $20,000. Hence, you need a loan of $80,000. You are able to acquire a 30-year loan at 7% interest starting January 1, 2000. Let’s use Investment Analysis to specify and analyze this loan.
In the Investment Analysis dialog box, select Investment  New
New  Loan from the menu bar to open the Loan dialog box.
Specifying Loan Terms to Create an Amortization Schedule
You must specify the loan before generating the amortization table. To specify the loan, follow these steps:
-
Enter
MORTGAGEfor the Name. -
Enter 80000 for the Loan Amount.
-
Enter 7 for the Initial Rate.
-
Enter 360 for the Number of Payments.
-
Enter 01JAN2000 for the Start Date.
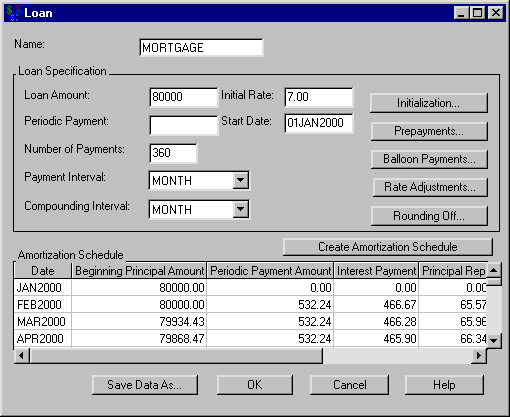
After you have specified the loan, click Create Amortization Schedule to generate the amortization schedule displayed in Figure 64.2.
Figure 64.2: Creating an Amortization Schedule
Storing Other Loan Terms
Let’s include information concerning the purchase price and downpayment. These terms are not necessary to specify the loan, but it may be advantageous to store such information with the loan.
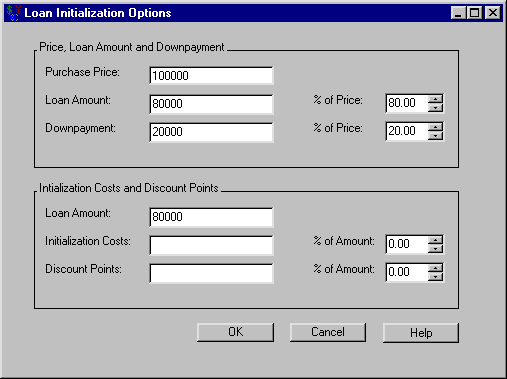
Consider the loan described in the section Loan Tasks. In the Loan dialog box (Figure 64.2) click Initialization to open the Loan Initialization Options dialog box, where you can specify the down payment, initialization costs, and discount points. To specify the down payment, enter 100000 for the Purchase Price, as shown in Figure 64.3.
Figure 64.3: Including the Purchase Price
Click OK to return to the Loan dialog box.
Adding Prepayments
Now let’s observe the effect of prepayments on the loan. Consider the loan described in the section Loan Tasks. You must pay a minimum of $532.24 each month to keep up with payments. However, let’s say you dislike entering this amount in your checkbook. You would rather pay $550.00 to keep the arithmetic simpler. This would constitute a uniform prepayment of $17.76 each month.
In the Loan dialog box, click Prepayments, which opens the Loan Prepayments dialog box shown in Figure 64.4.
Figure 64.4: Specifying the Loan Prepayments
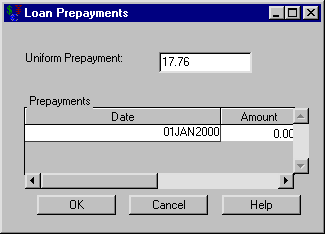
You can specify an arbitrary sequence of prepayments in the Prepayments area. If you want a uniform prepayment, clear the Prepayments area and enter the uniform payment amount in the Uniform Prepayment text box. That amount will be added to each payment until the loan is paid off.
To specify this uniform prepayment, follow these steps:
-
Enter 17.76 for the Uniform Prepayment.
-
Click OK to return to the Loan dialog box.
-
Click Create Amortization Schedule, and the amortization schedule is updated, as displayed in Figure 64.5.
Figure 64.5: The Amortization Schedule with Loan Prepayments
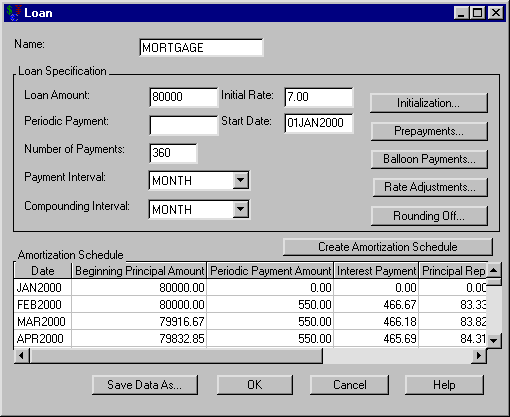
The last payment is on January 2030 without prepayments and February 2027 with prepayment; you would pay the loan off almost three years earlier with the $17.76 prepayments.
To continue this example you must remove the prepayments from the loan specification, following these steps:
-
Reopen the Loan Prepayments dialog box from the Loan dialog box by clicking Prepayments.
-
Enter 0 for Uniform Prepayment.
-
Click OK to return to the Loan dialog box.
Adding Balloon Payments
Consider the loan described in the section Loan Tasks. Suppose you cannot afford the payments of $532.24 each month. To lessen your monthly payment, you could pay balloon payments of $6,000 at the end of 2007 and 2023. You wonder how this would affect your monthly payment. (Note that Investment Analysis does not allow both balloon payments and rate adjustments to be specified for a loan.)
In the Loan dialog box, click Balloon Payments, which opens the Balloon Payments dialog box shown in Figure 64.6.
Figure 64.6: Defining Loan Balloon Payments
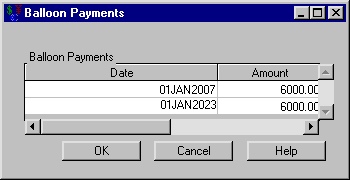
You can specify an arbitrary sequence of balloon payments by adding date-amount pairs to the Balloon Payments area.
To specify these balloon payments, follow these steps:
-
Right-click within the Balloon Payment area (which pops up a menu) and release on New.
-
Set the pair’s Date to 01JAN2007.
-
Set Amount to 6000.
-
Right-click within the Balloon Payment area (which pops up a menu) and release on New.
-
Set the new pair’s Date to 01JAN2023.
-
Set its Amount to 6000.
Click OK to return to the Loan dialog box. Click Create Amortization Schedule, and the amortization schedule is updated. Your monthly payment is now $500.30, a difference of approximately $32 each month.
To continue this example you must remove the balloon payments from the loan specification, following these steps:
-
Reopen the Balloon Payments dialog box.
-
Right-click within the Balloon Payment area (which pops up a menu) and release on Clear.
-
Click OK to return to the Loan dialog box.
Handling Rate Adjustments
Consider the loan described in the section Loan Tasks. Another option for lowering your payments is to get a variable rate loan. You can acquire a three-year adjustable rate mortgage (ARM) at 6% with a periodic cap of 1% with a maximum of 9%. (Note that Investment Analysis does not allow both rate adjustments and balloon payments to be specified for a loan.)
In the Loan dialog box, click Rate Adjustments to open the Rate Adjustment Terms dialog box shown in Figure 64.7.
Figure 64.7: Setting the Rate Adjustments
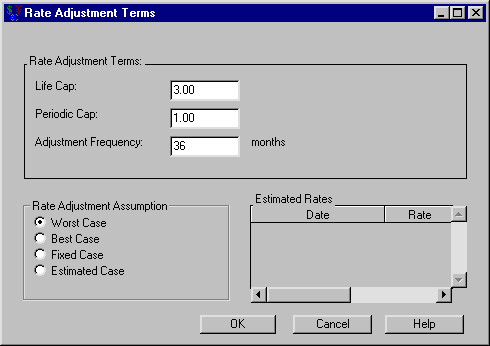
To specify these loan adjustment terms, follow these steps:
-
Enter 3 for the Life Cap. The Life Cap is the maximum deviation from the Initial Rate.
-
Enter 1 for the Periodic Cap.
-
Enter 36 for the Adjustment Frequency.
-
Confirm that Worst Case is selected from the Rate Adjustment Assumption options.
-
Click OK to return to the Loan dialog box.
-
Enter 6 for the Initial Rate.
-
Click Create Amortization Schedule, and the amortization schedule is updated.
Your monthly payment drops to $479.64 each month. However, if the worst-case scenario plays out, the payments will increase to $636.84 in nine years. Figure 64.8 displays amortization table information for the final few months under this scenario.
Figure 64.8: The Amortization Schedule with Rate Adjustments
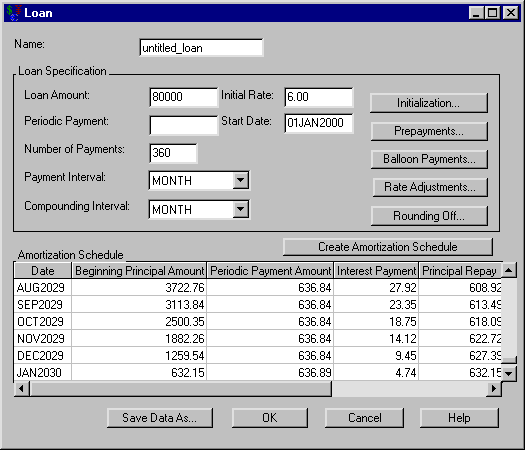
Click OK to return to the Investment Analysis dialog box.