Promote a Portal Page Template, Content Object, Portlet Instance, or Portal Page

About Fine-Grained Promotion of Portal Content

Overview

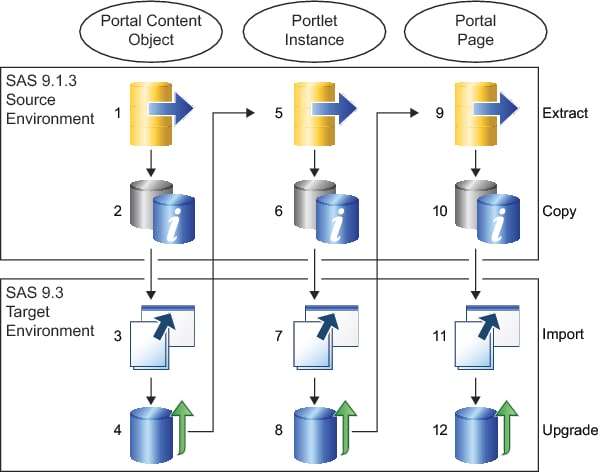
A very incremental alternative to promoting the entire Portal Application Tree or one Permission Tree at a time is to promote a single piece of portal content. For example, you can promote a single portal page template, portal page, portal content object, or portlet instance.
CAUTION:
Certain types of portal content have dependencies.
For successful fine–grained promotion, you must carefully follow a specific sequence of steps.
Fine-grained promotion can be much more difficult than promoting the entire Portal Application Tree or a Permission Tree. This is because the content promotion tool cannot determine the associated child objects (for example, the portlets that are on a page that you are promoting). Instead, you must identify and promote each child object before you promote the parent object. For example, to promote a page, you complete the following tasks:
  1. Identify all portlets that are associated with the page, and all SAS content for each of those portlets.
  2. Promote the SAS Content.
  3. Promote the portlets.
  4. Promote the page.
Because of this complexity, fine-grained promotion is not a first-choice approach in most scenarios.

Step 1: Prepare the Source System

To prepare the source system for fine-grained promotion, follow these steps:
  1. Perform a complete backup of the source system (including the metadata repository, the configuration directories, and the SAS Content Server).
    Note: For instructions, see the SAS Intelligence Platform: System Administration Guide. Use either the SAS 9.1.3, SAS 9.2, or 9.3 version of this document, as appropriate for the version of your source system.
  2. On the source host, create a PortalPromotion subdirectory within your equivalent of SAS-Configuration-Directory\Lev1\Web\Applications\SASPortalversion\. Copy the promotion scripts into that directory. The portal promotion scripts use the directory paths specified for the JAVA_HOME and the SAS_HOME environment variables.
    • If you have SAS Information Delivery Portal 4.31, the scripts are in the configuration directory under your equivalent of \Lev1\Web\Applications\SASPortal4.3\PortalPromotion
    • If you do not have SAS Information Delivery Portal 4.31, obtain the scripts by contacting SAS Technical Support.
    Note: The scripts use relative paths, so it is essential that they are present in the correct location.
  3. Set environment variables for SAS_HOME and JAVA_HOME. For example:
    set SAS_HOME=C:\Program Files\SAS-Installation-Directory
    set JAVA_HOME=C:\Program Files\Java\jre1.5.0_15\
    or
    export SAS_HOME=/disk2/SAS9.3/SAS-Installation-Directory/
    export JAVA_HOME=/usr/java/jdk1.5.0_07/

Step 2: Prepare the Target System

To prepare the target system for fine-grained promotion, follow these steps:
  1. Perform a complete backup of the target system (including the metadata repository, the configuration directories, and the SAS Content Server). For instructions, see “Creating, Registering, Moving, Copying, Renaming, and Deleting SAS Metadata Repositories,” in the SAS Intelligence Platform: System Administration Guide. Use either the SAS 9.1.3, SAS 9.2, or 9.3 version of this document, as appropriate for the version of your source system.
  2. On the target system, create a create a PortalPromotion subdirectory within your equivalent of SAS-Configuration-Directory\Lev1\Web\Applications\SASPortalversion\. Copy the promotion scripts into that directory. The portal promotion scripts use the directory paths specified for the JAVA_HOME and the SAS_HOME environment variables.
    • If you have SAS Information Delivery Portal 4.31, the scripts are in the configuration directory under your equivalent of \Lev1\Web\Applications\SASPortal4.3\PortalPromotion
    • If you do not have SAS Information Delivery Portal 4.31, obtain the scripts by contacting SAS Technical Support.
    Note: The scripts use relative paths, so it is essential that they are present in the correct location.
  3. Set environment variables for SAS_HOME and JAVA_HOME. For example:
    set SAS_HOME=C:\Program Files\SAS-Installation-Directory
    set JAVA_HOME=C:\Program Files\Java\jre1.5.0_15\
    or
    export SAS_HOME=/disk2/SAS9.3/SAS-Installation-Directory/
    export JAVA_HOME=/usr/java/jdk1.5.0_07/
  4. If the target system's version is different from the source system's version (for example, you are promoting content from a SAS 9.1.3 system to a SAS 9.3 or SAS 9.2 system), install the following JAR files in the ANT_HOME/lib directory:
    • bsf.jar
    • BeanShell JAR files: bsh*.jar
    • commons-logging.jar
    You can obtain JAR files from the following locations:
    On Windows: SAS_Installation_Directory \Program Files\SAS\SASVersionedJarRepository\9.3\eclipse\plugins
    On UNIX: SAS_Installation_Directory/SASVersionedJarRepository/9.3/eclipse/plugins
    JAR files can also be obtained from http://ant.apache.org/manual/install.html. In the section about Library Dependencies, click the appropriate URL paths to download each set of JAR files.

Promote a Portal Page Template

Overview

A portal page template is a page definition that is stored in SAS metadata. Page templates are defined for groups. The process for promoting a portal page template is similar to the promotion process used for a Permissions Tree.

Step 1: Perform the Required Promotion Tasks for a Portal Page Template on the Source System

To perform the required promotion tasks for a portal page template on the source system, follow these steps:
  1. Verify that any non-portal content (for example, SAS Reports or SAS Stored Processes) exist with the same names in the target SAS 9.3 or SAS 9.2 system.
  2. Promote any content upon which the portal page template depends.
  3. Edit the source copy of the PortalPageTemplate.xml file so that it points to the source metadata repository.
    1. Locate the source metadata repository's ID. In SAS Management Console, navigate to Environment Managementthen selectMetadata Managerthen selectActive Server and select Foundation. The repository ID is displayed in the right panel and consists of two 8-digit numbers separated by a period (for example, A0000031.A5BQ25K2).
    2. Edit the PortalPageTemplate.xml file to specify the source metadata repository's ID in the ReposId parameter.
  4. Modify the @Name value in the Tree search parameter and save the PortalPageTemplate.xml  file:
    <Tree search="*[@Name=FinanceTemplatePage'']"
    TemplateName="PortalPageTemplate"/>
  5. Run the extraction command:
    extractPortalversion.bat PortalPageTemplate.xml -user AdminID
    -password AdminPwd
    or
    extractPortalversion.sh  PortalPageTemplate.xml -user AdminID
    -password AdminPwd
    Note: Choose the version of the script that matches your source. For example: extractPortal913.bat (for a SAS 9.1.3 source on Windows), or extractPortal92.sh (for a SAS 9.2 source on UNIX), or extractPortal93.sh (for a SAS 9.3 source on UNIX). For more information, see About the Portal Promotion Tools.
    The extraction script generates the following files:
    • PortalPageTemplate_deployFile.xml
    • PortalPageTemplate_expand.xml
    • PortalPageTemplate_extract.xml
    • extract.log
  6. Open the extract.log file, and verify that the file does not contain any errors. If the .xml files are not generated, the extract.log file explains the reason why the extraction procedure did not work.
  7. If the SAS installation of the target host resides on a different machine or platform, copy the generated .xml files to the PortalPromotion subdirectory on the target system.

Step 2: Perform the Required Promotion Tasks for a Portal Page Template on the Target System

To perform the required promotion tasks for a portal page template on the target system, follow these steps:
  1. Verify that any non-portal content (for example, SAS Reports or SAS Stored Processes) exist with the same names in the target SAS 9.3 or SAS 9.2 system.
  2. Promote any content upon which the portal page template depends.
  3. Locate the target metadata repository's ID. In SAS Management Console, navigate to Metadata Managerthen selectActive Server and select Foundation. The repository ID is displayed in the right panel and consists of two 8-digit numbers separated by a period (for example, A0000001.A5T8FYJJ). Make a note of the repository ID.
  4. The default name in SAS 9.1.3 is SAS Trusted User. The default name in SAS 9.2 and SAS 9.3 is sastrust. Specify the values for the metadata repository IDs, the SAS Administrator accounts, and the SAS Trusted User accounts. There are two methods available to ensure that the correct values are specified and used to prepare the target system for the import process. Determine which method is appropriate for your environment and follow that method.
    • If the source is a SAS 9.1.3 or SAS 9.2 system, and the default values for the SAS Administrator and the SAS Trusted User accounts were retained in those deployments without any changes, then modify the build.properties file. In the build.properties provide the values for the metadata repository IDs, the SAS Administrator accounts, and the SAS Trusted User accounts. Here is an example of the build.properties file:
      xml.file=PortalPageTemplate
      source.reposid.of.metadata.repository=A0000031.A5BQ25K2
      target.reposid.of.metadata.repository=A0000001.A5T8FYJJ
      source.sasadm.name=SAS Administrator
      target.sasadm.name=sasadm
      source.sastrust.name=SAS Trusted User
      target.sastrust.name=sastrust
      In the build.properties, specify the name of the Portal Page Template and the repository ID for the source and target systems. Specify the default values for the names of the SAS Administrator and SAS Trusted User accounts in the source and target systems.
    • If you modified the build.properties file, skip this step. If you did not modify the build.properties file (because the source is a SAS 9.1.3 or SAS 9.2 system, and the default values for the SAS Administrator and the SAS Trusted User were previously customized and modified in the source or target deployments), then you should manually modify the values for these internal accounts in these generated .xml files:
      PortalPageTemplate_deployFile.xml, PortalPageTemplate_expand.xml, and PortalPageTemplate_extract.xml.
      In each applicable .xml file, specify the values for the @Name parameter as it applies to the SAS Administrator and the SAS Trusted User. Note that some .xml files might not require these values for the @Name parameter.
      This manual process of modifying the .xml files is required because the build.properties file can be edited and used only in deployments where the default values for the internal accounts were retained and not modified.
  5. In the PortalPageTemplate.xml file, modify the @Name value in the Tree search parameter and save the PortalPageTemplate.xml file:
    <Tree search="*[@Name=FinancePage'']"
    TemplateName="PortalPageTemplate"/>
  6. If you modified the build.properties file, skip this step. When you run the upgrade metadata commands later, the .xml files are updated with the required values. If you manually updated the values in the .xml files, open the PortalPageTemplate_deployFile.xml file. Update the Deploy_Id and Deploy_Name values to reference the target metadata repository.
    Here is an example:
    <RepositoryBase Id="A0000001.A5HQ15K2"
    Name="Foundation"
    Deploy_Id="A0000031.A5T8FYJJ"
    Deploy_Name="Foundation"/>
  7. Save the PortalPageTemplate_deployFile.xml file.
  8. On the target system, remove any old portal content or existing portal page template object with the same name.
    removePortalversion.bat PortalPageTemplate.xml -user AdminID -password AdminPwd
     -portalpagetemplatename NameofPortalPageTemplate
    or
    removePortalversion.sh PortalPageTemplate.xml -user userID -password AdminPwd
     -portalpagetemplatename NameofPortalPageTemplate
    CAUTION:
    This action is irreversible.
    Note: Choose the version of the script that matches your source. For example: importPortal913.bat (for a SAS 9.1.3 source on Windows), or importPortal92.sh (for a SAS 9.2 source on UNIX), or importPortal93.sh (for a SAS 9.3 source on UNIX). For more information, see About the Portal Promotion Tools.
  9. Run the appropriate import command:
    importPortalversion.bat PortalContentObject.xml -user AdminID
     -password AdminPwd
    or
    importPortalversion.sh  PortalContentObject.xml -user AdminID
     -password AdminPwd
Note: Sharing content as page templates is not a best practice because each user gets a copy of the template. This causes the size of the metadata to increase over time, and it is difficult to remove or replace content that is created from templates.

Upgrade the Portal Metadata in the Target Repository

Determine How to Upgrade the Portal Metadata

There are two ways to upgrade the portal metadata:

Upgrade the Portal Page Template Metadata After Editing the build.properties File

To upgrade the Portal Page Template metadata in the target repository, follow these steps:
  1. Open a host command window.
  2. When preparing the target system, if you edited the build.properties file, run the following upgrade command:
    upgradeMetadata updateXMLSource -user ID -password AdminID
    When the upgradeMetadata command runs, the values specified for the metadata repository IDs, name for the SAS Administrator, and the SAS Trusted User are retrieved from the build.properties file to update the values in these files:
    • PortalPageTemplate.xml
    • PortalPageTemplate_deployFile.xml
    • PortalPageTemplate_expand.xml
    • PortalPageTemplate_extract.xml

Upgrade the Portal Page Template After Editing .xml Files

Run the appropriate upgrade script for this content type, if the source system is not at the same version level as the target system.
  1. Run the appropriate upgrade script for this content type, if the source system is not at the same version level as the target system:
    upgradeMetadata.bat fixDav -user AdminID -password AdminPwd
    or
    upgradeMetadata.sh fixDav -user AdminID -password AdminPwd
  2. Run the following upgrade scripts if the target system has the 4.3 or 4.31 version of SAS Information Delivery Portal:
    upgradeMetadata.bat convertIMVtoReportPortlet -user AdminID
    -password AdminPwd
    upgradeMetadata.bat adjustUrls -user AdminID -password AdminPwd
    or
    upgradeMetadata.sh convertIMVtoReportPortlet -user AdminID
    -password AdminPwd
    upgradeMetadata.sh adjustUrls -user AdminID -password AdminPwd

Promote a Portal Content Object

Overview

A portal content object can be a Web application, an RSS feed, or a link that users have added to their portal pages. Portal content objects are simple forms of content that are easy to identify and promote.
When you promote a new set of portal content objects, you can inform users about the availability of these objects. These objects can be searched by name and added to user desktops. Promoting content objects that are not associated with portlets (for example, a Collection Portlet) is recommended for a user community that meets these criteria:
  • comfortable with the search feature
  • has the ability to build custom content collections with a Collection Portlet.

Step 1: Perform the Required Promotion Tasks for a Portal Content Object on the Source System

To promote a portal content object (for example, a Web application, an RSS feed, or a link) from a source system, follow these steps:
  1. Verify that the User or Group Permissions Tree associated with the portal content object already exists.
  2. Promote any content upon which the content object depends.
  3. On the source system, open the PortalContentObject.xml file.
  4. Edit the source copy of the PortalContentObject.xml file so that it points to the source metadata repository.
    1. Locate the source metadata repository's ID. In SAS Management Console, navigate to Metadata Managerthen selectActive Server and select Foundation. The repository ID is displayed in the right panel and consists of two 8-digit numbers separated by a period (for example, A0000031.A5BQ25K2).
    2. Edit the PortalContentObject.xml file to specify the source metadata repository's ID in the ReposId parameter. For example: <ReposId>A0000031.A5BQ25K2</ReposId>
  5. In the PortalContentObject.xml file, modify the @Name value in the Document search parameter. Here is an example:
    <Document search="*[@Name='CNN News']" TemplateName="PortalLink"/>
  6. Run the appropriate extraction command:
    extractPortalversion.bat PortalContentObject.xml -user AdminID
    -password AdminPwd
    or
    extractPortalversion.sh  PortalContentObject.xml -user AdminID
    -password AdminPwd
    The extraction script generates the following files:
    • PortalContentObject_deployFile.xml
    • PortalContentObject_expand.xml
    • PortalContentObject_extract.xml
    • extract.log
  7. Open the extract.log file, and verify that the file does not contain any errors. If the .xml files are not generated, the extract.log file explains the reason why the extraction procedure did not work.
  8. If the SAS installation of the target host resides on a different machine or platform, copy the generated .xml files to the PortalPromotion subdirectory on the target system.

Step 2: Perform the Required Promotion Tasks for a Portal Content Object on the Target System

To promote a portal content object (for example, a Web application, an RSS feed, or a link) on a target system, follow these steps:
  1. Locate the target metadata repository's ID. In SAS Management Console, navigate to Metadata Managerthen selectActive Server and select Foundation. The repository ID is displayed in the right panel and consists of two 8-digit numbers separated by a period (for example, A0000001.A5T8FYJJ). Make a note of the repository ID.
  2. There are two methods available to ensure that the correct values are specified and used to prepare the target system for the import process. Determine which method is appropriate for your environment and follow that method.
    • If the source is a SAS 9.1.3 or SAS 9.2 system, and the default values for the SAS Administrator and the SAS Trusted User accounts were retained in those deployments without any changes, then modify the build.properties file. Here is an example of the build.properties file:
      xml.file=PortalContentObject
      source.reposid.of.metadata.repository=A0000031.A5BQ25K2
      target.reposid.of.metadata.repository=A0000001.A5T8FYJJ
      source.sasadm.name=SAS Administrator
      target.sasadm.name=sasadm
      source.sastrust.name=SAS Trusted User
      target.sastrust.name=sastrust
      In the build.properties, specify the name of the Portal Content Object and the repository ID for the source and target systems. Specify the default values for the names of the SAS Administrator and SAS Trusted User accounts in the source and target systems.
    • If you modified the build.properties file, skip this step. If you did not modify the build.properties file (because the source is a SAS 9.1.3 or SAS 9.2 system, and the default values for the SAS Administrator and the SAS Trusted User were previously customized and modified in the source or target deployments), then you should manually modify the values for these internal accounts in these generated .xml files:
      PortalContentObject_deployFile.xml, PortalContentObject_expand.xml, and PortalContentObject_extract.xml.
      This manual process of modifying the .xml files is required because the build.properties file can be edited and used only in deployments where the default values for the internal accounts were retained and not modified.
      In each applicable .xml file, specify the values for the @Name parameter as it applies to the SAS Administrator and SAS Trusted User. Note that some .xml files might not require these values.
  3. In the PortalContentObject.xml file, modify the @Name value in the Document search parameter and save the file. Here is an example:
    <Document search="*[@Name='CNN News']" TemplateName="PortalLink"/>
  4. If you modified the build.properties file, skip this step. When you run the upgrade metadata commands later, the .xml files are updated with the required values. Edit the extracted copy of the PortalContentObject_deployFile.xml file. Update the Deploy_Id and Deploy_Name values to reference the target metadata repository.
    Here is an example:
    <RepositoryBase Id="A0000001.A5BQ25K"
    Name="Foundation"
    Deploy_Id="A0000031.A5T8FYJJ"
    Deploy_Name="Foundation"/>
  5. Save the PortalContentObject_deployFile.xml file.
  6. On the target system, remove any old portal content or existing portal page template object with the same name.
    removePortalversion.bat PortalContentObject.xml -user AdminID
    -password AdminPwd -portalcontentname NameofContenttobeDeleted
    or
    removePortalversion.sh PortalContentObject.xml -user AdminID
    -password AdminPwd -portalcontentnameNameofContenttobeDeleted
    CAUTION:
    This action is irreversible.
  7. Run the appropriate import command:
    importPortalversion.bat PortalContentObject.xml -user AdminID
     -password AdminPwd
    or
    importPortalversion.sh  PortalContentObject.xml -user AdminID
     -password AdminPwd
    Note: Choose the version of the script that matches your source. For example: importPortal913.bat (for a SAS 9.1.3 source on Windows), or importPortal92.sh (for a SAS 9.2 source on UNIX), or importPortal93.sh (for a SAS 9.3 source on UNIX). For more information, see About the Portal Promotion Tools.
  8. Run the appropriate upgrade script for this content type, if the source system is not at the same version level as the target system:
    upgradeMetadataversion.bat fixDav -user AdminID
    -password AdminPwd
    or
    upgradeMetadataversion.sh fixDav -user AdminID
    -password AdminPwd 
    Note: In SAS 9.1.3, the DAV repository name is WebDAVDemo. In SAS 9.3 and SAS 9.2, the repository name is WebDAV. When the upgrade script upgrades the metadata by using the fixDav parameter, the script applies the appropriate repository name and completes the upgrade process.

Promote a Portlet Instance

Overview

A portlet instance is a user or group's instance of a supplied portlet (for example, Linda Collection Portlet).
The same rules that apply to the promotion of portal content objects also apply to portlet instances. First, promote the portlets that belong to a page. Next, promote the page that contains these portlets. A different strategy is to promote the portlet instances individually. Then, inform the users about the availability of these items that can be searched and added to new or existing pages.

Step 1: Perform the Required Tasks to Promote a Portlet Instance on the Source System

To promote a portlet instance on the source system, follow these steps:
  1. First, promote any content upon which the portlet instance depends.
  2. Edit the source copy of the PortletInstance.xml file so that it points to the source metadata repository.
    1. Locate the source metadata repository's ID. In SAS Management Console, you can find the ID by navigating to Metadata Managerthen selectActive Server and selecting Foundation. The repository ID is displayed in the right panel and consists of two 8-digit numbers separated by a period (for example, A0000031.A5BQ25K2).
    2. Edit the PortletInstance.xml file to specify the source metadata repository's ID in the ReposId parameter. For example: <ReposId>A0000031.A5BQ25K2</ReposId>
  3. In the source copy of the extraction template, modify the @Name value (for example, Linda Collection Portlet) in the PSPortlet search parameter.
    Here is an example:
    <PSPortlet search="*[@Name='Linda  Collection Portlet'][Trees/Tree
    [@Name='SASAdministrators Permissions Tree']]"TemplateName="PortletInstance"/>
  4. Run the appropriate extraction command:
    extractPortalversion.bat PortletInstance.xml  -user AdminID
    -password AdminPwd
    or
    extractPortalversion.sh  PortletInstance.xml  -user AdminID
    -password AdminPwd
    Note: Choose the version of the script that matches your source. For example: extractPortal913.bat (for a SAS 9.1.3 source on Windows), or extractPortal92.sh (for a SAS 9.2 source on UNIX), or extractPortal93.sh (for a SAS 9.3 source on UNIX). For more information, see About the Portal Promotion Tools.
    The extraction script generates the following files:
    • PortletInstance_deployFile.xml
    • PortletInstance_expand.xml
    • PortletInstance_extract.xml
    • extract.log
  5. Open the extract.log file, and verify that the file does not contain any errors. If the other .xml files are not generated, the extract.log file explains the reason why the extraction procedure did not work.
  6. If the SAS installation of the target host resides on a different machine or platform, copy the generated .xml files to the PortalPromotion subdirectory on the target SAS 9.2 or SAS 9.3 system.

Step 2: Perform the Required Tasks to Promote a Portlet Instance on the Target System

To promote a portlet instance, follow these steps:
  1. Edit the target copy of the PortletInstance.xml file so that it points to the target metadata repository.
    1. Locate the target metadata repository's ID. In SAS Management Console, you can find the ID by navigating to Metadata Managerthen selectActive Server and selecting Foundation. The repository ID is displayed in the right panel and consists of two 8-digit numbers separated by a period (for example, A0000031.A5T8FYJJ).
    2. Edit the PortletInstance.xml file to specify the target metadata repository's ID in the ReposId parameter. For example: <ReposId>A0000001.A5T8FYJJ</ReposId>
  2. If you have content that is associated with SAS BI Portlets based on JSR 168, copy the content to the same metadata location on the target system. For example, if you have SAS reports that are displayed with the SAS Report Portlet, copy those reports from the source system’s folder to an identical folder on the target system. If the content associated with these portlets is not available in an identical target location, these portlets will not be updated during promotion.
  3. The default name in SAS 9.1.3 is SAS Trusted User. The default name in SAS 9.2 and SAS 9.3 is sastrust. Specify the values for the metadata repository IDs, the SAS Administrator accounts, and the SAS Trusted User accounts. There are two methods available to ensure that the correct values are specified and used to prepare the target system for the import process. Determine which method is appropriate for your environment and follow that method.
    • If the source is a SAS 9.1.3 or SAS 9.2 system, and the default values for the SAS Administrator and the SAS Trusted User accounts were retained in those deployments without any changes, then modify the build.properties file to customize and provide the values for the metadata repository IDs, the SAS Administrator accounts, and the SAS Trusted User accounts. Here is an example of the build.properties file:
      xml.file=PortletInstance
      source.reposid.of.metadata.repository=A0000031.A5BQ25K2
      target.reposid.of.metadata.repository=A0000001.A5T8FYJJ
      source.sasadm.name=SAS Administrator
      target.sasadm.name=sasadm
      source.sastrust.name=SAS Trusted User
      target.sastrust.name=sastrust
      In the build.properties, specify the name of the Portlet Instance and the repository ID for the source and target systems. Specify the default values for the names of the SAS Administrator and SAS Trusted User accounts in the source and target systems.
    • If you modified the build.properties file, skip this step. If you did not modify the build.properties file (because the source is a SAS 9.1.3 or SAS 9.2 system, and the default values for the SAS Administrator and the SAS Trusted User were previously customized and modified in the source or target deployments), then you should manually modify the values for these internal accounts in these generated .xml files:
      PortletInstance_deployFile.xml, PortletInstance_expand.xml, and PortletInstance_extract.xml.
      In each generated .xml file, specify the values for the @Name parameter as it applies to the SAS Administrator and the SAS Trusted User. Note that some .xml files might not require these values for the @Name parameter.
      This manual process of modifying the .xml files is required because the build.properties file can be edited and used only in deployments where the default values for the internal accounts were retained and not modified.
  4. In the PortletInstance.xml file, modify the @Name value in the PSPortlet search parameter.
    Here is an example:
    <PSPortlet search="*[@Name='SAS Collection Portlet'][Trees/Tree
    [@Name='SASAdministrators Permissions Tree']]"TemplateName="PortletInstance"/>
  5. If you modified the build.properties file, skip this step. When you run the upgrade metadata commands later, the .xml files are updated with the required values. If you manually updated the values in the .xml files, open the extracted copy of the PortletInstance_deployFile.xml file. Update the Deploy_Id and Deploy_Name values to reference the target metadata repository. Here is an example:
    <RepositoryBase Id="A0000031.A5BQ25K2"
    Name="Foundation"
    Deploy_Id="A0000001.A5T8FYJJ"
    Deploy_Name="Foundation"/>
  6. On the target system, remove any old portal content or existing portlet instances with the same names.
    removePortalversion.bat PortletInstance.xml  -user AdminID
    -password AdminPwd -portalcontentname NameofPortletInstancetobeDeleted
    or
    removePortalversion.sh PortletInstance.xml  -user AdminID
    -password AdminPwd -portalcontentname NameofPortletInstancetobeDeleted
    CAUTION:
    This action is irreversible.
  7. Run the appropriate import command:
    importPortalversion.bat PortletInstance.xml  -user AdminID
    -password AdminPwd
    or
    importPortalversion.sh  PortletInstance.xml  -user AdminID
    -password AdminPwd
    Note: Choose the version of the script that matches your source. For example: importPortal913.bat (for a SAS 9.1.3 source on Windows), or importPortal92.sh (for a SAS 9.2 source on UNIX), or importPortal93.sh (for a SAS 9.3 source on UNIX). For more information, see About the Portal Promotion Tools.
  8. Run the following upgrade script for this content type if the source is not at the same version level as the target system:
    upgradeMetadata.bat fixDav -user AdminID
    -password AdminPwd
    or
    upgradeMetadata.sh fixDav -user AdminID
    -password AdminPwd
  9. Run the following upgrade scripts if the target system has SAS Information Delivery Portal 4.31:
    upgradeMetadata.bat convertIMVtoReportPortlet -user AdminID
    -password AdminPwd
    upgradeMetadata.bat adjustUrls -user  AdminID  -password AdminPwd
    or
    upgradeMetadata.sh convertIMVtoReportPortlet -user AdminID
    -password AdminPwd
    upgradeMetadata.sh adjustUrls -user  AdminID
    -password AdminPwd
  10. Start the Web application server. Note that the Web application server should be started before running the upgradeMetadata command in the next step.
  11. Run the following upgrade script if the target system has SAS Information Delivery Portal 4.31 on a SAS 9.3 system and you are promoting content from a source system that has a different version of SAS such as SAS 9.1.3 or SAS 9.2:
    upgradeMetadata.bat convertAlertstoSharedAlertsPortlet -user AdminID
     -password AdminPwd -repository repositoryName
    or
    upgradeMetadata.sh convertAlertstoSharedAlertsPortlet -user AdminID
    -password -repository repositoryName

Promote a Portal Page

Overview

A portal page is an individual Web page in the portal that contains portlets. These portlets can contain portal content objects. In the default view, a user might have a single home page, and each new page added by the user displays in a new tab.
Before promoting a portal page, all dependent objects and portlets must be promoted first. To promote a page and its contents, you are required to perform an inventory of all content in the page and promote that content. Then, you can promote the portal page.
CAUTION:
This task can be arduous and prone to errors.
It is easier to promote a portal page as part of a Group Permissions Tree because the content promotion tool can identify the page contents that are shared with the Group Permissions Tree.
The following figure illustrates the individual portal promotion tasks that should be completed to promote a portal page from a source to a target system.
Sequence of Tasks for Portal Promotion
Tasks for Portal Promotion

Step 1: Perform the Required Tasks to Promote a Portal Page on the Source System

To promote a portal page on the source system, follow these steps:
  1. First, promote any content upon which the page depends.
  2. On the source system, open the PortalPage.xml extraction template.
  3. Edit the source copy of the PortalPage.xml file so that it points to the source metadata repository.
    1. Locate the source metadata repository's ID. In SAS Management Console, navigate to Metadata Managerthen selectActive Server and select Foundation. The repository ID is displayed in the right panel and consists of two 8-digit numbers separated by a period (for example, A0000031.A5BQ25K2).
    2. Edit the PortalPage.xml file to specify the source metadata repository's ID in the ReposId parameter. For example: <ReposId>A0000031.A5BQ25K2</ReposId>
  4. In the source copy of the PortalPage.xml extraction template, modify the @Name value in the PSPortalPage search  parameter. Here is an example:
    <PSPortalPage search="*[@Name='Finance Page']"
    TemplateName="PortalPage"/>
  5. Save the PortalPage.xml file.
  6. Run the extraction command:
    extractPortalversion.bat PortalPage.xml  -user AdminID
    -password AdminPwd
    or
    extractPortalversion.sh PortalPage.xml  -user AdminID
    -password AdminPwd
    Note: Choose the version of the script that matches your source. For example: extractPortal913.bat (for a SAS 9.1.3 source on Windows), or extractPortal92.sh (for a SAS 9.2 source on UNIX), or extractPortal93.sh (for a SAS 9.3 source on UNIX). For more information, see About the Portal Promotion Tools.
    The extraction script generates the following files:
    • PortalPage_deployFile.xml
    • PortalPage_expand.xml
    • PortalPage_extract.xml
    • extract.log
  7. Open the extract.log file, and verify that the file does not contain any errors. If the other .xml files are not generated, the extract.log file explains the reason why the extraction procedure did not work.
  8. If the SAS installation of the target host resides on a different machine or platform, copy the generated .xml files to the PortalPromotion subdirectory on the target system.

Step 2: Perform the Required Tasks to Promote a Portal Page on the Target System

To promote a portal page on the target system, follow these steps:
  1. Locate the target metadata repository's ID. To find the metadata repository ID, go to SAS Management Console and navigate to Metadata Managerthen selectActive Server and selecting Foundation. The repository ID is displayed in the right panel and consists of two 8-digit numbers separated by a period (for example, A0000001.A5T8FYJJ). Make a note of the metadata repository ID so that you can specify it in either the build.properties file or the PortalPage_deployFile.xml .xml file.
  2. There are two methods available to ensure that the correct values are specified and used to prepare the target system for the import process. Determine which method is appropriate for your environment and follow that method.
    • If the source is a SAS 9.1.3 or SAS 9.2 system, and the default values for the SAS Administrator and the SAS Trusted User accounts were retained in those deployments without any changes, then modify the build.properties file to customize and provide the values for the metadata repository IDs, the SAS Administrator accounts, and the SAS Trusted User accounts. Here is an example of the build.properties file:
      xml.file=PortalPage
      source.reposid.of.metadata.repository=A0000031.A5BQ25K2
      target.reposid.of.metadata.repository=A0000001.A5T8FYJJ
      source.sasadm.name=SAS Administrator
      target.sasadm.name=sasadm
      source.sastrust.name=SAS Trusted User
      target.sastrust.name=sastrust
      In the build.properties file, specify the name of the Portal Page and the repository ID for the source and target systems. Specify the default values for the names of the SAS Administrator and SAS Trusted User accounts in the source and target systems.
    • If you modified the build.properties file, skip this step. If you did not modify the build.properties file (because the source is a SAS 9.1.3 or SAS 9.2 system, and the default values for the SAS Administrator and the SAS Trusted User were previously customized and modified in the source or target deployments), then you should manually modify the values for these internal accounts in these generated .xml files:
      PortalPage_deployFile.xml, PortalPage_expand.xml, and PortalPage_extract.xml.
      In each applicable .xml file, specify the values for the @Name parameter as it applies to the SAS Administrator and SAS Trusted User. Note that some .xml files might not require these values.
      This manual process of modifying the .xml files is required because the build.properties file can be edited and used only in deployments where the default values for the internal accounts were retained and not modified.
  3. If you modified the build.properties file, skip this step. When you run the upgrade metadata commands later, the .xml files are updated with the required values. If you manually updated the values in the .xml files, open the PortalPage_deployFile.xml file. Search for the RepositoryBase Deploy_Id parameter. Specify the target system’s metadata repository ID as the value for RepositoryBase Deploy_Id and the target systems’s metadata name as the value for the Deploy_Name parameter. Here is an example:
    <Repository Base Deploy_Id="A0000001.A5T8FYJJ"
    Deploy_Name="Foundation"
    Id="A0000031.A5BQ25K2"
    Name="Foundation"/>
  4. In the target copy of the PortalPage.xml extraction template, modify the @Name value for the PSPortalPage search parameter.
    Here is an example:
    <PSPortalPage search="*[@Name='Finance Page']"
    TemplateName="PortalPage"/>
  5. On the target system, remove any old portal content or existing portlet instances with the same names.
    removePortalversion.bat PortalPage.xml -user AdminID
    -password AdminPwd -portalcontentname NameofPortalPagetobeDeleted
    or
    removePortalversion.sh PortalPage.xml -user AdminID
    -password AdminPwd -portalcontentname NameofPortalPagetobeDeleted
    CAUTION:
    This action is irreversible.
  6. Run the appropriate import command:
    importPortalversion.bat PortalPage.xml -user AdminID -password AdminPwd
    or
    importPortalversion.sh  PortalPage.xml -user AdminID -password AdminPwd
  7. Run the appropriate upgrade script for this content type if the source is not at the same version level as the target system:
    upgradeMetadataversion.bat fixDav -user AdminID -password AdminPwd
    or
    upgradeMetadataversion.sh fixDav -user AdminID -password AdminPwd
  8. To verify that the page content was recreated, log on to the portal, select Add New Page, and search for the new page that was promoted. Share the promoted page with the group.

Convert Data Explorations to Reports (Optional)

During the portal promotion process, supporting SAS content should be at the appropriate version level. Beginning with the 4.3 release of SAS Information Delivery Portal and later, data explorations must be converted to reports. Typically, this conversion occurs during a migration or an upgrade to SAS Information Delivery Portal 4.3 or later. Because data explorations can have dependencies on OLAP cubes, make sure the cubes have been built after you migrate.
If you did not convert data explorations to reports, then you must manually convert data explorations and bookmarks to SAS Web Report Studio reports. Then, adjust directive URLs and references to the reports. In the SAS 9.3 environment, the manualLoadContent-OrderNumber and the manualAdjustUrls–OrderNumber scripts are available for converting data explorations and bookmarks to reports. These scripts are located in the SAS-Configuration-Directory\Lev1\Web\Utilities directory.
To load content into the SAS Content Server and manually convert data explorations and bookmarks into reports, follow these steps:
  1. Start the Web application server with the SAS Content Server.
  2. Rebuild OLAP cubes.
  3. Run the following command to convert data explorations and bookmarks to SAS Web Report Studio Reports.
    On Windows:
    SAS-configuration-directory\Lev1\Web\Utilities\
    manualLoadContent-OrderNumber.bat
    On UNIX and z/OS:
    SAS-configuration-directory/Lev1/Web/Utilities
    /manualLoadContent-OrderNumber.sh
  4. Run the following command to adjust directive URLs and references to the new reports:
    On Windows:
    SAS-configuration-directory\Lev1\Web\Utilities\
    manualAdjustUrls-OrderNumber.bat
    On UNIX and z/OS:
    SAS-configuration-directory/Lev1/Web/Utilities
    /manualAdjustUrls-OrderNumber.sh
  5. Validate and verify that the conversion was successful. Review the logs saved to the log file in the SAS-Configuration-Directory\Lev1\Logs\Configure directory.
  6. Either delete the manualLoadContent-OrderNumber and the manualAdjustUrls–OrderNumber script files or remove the credentials for the SAS Administrator and the SAS Trusted User accounts from these script files.