Configure Job Statistics Reporting for SAS Data Integration Studio

Summary of Steps for Configuring the Job Statistics Reporting Package

The job statistics reporting package is delivered with the SAS Data Integration Studio client application. Before you can use the package, complete the following steps to install it on your server tier and configure it for your environment: Details are provided in the following topics.

Step 1: Create Directories on the Batch Server Host Machine

First, you must create directories on the SAS DATA step batch server host machine. Follow these steps on the host machine that runs the jobs for which you want to report statistics:
  1. Create a directory to store the reporting package’s programs, scripts, and configuration information. For example:
    • On Windows: C:\SASDIStudioJobReports
    • On UNIX: /usr/local/SASDIStudioJobReports
  2. Create a directory to be used as the library location for the job statistics data sets. For example:
    • On Windows: C:\SASDIStudioJobStats
    • On UNIX: /usr/local/SASDIStudioJobStats
    Give Write access to this directory for the user who will build the OLAP cubes for job statistics reporting. (This step is required only if you will be using SAS Web Report Studio to generate reports).
  3. Create a directory to contain the source code for stored processes that produce job statistics reports. (This step is optional if you will be using SAS Web Report Studio to generate reports.) Here are examples:
    • On Windows: C:\SASDIStudioJobStoredProcesses
    • On UNIX: /usr/local/SASDIStudioJobStoredProcesses
    Give Write access to this directory for the user who will import the stored process objects. (See Step 6: Import Stored Processes and Customize Them for Your Environment.)
    Note: In the subsequent configuration steps, the directories are referred to using the example names.

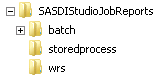
Step 2: Copy Reporting Components to the Batch Server Host Machine

On the machine where SAS Data Integration Studio client software is installed, navigate to the following directory:
SAS-installation-directory/SASDataIntegrationStudio/4.3/jobreports
Copy the contents of the jobreports directory from the client machine to the SASDIStudioJobReports directory on the batch server machine. The resulting directory should have the following structure:
DIStudioJobReports directory structure

Step 3: Customize the Properties File, Job Logs Parsing Program, and Batch Script for Your Environment

On the batch server machine, follow these steps to customize the properties file, job logs parsing program, and batch scripts for your environment:
  1. In the path SASDIStudioJobReports/batch, locate the job statistics properties file for your operating system environment (for example, DIStudioJobStats.properties.Windows). Copy this file to DIStudioJobStats.Properties.
    Then open DIStudioJobStats.Properties in a text editor and make the following changes:
    1. Find the line that contains DIStudioJobStats.logdir=. Update this property to point to the location of the logs for your batch server. For example:
      DIStudioJobStats.logdir=C\:\\SAS\\Config\\Lev1\\SASApp\\BatchServer\\Logs
      Note that in Windows environments, each colon (:) and backslash (\) must be preceded by an additional backslash character.
      Note: For best results, the batch server logs should be stored in their own directory rather than in a directory that is shared by other server logs. To determine the configured location, open the batch server’s logconfig.xml file (located in SAS-configuration-directory/Lev1/SASApp/BatchServer). In this file, check the FileNamePattern parameter of the RollingFileAppender configuration. If a unique location is not specified in this parameter, specify a location such as SAS-configuration-directory/Lev1/SASApp/BatchServer/Logs.
    2. Find the line that contains DIStudioJobStats.user=. This property should specify the user ID for the SAS General Server account (sometimes referred to as the SAS Spawned Server account) that is defined in your operating system.
      Typically, the user ID for this user is sassrv. If a different user is specified, update this property with the appropriate user ID.
    3. Find the line that contains DIStudioJobStats.password=. Update this property with the password of the user that is specified in DIStudioJobStats.user=. The password should be encrypted using SAS proprietary 32-bit encryption. To obtain the encrypted password, use PROC PWENCODE. Specify the encrypted password as shown in the following example:
      DIStudioJobStats.password={sas002}0123456789
    4. Find the line that contains DIStudioJobStats.librefs=. Update this property with the directory location that you created for the job statistics data sets. For example:
      DIStudioJobStats.librefs=C\:\\SASDIStudioJobStats
    5. Find the line that contains DIStudioJobStats.sqlurl. Update this property with the host name and port for the SAS Workspace Server. For example:
      DIStudioJobStats.sqlurl=jdbc:sasiom://HOST01.example.com:8591
    6. Find the line that contains DIStudioJobStats.overwriteTables=. Make sure that this property is set to true.
      Note: Later, after you run the log parsing program for the first time, this setting should be changed to false.
      Save the file.
  2. In SASDIStudioJobReports/batch, locate the file joblogsFlow.sas. Open this file in the SAS Program Editor or a text editor, and find the LIBNAME statement. Update the LIBNAME statement to specify the directory location for the job statistics data sets. This should be the same path that you specified in step 1.c. For example:
    libname jobstats 'C:\SASDIStudioJobStats';
    Save the file.
  3. In the path SASDIStudioJobReports/batch, locate the file joblogsFlow.bat or joblogsFlow.sh. Open this file in a text editor and make the following changes:
    • Edit the path to the batch server command to specify the correct path for your environment. For example:
      C:\SAS\Config\Lev1\SASApp\BatchServer\sasbatchjob
    • Edit the value for the -log parameter to specify an appropriate path and filename for the parsing program’s log file. For example:
      -log "C:\SASDIStudioJobReports\batch\logs\joblogsFlow.log"
    • Edit the value for the -sysin parameter to specify the location of the joblogsFlow.sas program. For example:
      -sysin "C:\SASDIStudioJobReports\batch\joblogsFlow.sas"
    Save the file.

Step 4: Add the Java Runtime Environment Executable to the PATH Environment Variable.

The SAS Data Integration Studio job statistics reporting package requires version 1.5 or higher of the Java Runtime Environment (JRE). This software should have been installed on your batch server machine when you installed your SAS software.
Update the PATH environment variable on your machine to include the path to the JRE executable.

Step 5: Import BI Reporting Objects from DIStudioJobStats.spk

The package file DIStudioJobStats.spk contains BI objects (including information maps, cubes, SAS Web Report Studio reports, table definitions, and a library) that are used to produce SAS Data Integration Studio job statistics reports.
Note: Import this package only if you will be using SAS Web Report Studio to generate the job statistics reports. Otherwise, follow the instructions in Step 6: Import Stored Processes and Customize Them for Your Environment.
To import DIStudioJobStats.spk, follow these steps:
  1. Log on to SAS Management Console on a machine that has access to the directories on the DATA step batch server host machine.
  2. On the Folders tab, right-click the root folder (SASFolders) or another folder where you want to install the package. Then select Import SAS Package.
  3. On the first Import SAS Package wizard page, click Browse and navigate to SASDIStudioJobReports/wrs in the file system of the batch server machine. Select the file DIStudioJobStats.spk to import.
    If you are importing to the root folder (SASFolders), deselect the Preserve source path information for objects in the package check box. Click Next.
  4. On the second wizard page, click Next to accept the defaults. If a warning is displayed about directly applied access control entries, click Yes to proceed.
  5. The third wizard page displays information about required metadata connections for the imported objects. Click Next.
  6. The next several wizard pages prompt for metadata connections such the SAS Application Server and OLAP schema. Specify values that are appropriate for your environment.
  7. When you are prompted for report objects, click Next to accept the defaults.
  8. The next wizard page prompts for a directory path, as shown here:
    Directory Paths prompt in Import SAS Package wizard
    In both rows of the Target column, browse to the path for your job statistics data library. Specify the same path that you specified in DIStudioJobStats.Properties and joblogsFlow.sas (for example, C:\SASDIStudioJobStats).
  9. The next wizard page provides a summary of the objects to be imported. Click Next to begin the import.
The import creates a metadata folder called DIStudioJobReports. The folder contains tables, reports, jobs, maps, cubes, and a library.

Step 6: Import Stored Processes and Customize Them for Your Environment

Import DIStudioJobStatsStoredProcess.spk

The package file DIStudioJobStatsStoredProcess.spk contains stored processes that are used to produce SAS Data Integration Studio job statistics reports.
Note: The stored processes are provided for sites that do not have SAS Web Report Studio. If you will be using SAS Web Report Studio to produce the reports, this step is optional.
To import the file DIStudioJobStatsStoredProcess.spk, follow these steps:
  1. Make sure that you have Write permission on the directory that was created for the stored process source code (for example, /SASDIStudioJobStoredProcesses).
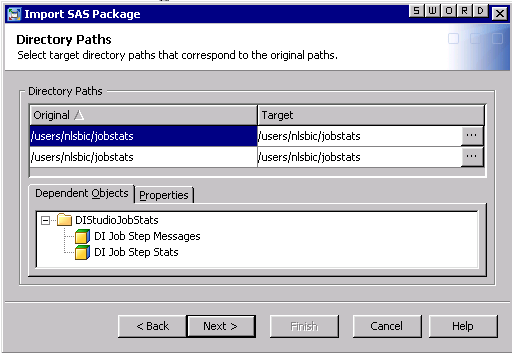
  2. On the Folders tab of SAS Management Console, right-click the DIStudioJobStats folder, which was created in Step 5: Import BI Reporting Objects from DIStudioJobStats.spk. Then select Import SAS Package.
  3. On the first Import SAS Package wizard page, click Browse and navigate to SASDIStudioJobReports/storedprocess in the file system of the batch server machine. Select the file DIStudioJobStatsStoredProcess.spk to import. Click Next.
  4. On the second wizard page, click Next to accept the defaults.
  5. The third wizard page displays information about required metadata connections for the imported objects. Click Next.
  6. The fourth wizard page prompts for a metadata connection to a SAS Application Server. Specify the value that is appropriate for your environment, and click Next.
  7. The fifth wizard page prompts for a directory path for source code repositories. Specify the directory as follows:
    1. On the Target source code repositories tab, click Add.
    2. In the Add Source Code Repository dialog box, specify the source code directory that you created in Step 1: Create Directories on the Batch Server Host Machine (for example, C:\SASDIStudioJobStoredProcesses). Click OK.
    The directory should appear in the Target column on the wizard page. Click Next.
  8. The sixth wizard page provides a summary of the objects to be imported. Click Next to begin the import, and then click Finish on the final wizard page.
The DIStudioJobStats folder should now contain three stored processes. In addition, the source code directory in the file system should contain three SAS programs.

Customize the Stored Process Source Code for Your Environment

After you import DIStudioJobStatsStoredProcess.spk, you must customize the stored process source code for your environment, as follows:
  1. In the file system of the batch server host machine, navigate to the directory that contains the source code for the stored processes (for example, C:\SASDIStudioJobStoredProcesses).
  2. If you are using a UNIX machine, make sure that you have Edit permission (chmod 664) for the three stored process programs in the directory (disjobmesgsreport.sas, disjobparammesgs.sas, and disjobperformancereport.sas).
  3. Open each of the three programs that are stored in the directory, and locate the following lines in the programs:
    • In disjobmesgsreport.sas:
      %isExist(libpath=d:\jobstats)
      %preProcessData(libpath=d:\jobstats)
    • In disjobparammesgs.sas:
      %prepareData(libpath=d:\jobstats,jobname=,jobnumber=)
    • In disjobperformancereport.sas:
      %isExist(libpath=d:\jobstats)
  4. In each of these lines, edit the value for LIBPATH to specify the path for your job statistics data library. Specify the same path that you specified in DIStudioJobStats.Properties and joblogsFlow.sas (for example, C:\SASDIStudioJobStats).

Step 7: Enable ARM Logging and Run-Time Statistics Collection for Deployed SAS Data Integration Studio Jobs

To enable the collection of data for job statistics reporting for deployed SAS Data Integration Studio jobs, follow these steps:
  1. Set up ARM logging and run-time statistics collection by following the instructions in About Collecting ARM Log Information for SAS Data Integration Studio Jobs.
  2. To enable the collection of statistics for deployed jobs, select Toolsthen selectOptions in SAS Data Integration Studio. Then deselect the Override and disable performance statistics when a job is deployed check box, and click OK.

Step 8: Apply Required Permissions

To enable the creation and viewing of SAS Data Integration Studio job statistics reports, you must apply the following permissions to files, directories, metadata folders, and objects:
Directory, File, Metadata Folder, or Object
User
Required Permission
Directory that stores programs, scripts, and configuration information for the reporting package
For example: /SASDIStudioJobReports
User who is specified in the DIStudioJobStats.user property of DIStudioJobStats.Properties, and who runs joblogsFlow.bat or joblogsFlow.sh
For example: sassrv
Write
Library location for job statistics data sets
For example:/SASDIStudioJobStats
User who is specified in the DIStudioJobStats.user property of DIStudioJobStats.Properties, and who runs joblogsFlow.bat or joblogsFlow.sh (for example, sassrv)
User who builds cubes1
Write
DIStudioJobStats.sh and joblogsFlow.sh
User who is specified in the DIStudioJobStats.user property of DIStudioJobStats.Properties, and who runs joblogsFlow.bat or joblogsFlow.sh
For example: sassrv
Execute (chmod +x )
OLAP schema object
For example: SASApp - OLAP Schema
User who builds cubes1
Read
Metadata folder that contains the DI Job Step Messages cube and the DI Job Step Stats cube
For example: DIStudioJobStats
User who builds cubes1
ReadMetadata
DI Job Step Messages cube, DI Job Step Stats cube, DI Job Step Messages cube job, and DI Job Step Stats cube job
User who builds cubes1
WriteMetadata
Metadata folder that contains information maps for the reporting package
For example: DIStudioJobStats
Read and ReadMetadata
1Required only if you will be using SAS Web Report Studio to generate reports.
Configuration of the SAS Data Integration Studio job statistics reporting package is now complete. The following topics provide instructions for the ongoing production of job statistics reports.