


|
|
User's Guide 1.1 |
|
The SAS Information Delivery Portal Table Viewer allows you to view SAS tables through the portal. You can specify which table columns you want to display and the order in which you want them displayed. In addition, you can specify which rows of the table to display by entering a Standard Query Language (SQL) WHERE expression.
To view a table:
From the navigation column, select the window that contains the table you want to view. If your portal does not include the necessary window, you can add it. For details, see Personalizing Your Desktop.
Find the desired table in a list.
You can identify tables by the
![]() icon.
icon.
Click the table name. The Filtering Criteria section of the Portal Table Viewer appears:
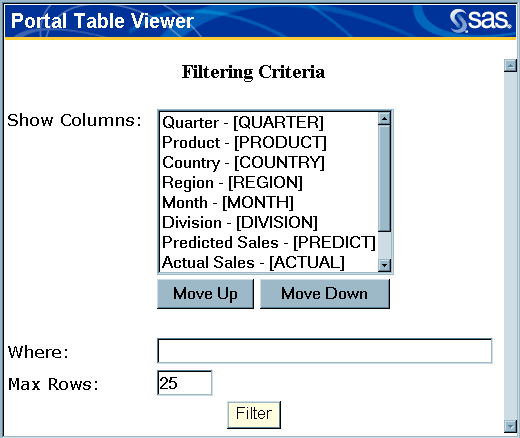
From Show Columns, specify the order in which you want the columns to appear.
If you highlight a column name and click Move Up, the column name moves to the top of the list. This means the column will be placed at the far left of the table.
If you highlight a column name and click Move Down, the column name moves to the bottom of the list. This means the column will be placed at the far right of the table.
Note: A simple method for you to order the columns is to select the field you want to appear in the first column, and click Move Down. Select the field you want to appear in the second column, and click Move Down. Continue this process until you have moved the names of all the columns you want to include.
From Show Columns, press the CTRL key and highlight the names of the columns that you want to view. You must select at least one column.
In the Where field, you can enter an SQL expression to specify which rows of the table you want to view. To compose the statement, use the column names that appear in brackets in the Show Columns list. The following table shows some standard operators that you can use in SQL statements and some simple examples.
Note: If you want to view all of the table's rows, leave the Where field blank.
| Operator | Definition | Example "Where" Expression |
| = | equal to | empnum = 3374 |
| <> | not equal to | status <> fulltime |
| > | greater than | salary > 30000 |
| < | less than | empnum < 2000 |
| >= | greater than or equal to | empnum >= 3374 |
| <= | less than or equal to | empnum <= 3374 |
| AND | logical AND | state = 'NC' AND empnum >= 3374 |
| BETWEEN...AND | between two values(inclusive) | empnum BETWEEN 3100 AND 3200 |
| IN | matching any of the list of values | state IN ('NC','TX') |
| IS NOT NULL | is not a NULL VALUE | state IS NOT NULL |
| IS NULL | is a NULL VALUE | state IS NULL |
| LIKE | matching a character pattern | lastname LIKE 'M%'
(Where lastname begins with 'M') position LIKE '%Programmer%'; (Where position title includes 'Programmer') deptcode LIKE '_RD'; (Where second and third characters of deptcode = 'RD') |
| NOT BETWEEN...AND | not between two values | empnum NOT BETWEEN 3100 AND 3200 |
| NOT colname = | not equal to | NOT state = 'NC' |
| NOT colname > | not greater than | NOT salary > 30000 |
| NOT LIKE | not matching a character pattern | NOT LIKE position '%Manager%'
(Where position title does not include 'Manager') |
| OR | logical OR | state = 'NC' OR state = 'TX' |
In the Max Rows field, enter the maximum of number of rows to be displayed on each page of the Portal Table Viewer.
Click Filter to display the table. The Portal Table Viewer appears showing
the table itself, with the rows and columns you selected. The rows appear in the same order that they occur in the original table.
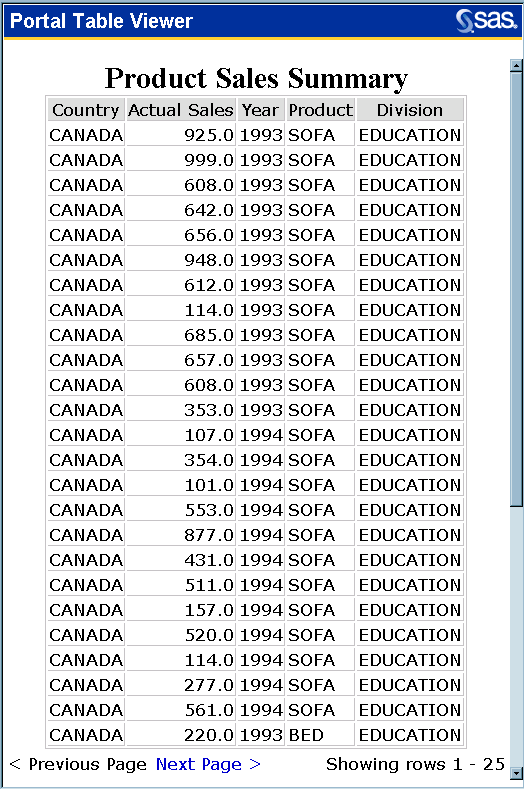
the filter criteria that were used to display the table. These are shown at the bottom of the Portal Table Viewer.
Use the Portal Table Viewer as follows:
To move from page to page, click Next Page or Previous Page.
To print the currently displayed page, select File
![]() Print.
Print.
When you finish viewing the table, click
![]() to close the Portal Table Viewer.
to close the Portal Table Viewer.
To view the properties of a table:
Open the SAS Information Delivery Portal. If the table you want is available from the Public Kiosk, go to step 2. If not, select Log On from the toolbar and enter your user name and password.
From the navigation column at left, select the window that contains the table whose properties you want to view.
Find the desired table entry in a list.
You can identify tables by the
![]() icon.
icon.
Click the
![]() icon.
icon.
The Portal Properties Viewer appears showing the following properties of the table:
description of the table
table member name, unique name, and logical name
list of the columns included in the table
portal reference, which is the URL the portal uses to refer to the table.
When you finish viewing the properties, click ![]() to close the Portal Properties Viewer.
to close the Portal Properties Viewer.
|
|
User's Guide 1.1 |
|