SAS 9.1.3 Integration Technologies » Developer's Guide
SAS BI Web Services
Securing SAS BI Web Services for .NET with WSE 2.0
Web Services Enhancements for Microsoft .NET (WSE) is a tool that provides developers with advanced Web services capabilities, and enables developers to secure SAS BI Web Services for .NET. WSE is a supported add-on to Microsoft Visual Studio .NET and the Microsoft .NET Framework. You can use WSE to secure SAS BI Web Services for .NET by performing the following tasks:
- modifying the Web.config file to enable WSE
- adding a new policy file that indicates the security policy required by SAS BI Web Services
- modifying client applications to use WSE, and to also use a security policy that matches the Web service
You can use the tools that are provided with WSE to configure SAS BI Web Services to authenticate users by using a Kerberos security context token, and to encrypt all transmissions using Kerberos encryption.
Configuration Steps
- Install WSE 2.0
- Launch WSE 2.0 Configuration Utility
- Configure SAS BI Web Services for .NET to use WSE 2.0
- Configure Policy for SAS BI Web Services for .NET
- Configure Microsoft .NET Client to use WSE 2.0
- Configure Policy for Microsoft .NET Client
- Update Client Code
- Test the New Security Policy
-
You can download Web Service Enhancements 2.0 from the Web Services and Other Distributed Technologies Developer Center on the Microsoft Web site. This documentation was written using WSE 2.0 Service Pack 3. It is recommended that you get the latest version of WSE 2.0 in order to ensure that you have all the latest features and bug fixes.
-
The WSE Settings 2.0 tool can modify an application configuration file to enable WSE 2.0, as well as configure the options that are available with WSE 2.0. To use the WSE Settings 2.0 tool from the Start menu, select Start
 All Programs Microsoft WSE 2.0 Configuration Editor.
 Configure SAS BI Web Services for .NET to use WSE 2.0
Select File
Open, and then open the Web.config file for the installation of SAS BI Web Services for .NET that you are modifying. By default,
the Web.config file is located here:C:\Inetpub\wwwroot\SASWS\Web.config
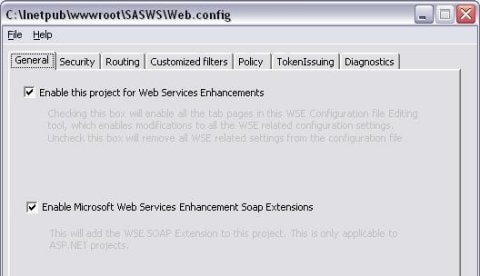
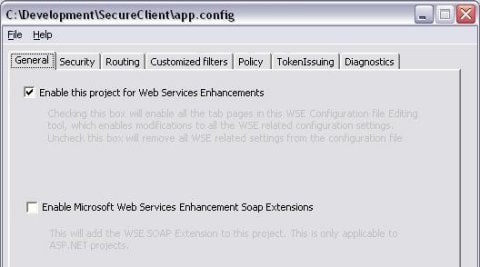
On the General tab, select Enable this project for Web Services Enhancements. Also, select Enable Microsoft Web Services Enhancement Soap Extensions.
Configure Policy for SAS BI Web Services for .NET
On the Policy tab, select Enable Policy and use the default file name policyCache.config. Under Edit Application Policy, click Add. In the Add or Rename Endpoint URI dialog box, accept the default of
<DefaultEndpoint>. This causes the policy to apply to any endpoint and operation that is defined for SAS BI Web Services for .NET. Click OK to launch the WSE Security Setting Tool.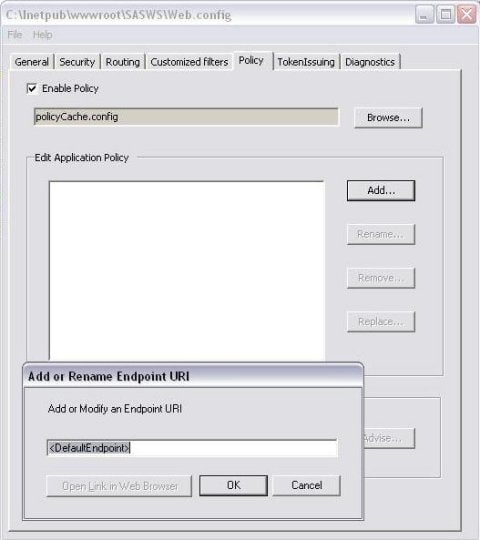
Click Next to proceed to the Choose the Type of Application page. Select Secure a service application. You can leave Use Secure Conversation unselected. If you want to use secure conversation, then you will need to supply an X.509 certificate. Click Next to continue.

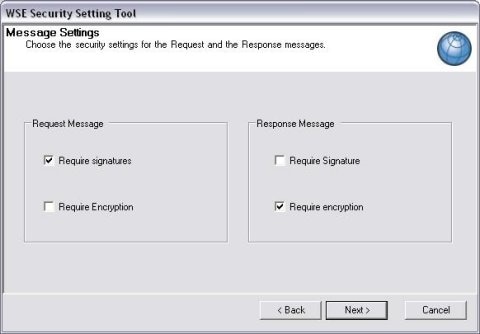
On the Message Settings page, accept the default settings to sign the request and encrypt the response. This simplifies the configuration so that no X.509 certificates are required. If you prefer to encrypt the request or sign the response, then you will need to supply an X.509 certificate. Click Next to continue.
On the Client Authentication Token page, select Kerberos. A Kerberos token is an authentication token that is used by Windows to authenticate clients with remote servers. To use the Kerberos token option, both the client and server must be in a Windows Server 2000 or later Active Directory domain.
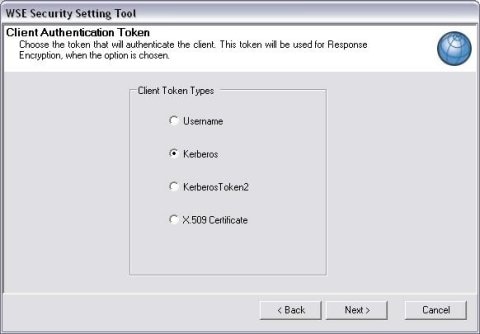
If the client and server machines are not in the same domain, then you can select the Username token type in order to create a token in the client code. This configuration is not covered here, but you can find more information on the Username token in the Web Services Enhancements 2.0 documentation.
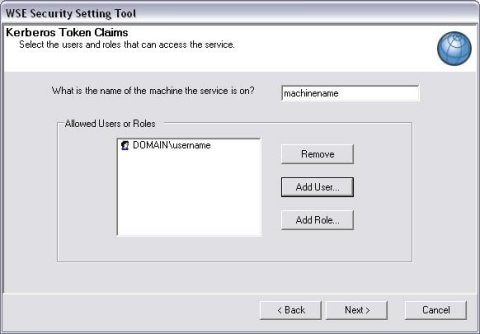
Click Next to continue to the Kerberos Token Claims page. Specify the name of the machine that the service is on, and add users or roles that are allowed access to the Web service.
Click Next to view the confirmation page, and click Finish to save the changes to the policy.
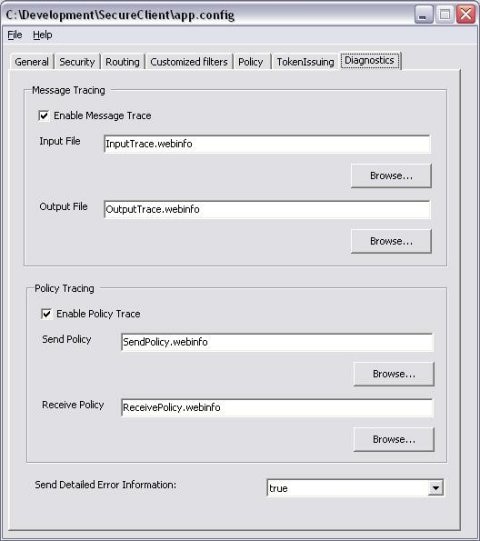
While you are testing various security settings, it is helpful to look at the input and output trace files that can be enabled on the Diagnostics tab of the configuration utility.
When you are finished making changes to the configuration file, select File
Save to save the changes to the Web.config file and to create a new policyCache.config
file.Configure Microsoft .NET Client to use WSE 2.0
If you are using Visual Studio .NET, then you can launch the WSE Settings 2.0 tool from Visual Studio .NET. In Solution Explorer, right-click on the client project and select WSE Settings 2.0 to launch the WSE Settings 2.0 tool.
Alternatively, you can use the WSE Settings 2.0 tool that was launched previously to open the configuration file (Web.config, App.config, or AppName.exe.config) for the application that calls SAS BI Web Services for .NET. If the application doesn't have a configuration file, then you will need to create one. For more information about configuration files, see Application Configuration Files in the MSDN Library.
On the General tab, select Enable this project for Web Services Enhancements. If this is an ASP.NET application and the Web service should also use WSE 2.0, then you can also select Enable Microsoft Web Services Enhancement Soap Extensions.
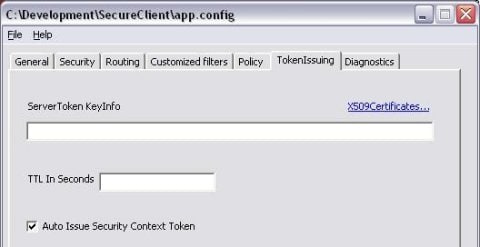
On the TokenIssuing tab, make sure that Auto Issue Security Context Token is selected. This will automatically issue a SecurityContextToken for the currently logged-on user to use when authenticating with SAS BI Web Services for .NET.
Configure Policy for Microsoft .NET Client
The configuration of the policy on the client is nearly identical to the configuration of the server policy. The only differences are as follows:
When prompted to secure a service application or a client application, select Secure a client application.
The path to the policyCache.config file might be slightly different. Visual Studio .NET will set an appropriate path for the policyCache.config file automatically. If you aren't using Visual Studio .NET, then be sure to specify a path that is relative to the location of the executable file.
If you are accessing Web services from the client application other than SAS BI Web Services for .NET, then you will need to provide a specific endpoint URI when you configure the policy instead of using the default value of
<DefaultEndpoint>.
-
Visual Studio .NET Project
After WSE is enabled in a Visual Studio .NET project, you should right-click the Web Reference for SAS BI Web Services for .NET and select Update Web Reference to force the proxy class to be re-generated with the new WSE features. Rebuild the project for the changes to take effect.
You will see a new class available in the proxy namespace called
SASAnalysisWse. This is the class that you should use to call SAS BI Web Services for .NET. Replace all instances ofSASAnalysiswithSASAnalysisWsein order to start using WSE in the client project.Microsoft .NET Framework Project
If you don't have Visual Studio .NET, you will need to generate a new Web service proxy class using the WseWsdl2.exe tool. By default, this tool is located in the WSE 2.0 installation folder in the
Tools\Wsdlfolder. The command will be similar to the following:"C:\Program Files\Microsoft WSE\v2.0\ Tools\Wsdl\WseWsdl2.exe" http://localhost/SASWS/sasxmla.asmx? WSDL localhost.csYou will need to modify the code to use the new generated proxy, because the proxy class that is generated by WseWsdl2.exe is different from the proxy class that is generated by the standard wsdl.exe tool that ships with the Microsoft .NET Framework.
-
At this point, the installation of SAS BI Web Services should be secured by Kerberos authentication and encryption, and only users who are specified in the policy configuration should be able to access the Web service. Verify the security policy as follows:
- Enable input and output message tracing on the Diagnostics tab in the WSE Settings 2.0 tool.
- Execute the client.
- View the log files to confirm that the request was signed and the response was encrypted.