Usage Note 39912: Creating and installing the self-signed certificate in SAS® Web Parts for Microsoft SharePoint
 |  |  |
Creating and Installing the Self-Signed Certificate
Perform the following steps on the machine in which the SAS Web Parts Service is hosted. Use the appropriate section below, depending on the Internet security system (IIS) version that your server uses.
After the certificate is created, import it using the instructions in the section "Importing the Certificate" section.
Microsoft Internet Information Server 6 (IIS6)
This procedure requires the IIS 6.0 Resource Kit, which you can install from the Microsoft Download Center.
- From the Start menu in a Windows environment, select Programs ► IIS Resources ► SelfSSL ► SelfSSL. This selection establishes a command prompt at C:\Progam Files\IIS Resources\SelfSSL.
- Open the Internet Information Services Manager by selecting Start ► Control Panel ► Administration Tools ► Internet Information Services (IIS) Manager.
- In the left pane, expand the local-computer node and click the Web Sites node.
- The list of Web sites, including the SAS Web Parts Services site, displays in the right pane. The site identifier (ID) displays in the second column. You need the site identifier ID when you create the self-signed certificate.
- At the command prompt that was established in step 1, you will see explanation of switches and an example command. Run the command as follows (you need to replace the site identifier ID as explained in step 4):
selfssl.exe /T /V:365 /S:siteidentifier(ID) /N:CN=machine.domain.ext
Note: /V specifies the number of days that the certificate remains valid.
- Type y to confirm that you want to override or install the certificate at the given site.
- To test that the certificate was created and installed successfully , go to https://machine.domain.ext/SASWebPartsService/Service.svc.
If the certificate was installed correctly, a lock icon appears in the browser.
Microsoft Internet Information Server 7 (IIS7)
- Open the Internet Information Services Manager by selecting Start ► Control Panel ► Administrative Tools ► Internet Information Services (IIS) Manager.
- In the Connections pane on the left, select the machine-name node. The machine-name Home Features View appears in the center pane.
- In the machine-name Home Features View, double-click the Server Certificates icon under the IIS heading. The Server Certificates Features View appears, which replaces the machine-name Home Features View.
- In the Actions pane on the right side, click Create Self-Signed Certificate…. The Create Self-Signed Certificate dialog box appears.
- Specify a name for the certificate. This name will be how you identify the certificate later when you attach it to the SAS Web Parts Service.
- Click OK to create the certificate.
- In the Connections pane on the left, expand the machine-name node and the Sites node and select the SASWebPartsService Web site. The SASWebPartsService Home Features View appears in the center pane.
- In the Actions pane on the right side, click Bindings…. The Site Bindings dialog box appears.
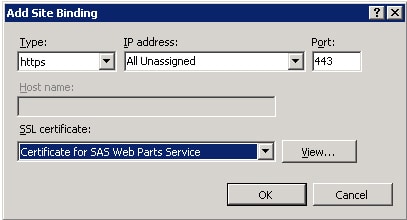
- Click Add…. The Add Site Binding dialog box appears.
- Remove any existing bindings by selecting them in the list and clicking Remove.
- Select https in theType list and select the newly created certificate in the SSL certificate list.

- Click OK to add the new binding and close the Add Site Binding dialog box.
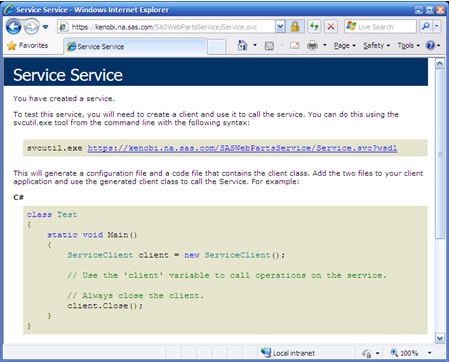
- Test that it worked by going to https://machine.domain.ext/SASWebPartsService/Service.svc.
A lock icon appears in the browser if the certificate was installed correctly.
Importing the Certificate
The following steps should be executed on the SharePoint machine where SAS Web Parts for Microsoft SharePoint will be installed:
- Open the SAS Web Parts Service site (https://machine-name/SASWebPartsService/Service.svc) in a Web browser. You might see a warning page with the message There is a problem with this website's security certificate. This message appears because the self-signed certificate was not created by a trusted authority. This behavior is expected.
- Click Continue to this website (not recommended) at the bottom of the page.
- You will see the Service page and the browser's address bar will have a pink background, indicating that there is a certificate error. At the right end of the address bar, click Certificate Error. At the bottom of the information pop-up, click View certificates.
- In the Certificates dialog box on the General tab, click Install Certificate....
- The Certificate Import Wizard appears. Click Next on the first page.
- On the Certificate Store page, select Place all certificates in the following store and click Browse.
- In the Select Certificate Store dialog box, check Show physical stores. In the tree view, expand Trusted Root Certification Authorities and select the Local Computer node. Click OK.
- Click Next and Finish to complete the Certificate Import Wizard. Click OK when you are informed that the import is successful.
- Close the Certificates dialog box and the browser window.
- Confirm that the certificate was successfully imported by opening the SAS Web Parts Service site (https://machine-name/SASWebPartsService/Service.svc) in a new browser window. You should see the lock icon in browser. The page should look similar to this:

Operating System and Release Information
| Product Family | Product | System | Product Release | SAS Release | ||
| Reported | Fixed* | Reported | Fixed* | |||
| SAS System | SAS Web Parts for Microsoft SharePoint | Microsoft Windows Server 2003 Datacenter Edition | 4.3 | 9.2 TS2M3 | ||
| Microsoft Windows Server 2003 Enterprise Edition | 4.3 | 9.2 TS2M3 | ||||
| Microsoft Windows Server 2003 Standard Edition | 4.3 | 9.2 TS2M3 | ||||
| Microsoft Windows Server 2003 for x64 | 4.3 | 9.2 TS2M3 | ||||
| Microsoft Windows Server 2008 | 4.3 | 9.2 TS2M3 | ||||
| Microsoft Windows Server 2008 for x64 | 4.3 | 9.2 TS2M3 | ||||
| Type: | Usage Note |
| Priority: |
| Date Modified: | 2010-11-17 15:56:51 |
| Date Created: | 2010-06-07 09:29:25 |