SAS® AppDev Studio 3.0 Developer's Site
Using AppDev Studio Middleware Server
- Middleware Server Overview
- Learning About Middleware Server
- Working with User Profiles
- Client Deployment Issues
- Debugging Middleware Server
Installing Middleware Server
Middleware Server (MWS) is installed automatically when you perform a full installation of SAS AppDev Studio. Once SAS AppDev Studio is installed, MWS can be deployed to another computer (such as a server) without having to put a full install of SAS AppDev Studio on that machine. To do this, follow these steps::
Install either the J2SDK 1.4.1 (or greater) or the J2RE 1.4.1 (or greater) on the server.
Locate the sas.ads.core.jar, sas.ads.misc.jar, sas.core.jar, sas.intrnet.javatools.jar, sas.svc.connection.jar, and sas.text.jar files. These files can typically be found in the following directory:
\install-directory\Java\SAS\ext(where install-directory is the directory in which AppDev Studio was installed).Create a directory on the server and copy the JAR files into it.
Create another directory to be the MWS Class Loader directory. This is where client JAR files will be deployed.
Locate the MWS configuration files — funnel.cfg, RocfORB.profiles, and RocfORB.properties — in
\install-directory\Java\SAS(where install-directory is the directory in which AppDev Studio was installed). Copy the MWS configuration files to a directory on the server. You can use the MWS Class Loader directory (created in the previous step) or another directory specifically created for the configuration files.Edit the RocfORB.properties file and change the rolloverDatabase and profileProcessor.profileDatabase properties to reflect the path to the funnel.cfg and RocfORB.profiles, respectively.
Starting and Stopping MWS
Windows Environment
There are two ways to start and stop MWS on a Windows machine where AppDev Studio is installed:
From outside of webAF software, select Start
![[arrow]](../images/arrow.gif) Programs SAS AppDev Studio Services SAS AppDev Studio Middleware Server.
Programs SAS AppDev Studio Services SAS AppDev Studio Middleware Server.From the webAF menu bar, select Tools
Services Start AppDev Studio Middleware Server.
Once you start MWS, the SAS AppDev Studio Middleware Server application appears as an icon on the lower task bar of your Windows session. This icon provides access to a screen that shows which MWS-related files (typically configuration files) have been loaded as well as the current MWS settings. In addition, any console output from clients using MWS appears on this screen.
When you start MWS from outside webAF software, you must stop it by closing the AppDev Studio Middleware Server icon. If you start MWS from the webAF menu bar, you must stop it by selecting Tools ![]() Services
Services ![]() Stop AppDev Studio Middleware Server.
Stop AppDev Studio Middleware Server.
Note: If you start MWS from the webAF menu bar while a project is open, that project's directory will automatically be added to the CLASSPATH. This is important, because of the order that MWS searches for JAR files. If you start MWS outside of webAF software and have JAR files or classes that you want the clients being served by the MWS to use, then you must place those files in the default directory for the MWS Class Loader. See Client Deployment Issues for more information.
On a Windows machine where SAS AppDev Studio is not installed, use the following command (from a command prompt, the Run prompt, or a .bat file) to start MWS:
%JAVA_HOME%\bin\java –Xmx128M
–Djava.ext.dirs=<mws jar directory>
–Dmws.class.path=<MWS Class Loader directory>
com.sas.rmi.RocfORB –f<config file location>\RocfORB.properties
This command assumes that the environment variable %JAVA_HOME% contains the location of the Java installation. Change <mws jar directory>, <MWS Class Loader directory>, and <config file location> to the directory paths that you created in steps 3, 4, and 5 when you installed the MWS.
UNIX Environment
Use the following UNIX script (called startmws) to start MWS:
#! /bin/ksh
#
# Shell script to start the SAS AppDev Studio Middleware Server.

# Fill in the appropriate values for the following environment
# variables. MWSJARDIR, MWSCLD, and MWSCONFIGDIR contain the
# locations of the three directories created in steps 3, 4, and 5
# when you installed MWS.
export JAVA_HOME=<location of Java installation>
export MWSJARDIR=<mws JAR directory>
export MWSCLD=<mws class loader directory>
export MWSCONFIGDIR=<config file location>

# Start the Middleware Server.
$JAVA_HOME/bin/java –Xmx128M \
–Djava.ext.dirs=$MWSJARDIR –Dmws.class.path=$MWSCLD \
com.sas.rmi.RocfORB –f${MWSCONFIGDIR}/RocfORB.properties
Note: If you use the startmws script, you must modify the specified location of the AppDev Studio JAR files and the specified location of the Java Runtime Environment (JRE) to match your particular installation.
Use the following UNIX script (called stopmws) to stop MWS:
#! /bin/ksh
#
# Shell script to kill the SAS AppDev Studio Middleware Server.

# MWSJARDIR refers to the directory created in step 3
# when you installed MWS.
export JAVA_HOME=<location of Java installation>
export MWSJARDIR=<mws JAR directory>

# Kill the Middleware Server.
$JAVA_HOME/bin/java –Djava.ext.dirs=$MWSJARDIR \
com.sas.rmi.RocfORBManager -hlocalhost:1099 -kill &
Note: It is not possible to stop the rmiregistry process without using the kill script. After stopping MWS, the rmiregistry process will still be active. A subsequent startmws script will result in a bind error from the rmiregistry command, but MWS will still start properly.
Using MWS with Projects or Documents
Connection objects are used to control how a project or document accesses the SAS server. Projects or documents can have multiple connections. You can determine whether a specific connection object uses MWS at runtime to connect to a SAS server (and access data) or whether it directly connects to a SAS server.
To have your project or document's connection object use MWS
Open a project or document in webAF or webEIS.
- Select
Tools
Register Connections in webAF.Tools
AppDev Studio Connections in webEIS.
Select the connection (connection object) that you want to use MWS, and then click Edit.
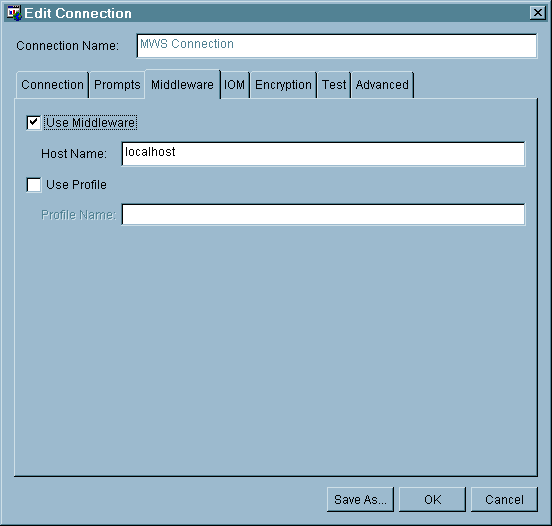
In the Edit Connection window, select the Middleware tab.
Select the Use Middleware check box.
In the Host Name field, enter the name of the machine where MWS is running (for example, the host name of the Web server where the applet is to be deployed).
If, in the future, you decide that you want your project or document to connect directly to a SAS server instead of using MWS, return to the Edit Connection window and deselect the Use Middleware check box.
Testing Your MWS Connection
You can quickly and easily test your MWS connection prior to running a project (such as an applet) that uses MWS. Follow these steps:
Start or open a project or document in webAF or webEIS.
Start MWS.
- Select
Tools
Register Connections in webAF.Tools
AppDev Studio Connections in webEIS.
Select the connection that you want to use MWS, and then click Edit.
In the Edit Connection window, select the Test tab.
Click Check Connection. The connection is then tested and any connection problems are listed. Note that because this test tests all parts of a connection, more than just MWS connection problems may be reported.
Customizing MWS with a Properties File
MWS has default settings that you can use. However, if the default settings are not appropriate, you can customize MWS through the use of a properties file.
Note: You can also customize MWS through server-side user profiles. For more information on user profiles, see Working with User Profiles.
Specifying All MWS Options with a Properties File
You can specify all MWS options using a single properties file. SAS recommends using a properties file to specify MWS options, because this file can be easily referenced or printed should you need technical support.
The default properties file name is RocfORB.properties. However, you can specify a different file using the following MWS command line argument, which is:
-f<filename>
Typically, this file exists in the following path: \install-directory\Java\SAS (where install-directory is the directory in which AppDev Studio was installed).
The following table includes the names, descriptions, and available values for all properties that you can set in the properties file:
| Property Name |
Description | Available Values |
|---|---|---|
| initialDelay | The number of seconds to delay execution at startup. This allows the rmiregistry to be started from a script and have enough time to load before RocfORB binds | Any number; the default value is 3. |
| connectionTimeout | The number of seconds to delay the closing of an unused connection. | Any number; the default value is 0. |
| clientTimeout | The number of seconds to delay the closing of an unused client. | Any number; the default value is 43200. |
| rolloverDatabase | The name of the rollover database. | This database identifies the file (typically, funnel.cfg) that contains the rules regarding how many sessions are allowed on a host and how many clients are allowed on each session. For more information, see Balancing Loads with Client and Server Rollovers. |
| rolloverType | The type of client rollover to use. | 0 for client (default) or 1 for server. If 0 is specified, then each SAS session will accept the maximum number of clients that it can handle before another SAS session is started (for example, a rollover). If 1 is specified, then the maximum number of SAS sessions that are possible will each accept one client before any SAS session accepts a second client. Note: The SAS session and client information are specified in the rollover database, which is typically a file named funnel.cfg. For more information, see Rollover Type Example. |
| profileProcessor.profileDatabase | Specifies the name of the profile database to use. | The default value is RocfORB.profiles. |
| hostname | Specifies the location where the RMI registry exists. The location typically matches the location of the MWS. | The default value is localhost. |
| port | The port number where the RMI registry is listening. | The default value is 1099. |
| adminHosts | The list of hosts that are allowed to administer MWS. | The default value for all hosts is an asterisk (*). Otherwise, provide a list of comma-separated hosts. |
| verbose | Enables or disables debug tracing. | 0 for disabled (the default) or 1 for enabled. |
| outputFile | Specifies the name of the output file. This file lists the results of debug tracing, if debug tracing has been enabled. You can enable or disable debug tracing with the verbose= properties file statement. |
The default value is RocfORB.txt. Typically, this file exists in the following path: \install-directory\Java\SAS (where install-directory is the directory in which AppDev Studio was installed). |
| preloadX | Specifies the list of profile names to be preloaded. | Use preload1.property=, preload2.property=, etc. |
| htmlFile | Specifies the location of MWSstatus.html, which is an HTML file that you can use to monitor the status of MWS. | The default value is: htmlFile=c:\inetpub\wwwroot\MWSstatus.html |
| htmlFileRefresh | Specifies the amount of time (in seconds) that the file specified using the htmlFile parameter should refresh itself. | Any number; the default value is 10. |
| synchLog | Enables or disables the tracing of client status. When enabled, synchLog sends a note to the output destination (such as the value of outputFile) after MWS checks to see whether a client is still active. |
0 for disabled (the default) or 1 for enabled. |
Here is an example of the property file:
# RocfORB.properties
# Property file for the SAS AppDev Studio Middleware Server.

# Specify the number of seconds to delay execution at
# startup. This allows the rmiregistry to be started from a
# script and have enough time to load before RocfORB binds.
initialDelay=3

# Specify the number of seconds to delay the closing
# of an unused connection.
connectionTimeout=0

# Specify the number of seconds to delay the closing
# of an unused client.
clientTimeout=43200

# Specify the name of the rollover database.
rolloverDatabase=funnel.cfg

# Specify the type of client rollover. 0=client major,
# 1=server major
rolloverType=0

# Specify the name of the profile configuration file.
profileProcessor.profileDatabase=RocfORB.profiles

# Specify the rmiregistry host name.
hostName=localhost

# Specify the rmiregistry port number.
port=1099

# Specify the list of hosts allowed to administrate the
# Middleware Server, or an asterisk (*) for all hosts.
# Hosts are given in a comma-separated list.
adminHosts=*

# Enable/disable debug tracing. 0=disabled, 1=enabled
verbose=0

# Specify the output file name.
#outputFile=RocfORB.txt

# Specify the list of profile names that will be preloaded.
# Use preload1.profile, preload2.profile, and so on.
#preload1.profile=local
#preload1.asynchronousStartup=true
#preload1.preloadedClients=1

# Generate an HTML status file for auto-refresh HTML file.
#htmlFile=c:\apache\htdocs\MWSstatus.html
htmlFile=c:\inetpub\wwwroot\MWSstatus.html
# set the refresh rate for the html status file
#htmlFileRefresh=10
Rollover Type Example
The following diagram visually represents the difference between setting the rolloverType statement to 1 or 0 in the RocfORB.properties file. For this example, assume that the maximum number of SAS sessions and clients are both equal to 2.
Balancing Loads with Client and Server Rollovers
You can balance loads by specifying client and server rollover information in a file called funnel.cfg. The funnel.cfg file is referred to as the Rollover Database. This file can typically be found at the following path: AppDev Studio Installation Directory\Java\SAS.
Server rollover enables you to set the maximum number of SAS sessions to be divided among clients. As clients are bound to sessions, they are evenly distributed across n number of SAS sessions.
Client rollover enables you to set each target host so that a new SAS session is created once a maximum number of clients has been reached. For instance, you might want to only allow 10 clients to share a SAS session on a particular host at any given time.
Once MWS has bound the maximum number of clients to a SAS session, the next client is forced to a new SAS session. This process is known as a rollover. A user can limit the number of rollovers that occur. In the default configuration, there are currently no upper bounds for the number of rollovers that can occur; new SAS sessions are created and shared until the server runs out of memory.
Note: As client applications terminate and reduce the number of clients for a given SAS session, new clients are bound in their place.
To set server and client rollover options in the rollover database:
Open the rollover database (typically, the funnel.cfg file).
Edit the value associated with each host. Each host can have two values (separated by a forward slash). The first value represents the number of SAS sessions. The second value represents the number of clients per SAS session.
The values can be a number or the asterisk character (*), which represents an unlimited value.
The following is an example of a rollover database that provides information on two hosts:
#MiddlewareServerAdmin
#Wed Jan 22 09:01:21 EST 2003
localhost=2/1
newhost=1/*
Notice that localhost can have two SAS sessions with one client per session. newhost can have one SAS session with an unlimited number of clients.
Note: If the SAS host being requested is not found in the configuration file, then all clients share a single SAS session.
Additional rollover options are available for use. For more information, see Working with User Profiles.
Configuring MWS to Rollover from one SAS Server to Another
You can configure a series of SAS host machines on one SAS Server to rollover to another SAS Server when the resources of the current SAS Server are exhausted. To do this, you must modify the funnel.cfg, RocfORB.profiles, and RocfORB.properties files. These files can typically be found at the following path: \install-directory\Java\SAS (where install-directory is the directory in which AppDev Studio was installed).
Example
Suppose that a SAS system administrator wants a maximum of two SAS sessions, each with two clients, on the SAS server machine called SASHost_1. When these resources are exhausted, the system administrator wants new connections to rollover to a SAS server machine called SASHost_2. SASHost_2 can have a maximum of three SAS sessions with three clients per session.
To create this scenario, the system administrator must:
Open the funnel.cfg file and add the following lines:
SASHost_1=2/2
SASHost_2=3/3
Open the RocfORB.profiles file and add the following lines (assuming that the name of the user profile is
rolloverExample):rolloverExample.connection.serverArchitecture=PC rolloverExample.connection.host=SASHost_1 rolloverExample.serverRollover=SASHost_2
Open the RocfORB.properties file and verify that
rolloverType=0. This property value specifies that the client rollover type isclient major.
In order to test the new scenario, the system administrator must:
Open the webAF project in which MWS should be configured to rollover from one SAS server to another.
Select Tools
Register Connections.In the Register Connections window, select the connection that the project uses and then click Edit. The Edit Connection window appears.
On the Connection tab, set the Typical Server Configuration pull-down to JConnect-PC.
Note: This step assumes that both servers are Windows NT servers running the JConnect spawner.
In the Host group box, set the Host Name field to SASHost_1.
On the Middleware tab, select the Use Middleware check box and set the Host Name field to the name of the host where MWS is running.
Select the Use Profile check box and enter rolloverExample in the Profile Name field.
Note: In order to rollover from one machine to another, the server architecture must be the same for each of the server machines. If you plan to use this scenario with a webAF project, then the server architecture must also be compatible with the typical server configuration of the webAF project connection.
Viewing MWS Status
If you are using MWS with your project or document, you can monitor MWS status through a Web page called MWSstatus.html. This file provides information on current MWS settings, such as the number of SAS sessions started, the number of clients connected to a SAS session, whether a profile is being used, and more.
The MWSstatus.html page reflects the current MWS settings and customizations. For more information, refer to the customization information provided earlier in this section.
To enable the MWSstatus.html file:
Locate and open the file called RocfORB.properties. This file is used to customize MWS settings. Typically, this file exists in the following path:
\install-directory\Java\SAS(where install-directory is the directory in which AppDev Studio was installed).Locate the
htmlFile=property line and remove the pound character (#) from the beginning of the line.Set this property to point to the path of your Web server root. Typically, this path is
c:/inetpub/wwwroot.Save and close the RocfORB.properties file.
Note: You can control how often MWSstatus.html updates itself by setting the
htmlFileRefresh=property in the RocfORB.properties file.Stop MWS, if it is currently running, and restart MWS in order to have the changes that you made to the RocfORB.properties file take effect.
To view the MWSstatus.html file:
- Open the MWSstatus.html file in a Web browser.
- Review the file to see current settings.
The following screen capture shows an example of the MWSstatus.html file:
From this file, you can tell that:
- a user profile named
MyProfileis being used - multiple rollover machines have been defined (machineA, MachineB)
- a new SAS session was started on machineB, because machineA can only handle one SAS session with one client before rolling over to machineB
- machineB can handle an infinite number of clients since the MaxClients setting equals '*'; only one client currently exists on the SAS session.
For more information on setting the options shown in this example, see Working with User Profiles.