Adding Gauge-Level Display Rules
A display rule is used by a gauge to designate intervals
and colors for ranges. You can add a shared display rule for a gauge,
which is used by other gauges to designate intervals and colors for
ranges.
Add Display Rules to a Gauge
To specify a new display
rule for a gauge:
-
If it is not already selected, select the gauge in the canvas that you want to update.
-
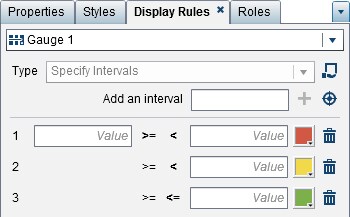
In the right pane, click the Display Rules tab.Here is an example of the Display Rules tab for a gauge:
-
Specify (or modify) the display rules for the gauge. You can populate intervals, edit the display rule, and specify the Type.To automatically populate the intervals:
-
-
(Optional) Review or change the values for the Number of intervals, Lower bounds, and Upper bounds fields.
-
Click OK. The gauge updates and the new display rule is displayed on the Display Rules tab.
-
To edit the display rule for a gauge, use the fields on the Display Rules tab. You can update the conditions for the values, the intervals, and the color for
the range. Select a color to open the color palette. To add new intervals to the display rule, enter a number, and click  beside the Add an interval field.
beside the Add an interval field.
Add a Shared Display Rule for Gauges
There are two ways to create a shared display rule for a gauge in the designer. You
can use either the Shared Rules tab in the left
pane or the Display Rules tab in the right
pane.
To create a shared
display rule for a gauge using the Shared Rules tab:
-
-
Enter a Name.
-
Add an interval or automatically populate the intervals.To automatically populate the intervals:
-
Click
 beside the Add an interval field
to display the Populate Intervals window.
beside the Add an interval field
to display the Populate Intervals window.
-
(Optional) Review or change the values for the Number of intervals, Lower bounds, and Upper bounds fields.
-
Click OK to return to the Create Display Rule window.
-
-
Click OK. The new shared display rule is added to the Shared Rules tab.

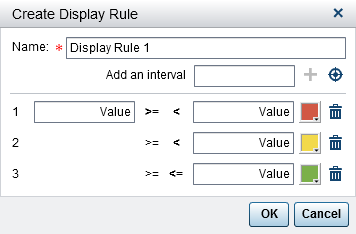
To create a shared
display rule for a gauge using the Display Rules tab:
-
-
Enter a Name.
-
Click OK. The new shared display rule is displayed below the Type field on the Display Rules tab. The new shared display rule is also added to the Shared Rules tab.

To edit a shared display
rule for a gauge:
-
Select the shared display rule on the Shared Rules tab, and then click
 . The Edit Display Rule window
is displayed.
. The Edit Display Rule window
is displayed.

-
Update the conditions for the values, the intervals, and the color for the range. Select a color to open the color palette. To add new intervals to the shared display rule, enter a number, and click beside the Add an interval field.
-
Click OK.
Copyright © SAS Institute Inc. All Rights Reserved.
Last updated: January 8, 2019