Project Explorer
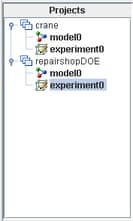
The Project Explorer (located on the top left side of the GUI in Figure 3.1) uses a tree structure to display the projects, associated models, and experiments that are currently loaded into the application. Figure 3.7 shows a Project Explorer with two projects loaded: crane and repairshopDOE, each with one model and one experiment.
Figure 3.7: Sample Project Explorer

Selecting a project, model, or experiment name listed in the Project Explorer hierarchy causes the windows associated with that item to activate and pop to the top in the Project window. The activated model and experiment names are shown in bold. Up to one model and one experiment in a project can be activated.
Context-sensitive pop-up menus are available on the items displayed in the Project Explorer. You can right-click a project to open a dialog box to edit factors and responses associated with the project and also to change the base directory location where any simulation results are stored. You can right-click a model to open the Anchors dialog box to associate block parameters in a model to project factors and responses and also to set flags in blocks for automatically saving results. You can right-click an experiment to open a dialog box to include factors and responses. Factors, responses, and anchors are detailed in Chapter 5: Experiments.