| Project Window |
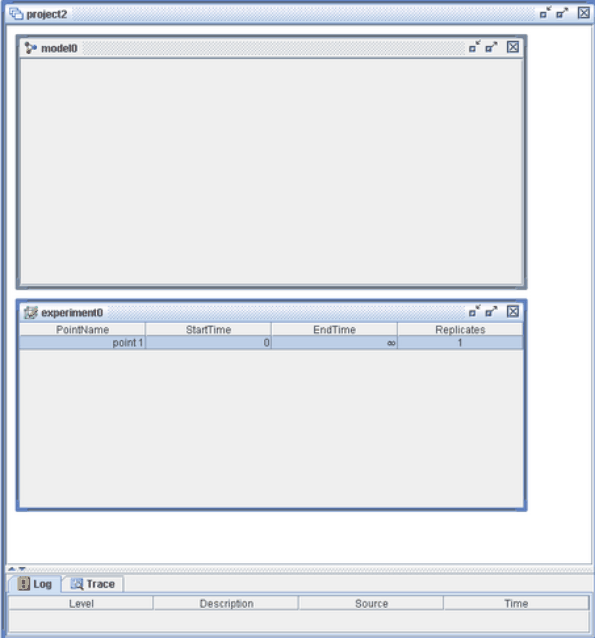
Each project loaded into Simulation Studio has a Project window associated with it in the Project Desktop area of the GUI. A newly created Project window is displayed in Figure 3.8. Each Project window has a desktop area at the top and a tabbed window at the bottom. The Project Desktop area contains any Model windows and Experiment windows associated with the project. When a new Project window is first created, it has one (empty) Model window, one Experiment window, and at the bottom of the frame, Log and Trace tabs. Project windows can be minimized as needed using controls on the Project window frame. To open the Factor and Response definition dialog boxes, right-click on the background of a Project window. See Chapter 5, Experiments, for details about factors and responses.
Model Window
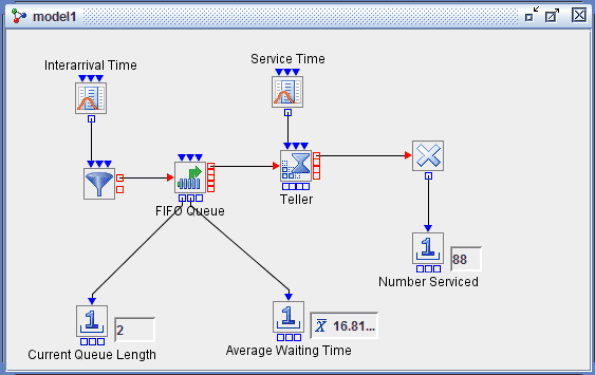
Each model in a project has a Model window associated with it. You use this window to graphically construct and display a simulation model. You drag a block from the Template Palette into a Model window to create an instance of the block associated with that template in your model. You connect the blocks in your model by creating links between ports on the various blocks. You can right-click or double-click an individual block to open a dialog box where you can modify parameters associated with the block. Interacting with blocks and models is discussed in detail in Chapter 4, Simulation Models. Closing a Model window deletes the window and removes the model entry from the Project Explorer. Note: Modified models are not automatically saved upon closing. You will however be prompted and asked whether you want to save the model before it is closed. Figure 3.9 displays a sample Model window that contains a simple M/M/1 model.
Experiment Window
You use Experiment windows to control the initialization and running of simulation models. Each experiment in a project has an Experiment window in the Project window. By default, each Experiment window contains columns for controlling the start and end times of a simulation run (or design point) along with a column for designating how many times you want to repeat this run. An experiment must have at least one design point in order to run an associated simulation model.
You can use an Experiment window to control initialization of block parameters before running a simulation model. Any factor or response defined on the project can be included in an experiment. Using this and other features of experiments is discussed in Chapter 5, Experiments.
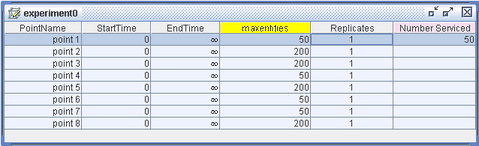
As with a Model window, closing an Experiment window deletes the window and removes the experiment entry from the Project Explorer. Figure 3.10 shows a sample Experiment window including a factor labeled maxentities and a response labeled Number Serviced. To modify the content of an Experiment window, right-click on the background of the Experiment window and select the appropriate item from the pop-up menu.