Binding Data to Metadata
Overview
The following list outlines the process for setting up a metadata-bound library:
Tip
Binding a physical library
introduces additional constraints on access, so it is a good practice
to review existing access patterns before you begin. For help with resolving
any unanticipated disruptions in end-user access, see Facilitate End-User Access.Note: If you want to support access
from clients that use metadata in order to locate data, make sure
that the data also has a traditional registration in metadata. See Traditional Registration.
Requirements
In order
to bind a physical library to metadata, the following requirements
must be met:
-
The workspace server (or SAS session) that makes the bind request must have host-layer control of the target library. This ensures that only users who have host control can bind a physical library to metadata. For host-specific details, see Requirement for Host-Layer Control.
-
The workspace server (or SAS session) that makes the bind request must connect to the metadata server as an identity that has the ReadMetadata and WriteMemberMetadata permissions to the target secured data folder.
Preparation
This introductory demonstration
limits access to a library that contains tables copied from the SASHELP
library. After you complete the steps that are in the preparation
section, use either the graphical user interface (GUI) method or the
SAS code method to bind the data.
-
-
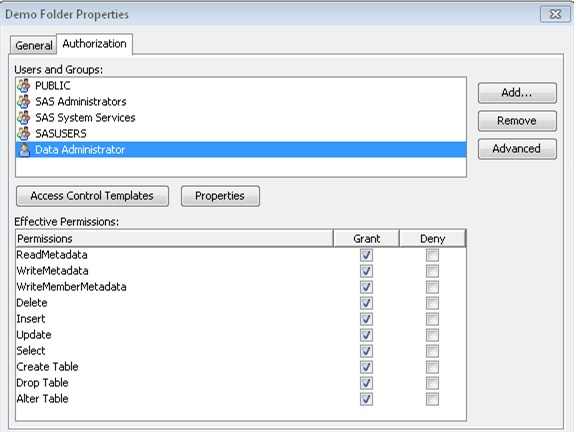
On the new folder’s Authorization tab, adjust access. As a simplified introductory example, give yourself exclusive access to the data. One way to do this is by adding explicit controls as follows:TipRead access to metadata-bound data is governed by the Select permission.TipIn SAS Management Console, an explicit setting has a white background color (not gray or green).TipIn practice, it would be a good idea to also apply the SAS Administrators Settings ACT (access control template).
GUI Method
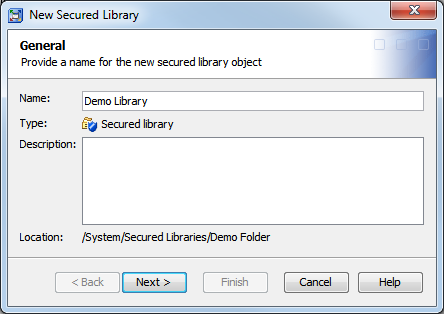
To bind the physical
library (your
test directory) to metadata:
-
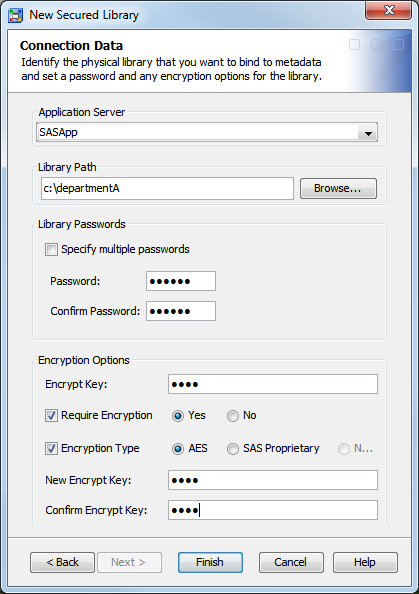
Note: The password can be no more than eight characters long. To create a more complex password, select the Specify multiple passwords check box and supply three distinct passwords. Using multiple passwords for a metadata-bound library only increases security; the different passwords do not manage different types of access.Note: Users do not supply metadata-bound library passwords in order to access data, so they should neither know, nor have access to, the password values.CAUTION:If you lose the password for a metadata-bound library, you cannot unbind the library or change its password.Keep track of passwords that you assign.
-
If any of the library’s data sets are currently encrypted using AES encryption, enter the current key in the Encrypt Key field.TipThe key that you enter is placed in quotation marks when it is submitted to SAS and is therefore case sensitive. If the key was originally specified in SAS code without quotation marks, then be sure to use uppercase letters when entering it here.Note: If the tables do not all have the same key, then you must use the code method to bind the library to metadata.
-
If you want to require encryption for all tables that are bound to the library, select the Require Encryption check box and select Yes. Then take one of the following actions:
-
To require AES encryption, you must specify an AES encryption key to store in the library’s metadata. See step 8.
-
To require SAS Proprietary encryption, select the Encryption Type check box and select SAS Proprietary. Then go to step 9.
-
-
Follow these steps if you are requiring AES encryption or if you want to store a default key to use for encrypting some data sets:
-
TipThe value that you enter is a passphrase of up to 64 characters in length, from which the actual AES encryption key is derived. Most SAS documentation refers to the passphrase as the encryption key.TipThe key is placed in quotation marks when it is submitted to SAS and is therefore case sensitive.TipBe sure to keep a record of the encryption key, even though it is stored in metadata.
If encryption is required, the stored encryption key will be used to encrypt every data set that is bound in the library. If encryption is not required, the stored key will be used to encrypt new tables when AES encryption is specified in SAS code but no key is supplied.CAUTION:For AES-encrypted data sets that are referentially related to one another, follow these best practices to ensure that the data does not become inaccessible:Store the encryption key in the library’s metadata. You can modify the stored key, but do not remove the key from metadata and do not unbind the library. -
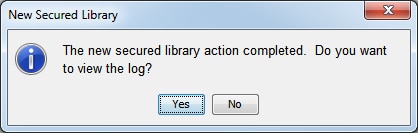
It is strongly recommended that you always check the log for warnings after you perform an action on a secured library object.
Code Method
As an alternative
to using SAS Management Console, you can use SAS code to bind the
data. See CREATE Statement.
Results
After the data is bound, each eligible physical table in your test library is represented
in the metadata as a new secured table object. A table is eligible if it is not already secured with a password that differs from
the password that you supply.
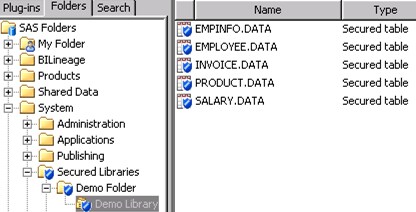
The following image depicts the new secured library object and secured table objects
in SAS Management Console. Your list of secured table objects
corresponds to the tables that you copied in the preparation phase. See Preparation.
Tip
If the new objects are not
immediately visible, right-click the Secured Libraries folder
and select Refresh. The new secured table
objects are visible in the right panel when their respective secured
library object is selected in the folder tree.
Traditional Registration
If you want to support
access from clients that use metadata to locate data, register the
library and tables in metadata (using the Data Library Manager plug-in
within SAS Management Console).
For example, to make
the data available from within SAS Web Report Studio, you might register
it beneath the
Shared Data folder.
Use the Data Library
Manager plug-in within SAS Management Console to perform this task.
Tip
Permissions on a traditional
library or table object can further limit access. For example, a user
who reads data through the META LIBNAME engine (MLE) must have permissions
on both the traditional table object (the ReadMetadata and Read permissions)
and the secured table object (the ReadMetadata and Select permissions).
Copyright © SAS Institute Inc. All rights reserved.