Mutually Exclusive Access
Introduction
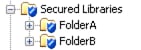
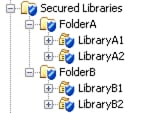
To establish several distinct levels of access, set up a metadata folder structure
with appropriate permissions. Each secured library object inherits permissions from its metadata folder. Each secured table object inherits permissions from its parent secured library object.
This example demonstrates
one way to set up mutually exclusive access for two user groups (GroupA
and GroupB) to four libraries (LibraryA1, LibraryA2, LibraryB1, and
LibraryB2).
Note: This example illustrates
library-level access distinctions. You can also set up table-level
access distinctions by setting metadata-layer permissions on individual
secured table objects within a metadata-bound library.
Preparation
The example assumes
that the following prerequisites are met:
-
The privilege and permission requirements are met. See Requirements.
-
The data exists in the host.
-
If you are using SAS code to perform the bind action, each physical library has been assigned a libref (liba1, liba2, libb1, and libb2) in your SAS session.
-
GroupA and GroupB exist in the SAS metadata.
Instructions
-
Constrain access at the
Secured Librariesfolder. One way to do this is to explicitly deny all permissions to the PUBLIC group and explicitly grant all permissions to the SAS Administrators group. These protections flow throughout the Secured Libraries branch, except where modified by additional direct access controls. -
FolderMetadata GroupExplicit Grants1
FolderAGroupAReadMetadata and SelectFolderBGroupBReadMetadata and Select1For conciseness, this example uses individual explicit controls (instead of ACTs) and provides only Read access (the Select permission). These settings do not allow members of GroupA and GroupB to update or delete data. TipTo add GroupA and GroupB to the Authorization tab, click the Add button next to the Users and Groups list box. In SAS Management Console, an explicit setting has a white background color (not gray or green). -
To bind the physical data to metadata, either use SAS Management Console or submit code. Be sure to specify
FolderAas the metadata location for the first two libraries, andFolderBas the metadata location for the last two libraries. -
TipIf the new secured library objects are not immediately visible, right-click the
Secured Librariesfolder and select Refresh from the pop-up menu. The new secured table objects are visible in the right panel when their respective secured library object is selected in the folder tree.Examine the Authorization tab of several of the new objects to verify that metadata-layer access is as expected.
Results
Test access from various
clients. Behavior should be as follows:
-
A user who is unrestricted should have access to all of the tables.
-
A user who is a direct or indirect member of both GroupA and GroupB should have access to all of the tables.
-
A restricted user who is a member of only GroupA or only GroupB should have access to only the data beneath
FolderAorFolderB. -
A restricted user who is not GroupA, GroupB, or the SAS Administrators group should not have access to any of the data.
Copyright © SAS Institute Inc. All rights reserved.