Setting Up a Metadata-Bound Library

Overview of Setting Up a Metadata-Bound Library

Setting up a metadata-bound library involves the following tasks:
  1. In the SAS metadata, below a /System/Secured Libraries/ folder, identify or create an appropriately secured folder for the data.
  2. In SAS code, submit a CREATE statement (within the AUTHLIB procedure) that references your physical data directory and the metadata folder that you identified or created in step 1.
  3. If you want to support access from clients that use metadata in order to locate data, make sure that the physical library and tables are also registered in metadata (using the Data Library Manager plug-in within SAS Management Console). For example, to make the data available from within SAS Web Report Studio, you might register it beneath the Shared Data folder.
Tip
Binding a physical library introduces additional constraints on access, so it is a good practice to review existing access patterns beforehand. For help resolving any unanticipated disruptions in end-user access, see Facilitate End-User Access.

Who Uses the CREATE Statement?

Administrators use the CREATE statement of the AUTHLIB procedure to bind a physical library to metadata.
In order to use the CREATE statement, you must meet the following criteria:
  • Your SAS session runs under an account that has host-layer control of the target physical library. To ensure that only users who have host control can bind a physical library to metadata, your SAS session must run under a privileged host account as follows:
    • On UNIX, the account must be the owner of the directory.
    • On Windows, the account must have Full Control of the directory.
    • On z/OS, for UNIX file system libraries, the account must be the owner of the directory.
    • On z/OS, for direct-access bound libraries, the account must have RACF ALTER access authority to the library data set.
  • Your SAS session connects to the metadata server as an identity that has Read and Write access (the ReadMetadata and WriteMemberMetadata permissions) to the target secured data folder.

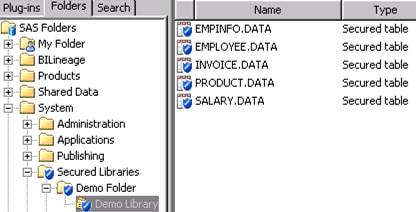
Introductory Demonstration

As a simple demonstration, limit access to a library that contains tables copied from the SASHELP library.
To prepare:
  1. In the operating system, create a directory called test. Copy some of the tables from your SASHELP directory into the test directory.
    Tip
    By default, SASHELP is in your SASHOME directory, under SASFoundation\<version>\core\.
  2. In a SAS session, assign the libref secdemo to the new directory.
    libname secdemo 'path-to-your-test-directory';
To bind the physical library (your test directory) to metadata:
  1. Create an appropriately secured metadata location.
    1. Log on to SAS Management Console as someone who has the ReadMetadata and WriteMemberMetadata permissions on the /System/Secured Libraries folder. In the standard configuration, only members of the SAS Administrators group (and unrestricted users) have the necessary access.
    2. On the Folders tab, navigate to SAS Foldersthen selectSystemthen selectSecured Libraries. Add a new folder called Demo Folder.
    3. On the new folder’s Authorization tab, adjust access. As a simplified introductory example, give yourself exclusive access to the data. One way to do this is by adding explicit controls as follows:
      • In the Users and Groups list box, select the PUBLIC group and explicitly deny all permissions for that group.
      • Add yourself to the tab (click the Add button next to the Users and Groups list box) and explicitly grant all permissions to yourself.
        Authorization tab
      Tip
      In SAS Management Console, an explicit setting has a white background color (not gray or green).
      Tip
      In practice, it would be a good idea to also apply the SAS Administrators Settings ACT (access control template).
  2. In the same SAS session in which you assigned the secdemo libref, submit the following code:
    proc authlib library=secdemo;
     create
       securedfolder='/System/Secured Libraries/Demo Folder'
       securedlibrary='Demo Library'
       pw=secret;
    
    run;
    Here are some details about the preceding code:
    • The LIBRARY= option references your previously defined physical library. This is the library for which a corresponding metadata-bound library object will be created and in which security location information will be stored.
    • The SECUREDFOLDER= option specifies the metadata folder location for the new secured library object. To minimize exposure, we suggest that you specify a folder for which you have already made any necessary adjustments to access (as discussed in step 1c above).
    • The SECUREDLIBRARY= argument specifies a name for the new secured library object (in metadata).
    • The PW= value is an initial assignment of a password for the library. This value can be encoded using the PWENCODE procedure. In order to submit an encoded password, you must enclose the value in quotation marks.
      CAUTION:
      If you lose the password (or passwords) for a metadata-bound library, you can't unbind the library or change its passwords.
      Be sure to keep track of passwords that you assign in the CREATE and MODIFY statements of the AUTHLIB procedure.
    • Your SAS session must be able to connect to the target metadata server as an identity that has the ReadMetadata and WriteMemberMetadata permissions on the target folder (SAS Folders/System/Secured Libraries).
      Note: The preceding code does not explicitly supply connection information for the metadata server. This example assumes that your SAS session already knows how to connect to the target metadata server.
    • After the code runs, each table in your test library is represented in the metadata as a new secured table object (a child of the new secured library object). The following image depicts the new objects in SAS Management Console.
      new secured library and table objects
  3. If you want to support access from clients that use metadata to locate data, register the library and tables in metadata (using the Data Library Manager plug-in within SAS Management Console).
    Tip
    Permissions on a traditional library or table object can further limit access. For example, a user who reads data through the META LIBNAME engine (MLE) must have permissions on both the traditional table object (the ReadMetadata and Read permissions) and the secured table object (the ReadMetadata and Select permissions).

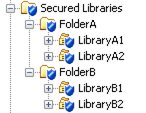
Set Up Mutually Exclusive Access

To establish several distinct levels of access, set up a metadata folder structure with appropriate permissions. Each secured library object inherits permissions from its metadata folder. Each secured table object inherits permissions from its parent secured library object.
The following example demonstrates one way to set up mutually exclusive access for two user groups (GroupA and GroupB) to four libraries (LibraryA1, LibraryA2, LibraryB1, and LibraryB2). The example assumes that the following prerequisites are met:
  • GroupA and GroupB exist in the SAS metadata.
  • The data exists in the host, and each physical library has been assigned a libref (liba1, liba2, libb1, and libb2) in your SAS session.
  • You have a host account that has host-layer access to the data.
  • Your SAS session knows how to connect to the metadata server using an account that has the ReadMetadata and WriteMemberMetadata permissions on the folder within which you will add the secured data folders (SAS Folders/System/Secured Libraries).
Here are the implementation steps:
  1. On the Folders tab in SAS Management Console, beneath SAS Folders/System/Secured Libraries, create two sibling secured data folders named FolderA and FolderB.
    Folders A and B
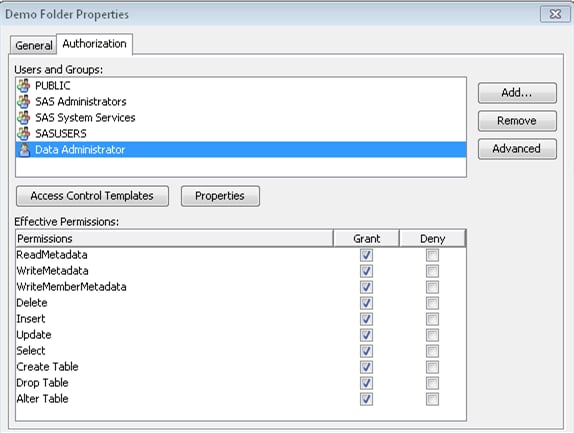
  2. Constrain access at the Secured Libraries folder. One way to do this is to explicitly deny all permissions to the PUBLIC group and explicitly grant all permissions to the SAS Administrators group. These protections flow throughout the Secured Libraries branch, except where modified by additional direct access controls.
  3. Expand access to the new folders as follows:
    Folder
    Metadata Group
    Explicit Grants1
    FolderA
    GroupA
    ReadMetadata and Select
    FolderB
    GroupB
    ReadMetadata and Select
    1For conciseness, this example uses individual explicit controls (instead of ACTs) and provides only Read access (the Select permission). These settings don’t allow members of GroupA and GroupB to update or delete data.
    Tip
    To add GroupA and GroupB to the Authorization tab, click the Add button next to the Users and Groups list box. In SAS Management Console, an explicit setting has a white background color (not gray or green).
  4. To bind the physical data to metadata, submit SAS code. Be sure to specify FolderA as the metadata location for the first two libraries, and FolderB as the metadata location for the last two libraries.
    proc authlib;
       create
          library=liba1
          securedfolder='FolderA'
          securedlibrary='LibraryA1'
          pw=secret;
       create
          library=liba2
          securedfolder='FolderA'
          securedlibrary='LibraryA2'
          pw=secret;
       create
          library=libb1
          securedfolder='FolderB'
          securedlibrary='LibraryB1'
          pw=secret2;
       create
          library=libb2
          securedfolder='FolderB'
          securedlibrary='LibraryB2'
          pw=secret2;
    run;
    Tip
    In the SECUREDFOLDER= option, if you supply a path that does not begin with a slash (/), the path is calculated relative to /System/Secured Libraries/.
  5. In SAS Management Console, examine the contents of FolderA and FolderB.
    contents of FolderA and FolderB
    Tip
    If the new secured library objects are not immediately visible, right-click the Secured Libraries folder and select Refresh from the popup menu. The new secured table objects are visible in the right panel when their respective secured library object is selected in the folder tree.
    Examine the Authorization tab of several of the new objects to verify that metadata-layer access is as expected.
  6. If you want to provide access through clients that use metadata to locate data, register the library and tables in metadata. For example, if the data is accessed from SAS Web Report Studio, you might register it beneath the Shared Data folder.
  7. Test access from various clients. Behavior should be as follows:
    • A user who is unrestricted should have access to all of the tables.
    • A user who is a direct or indirect member of both GroupA and GroupB should have access to all of the tables.
    • A restricted user who is a member of only GroupA or only GroupB should have access to only the data beneath FolderA or FolderB.
    • A restricted user who is not GroupA, GroupB, or the SAS Administrators group should not have access to any of the data.

Set Up Fine-Grained Access

Overview

To provide access to some but not all of the data within a physical table, use the following approach:
  1. If the physical table and its parent library are not already bound to metadata, use the AUTHLIB procedure and metadata-layer permissions to protect them.
  2. Create a view that excludes the rows or columns that you want to hide.
  3. Apply the password of the underlying physical table to the view.
  4. Set metadata-layer permissions to control who can access the view.

Column-Level Access

In this example, partial access to a customer data table is provided by creating a view and managing access to it. The view keeps the name and telephone number columns from the underlying table, but excludes the credit card number column.
options metauser="sasadm@saspw" metapass="********"
   metaserver="machine.company.com";

libname cust 'path';

proc authlib library=cust;
   create
      securedlibrary='cust'
      securedfolder='CustomerData'
      pw=secret;
quit;

proc sql; 
   create view cust.PUBLIC as
      select Name, Phone
      from PRIVATE(pw=secret);
quit;
The preceding code creates a new secured library object (CustomerData) that contains two objects: a table object (called PRIVATE) and a view object (called PUBLIC).
Note: The password that is supplied to bind the library is also supplied when the PUBLIC view is defined against the PRIVATE table. In order to create a view of a metadata-bound table, you must know the password of that physical table’s parent library, and provide that password in the view definition. You can enable end users to access the view without giving them access to the underlying table. In effect, this provides selective access to the columns and rows within the underlying table.
Note: If you modify the password for the metadata-bound library, you must also update the view definition with the new password.
Note: This example also demonstrates how you can explicitly provide metadata server connection information in an OPTIONS statement.
To complete the protection, use SAS Management Console to set metadata-layer permissions so that restricted users can access the PUBLIC view but not the PRIVATE table. For example, if only unrestricted users should access the PRIVATE table, you might use the following approach:
  • On the Authorization tab for the CustomerData folder, verify that the PUBLIC group is denied the ReadMetadata, WriteMetadata, WriteMemberMetadata, and Select permissions. Verify that the PRIVATE table inherits these denials.
  • On the Authorization tab for the PUBLIC view object, explicitly grant the ReadMetadata and Select permissions to SASUSERS.

Identity-Driven, Row-Level Access

In this example, partial access to an employee information table (HR.EMPINFO) is provided by creating a view (HR.PERSONAL) that dynamically filters rows in the underlying table. The filtering is based on each requesting user’s authenticated user ID. The filtering relies on a security associations table, which maps each user’s authenticated user ID to a corresponding employee ID.
The following code creates the identity-driven view of the employee information table. When requesting users access the view, they retrieve only those rows that match the user ID with which they authenticated to the metadata server.
proc sql; 
   create view hr.personal as
      select a.*
      from hr.empinfo(pw=secret) a,
           hr.security(where=(loginid=_METADATA_AUTHENTICATED_USERID_)) b
      where b.loginid ne '' and a.empid = b.empid;
quit;
Here are some details about the preceding code:
  • The code assumes that the HR libref is already established and points to a metadata-bound library that has a single password value of secret.
  • The reference to the EMPINFO table must supply the password (secret) in order to create the view, because the table is bound to metadata.
  • SECURITY is a security associations table that maps all valid _METADATA_AUTHENTICATED_USERID_ values to the primary key of the target table (the EMPID column in the EMPINFO table).
    Note: As an alternative to creating a separate security associations table, you could directly add a column of _METADATA_AUTHENTICATED_USERID_ values to your target table.
  • _METADATA_AUTHENTICATED_USERID_ is a substitution parameter that supplies a user-specific value in each request, based on the user ID with which the requesting user authenticated to the metadata server.
  • The _METADATA_AUTHENTICATED_USERID_ substitution parameter is used in a WHERE clause that is expressed as a data set option.
If you want to provide broader access to certain users (for example, to enable department managers to see information about their employees), you can enhance the SECURITY table to include a column that maps employees to departments, create an additional view that exploits that mapping, and set metadata-layer permissions so that only department managers can use the new view.

See Also

Chapter 27, “SAS Views,” in SAS Language Reference: Concepts
“Connection Options ” in Chapter 5 of SAS Language Interfaces to Metadata