The PM Procedure

This section describes some of the typical features of the PM window’s graphical user interface. The PM window provides both a Gantt View and a Table View of the project. The size of each view can be changed by pointing to the dividing line between the two views until the pointer changes to a double arrow and then dragging it to the right or left.
Only part of the project may be visible in the PM window; horizontal and vertical scroll bars enable you to scroll the project data in both directions. Note that the Gantt and the Table Views are attached to each other so that they scroll together vertically. Each view can be scrolled horizontally, independently of the other.
The menu associated with the PM window provides access to several project management functions under the Edit, View, and Project menus. For example, the Project menu is shown in Figure 5.3. The commands available through the menus are described in detail in the appropriate sections.

In addition to the drop-down menus, context-sensitive pop-up menus are available in the Table and Gantt Views, the time axis, along the arcs, and from select columns in the Table View. You open a pop-up menu by right-clicking on a particular object. For example, right-clicking on an arc in the Gantt View displays the arc pop-up menu shown in Figure 5.4.

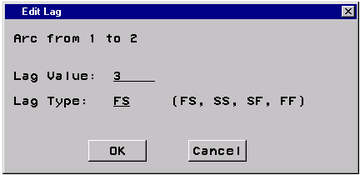
In some situations, the pop-up menu selection can lead to a dialog box that requires you to type a value in one or more of the fields in the box. For example, selecting from the arc pop-up menu leads to the dialog box displayed in Figure 5.5. (See Create Nonstandard Precedence Relationships for a discussion of nonstandard precedence constraints.)
The Table View displays project data in a tabular format. Some of the columns are editable (white background) while other columns, which are computed by the procedure, are not editable (gray background). The Gantt View always displays the early start schedule of the project. In addition, it also displays the resource-constrained schedule (if resources are present), the actual schedule (if the project has started and is in progress), and the baseline schedule (if a baseline schedule is saved for the project). The display of all the schedule bars (except the Early Schedule bar) can be toggled on or off using the pop-up menu from the Gantt View.
Note that each row of the combined Table View and Gantt View represents one activity (also referred to as task in this chapter). Any change in data or movement of a row in one view is also reflected in the other.
In addition to the drop-down and pop-up menu actions, several drag-and-drop actions are available within the PM window. You can move the columns and rows of the Table View by selecting a row or column and dragging it to the desired position. You can also change the width of the columns by dragging the column dividers in the Table header region.
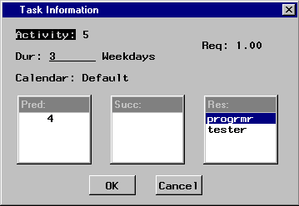
You can manipulate the durations of the tasks using the Task Information dialog box (see Figure 5.6) by right-clicking on the bar shown in the Gantt View or by changing the length of the Early Schedule bar in the Gantt View. You can also move the task in time by dragging the Early Schedule bar to a new position. This affects the Target Date for the associated task.
Any of the preceding actions may result in a change to the project schedule that is immediately reflected in the Table and Gantt Views. All editing abilities and the corresponding changes to the schedule are described in detail in the following sections.