The PM Procedure

| Table View |
The Table View displays information about a project in tabular form. It displays activities along with their descriptions, various activity schedules, resource requirements, calendars, and target dates. The hierarchical information about an activity is provided in the Job Nbr. column by a number of small square boxes to the left of the activity number. The number of square boxes corresponds to the level of the activity in the project hierarchy. Empty boxes indicate that the activity does not have any subtasks (it is a leaf activity), while filled boxes indicate that the activity is a supertask. Some columns in the Table View are editable while others are write-protected. The editable columns are lighter in color than the noneditable ones. In general, you can type into all columns that provide input to the project, while all other columns that contain output values from PROC PM are write-protected. For example, in Figure 5.2, the WBS Code column cannot be edited, while the activity and Duration columns can be edited.
In the Table View, you can add or delete activities, add subtasks, change the order of the columns or the activities, edit activity information, and so on. These tasks are described in the following sections.
Add/Copy/Delete Tasks
Right-clicking any task in the Table View displays the pop-up menu shown in Figure 5.8. From this pop-up menu, you can Add/Copy/Delete the selected task. If you select the Add Task menu item, the new task is added immediately following the selected task. You can also add a subtask to the selected task by selecting the Add Subtask menu item. If you select the Copy Task menu item, a copy of the selected task is added to the bottom of the Table View. The new task has the same duration and calendar as the selected task. If the selected task is a supertask, all its subtasks (and any internal precedence constraints) are also copied.

Change Column Width
The width of a column in the Table View can be increased or decreased by dragging (with the left mouse button) the column dividers in the Table Header region of the Table View. When the pointer is positioned on the column divider, it changes to a double arrow. Dragging it to the right or left increases or decreases the width of the column.
Change the Order of the Columns
The display order of columns in the Table View can be changed in several ways:
Drag the column in the header row to the destination.
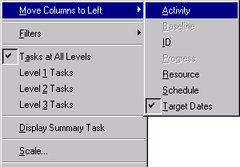
Select View from the menu and then select Move Columns to Left (see Figure 5.9). Choosing any of the available options moves the corresponding columns to the leftmost portion of the Table View.
Edit Durations
To change the duration of an activity, edit the Duration column in the Table View. Note that changing an activity’s duration to 0 changes the activity into a Milestone. Activity durations can also be changed in the Gantt View.
Edit Alignment Constraints
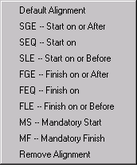
Scroll to columns named Target Date and Target Type. Enter one of the values SGE, SLE, MS, MF, FGE, or FLE in the Target Type column. You can either type the values or select them from the pop-up menu displayed by right-clicking the Target Type column (see Figure 5.10). Enter the appropriate date in the Target Date column. You can also view these columns by selecting View  Move Columns to Left Target Dates from the menu (Figure 5.9). You can also change an activity’s alignment constraints in the Gantt View.
Edit Calendars
To change an activity’s calendar, you can enter the calendar number in the Activity Calendar column or the calendar description in the Calendar Name column. The calendars that can be assigned to an activity are predefined in the Calendar data set. To see a list of the calendars, you can right-click in one of the calendar columns. This will pop up a list of calendars, from which you can select the activity’s calendar. See Figure 5.11 for an example of a calendar pop-up menu with two calendars.

Edit Resource Requirements
You can change the amount of resources required for an activity by editing the Resource columns in the Table View. Changing the resource requirement causes the project to be rescheduled using the new resource specifications. See Edit Resource Requirements for more details.
Edit Progress Information
You can edit the actual start, actual finish, percent complete, or remaining duration for an activity by editing one of the Progress Information columns in the Table View. Note that by changing one of these columns, all the other related progress columns might also be affected. For example, entering 100 in the Percent Complete column for an activity that is in progress updates the Remaining Duration column to 0, and the Actual Finish column is filled in appropriately. You can also modify the progress information of an activity in the Gantt View.
Expand/Collapse Supertasks
Double-clicking on a supertask in the Table View toggles the expand/collapse switch. This action enables you to either view or hide all the subtasks of the supertask.
Hide Tasks
An individual task can be hidden by right-clicking the task in the Table View and selecting Hide from the menu shown in Figure 5.8. Tasks can also be hidden from view using several filters described in the section Setting Activity Filters.