Setting Up a Connection to SAS/SHARE Server
The SAS
ODBC Driver uses a TCP/IP network connection to communicate with a
SAS/SHARE server. Use the instructions in this section to create a
DSN for accessing data on a SAS/SHARE server.
-
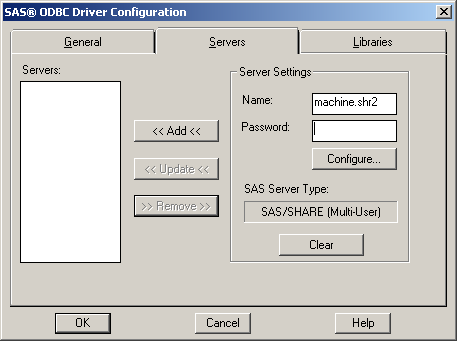
Click the Servers tab. In the Name field, enter a two-part name such as
machine.shr2.SAS/SHARE (Multi-User) -
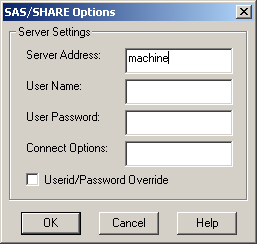
Provide the requested information:is automatically filled with the alias for the TCP/IP network machine name that you specified in the
Namefield of the Servers tab. In a complex networking environment, you might need to provide a fully qualified domain name address for the server (for example,machine.example.com).is your user ID on the system where the server is running. This field is required if the server is running in secured mode. Otherwise, it is ignored.is your password on the system where the server is running. If you provide aUser Namewithout aUser Password, then you are prompted for a password at connection time. The SAS ODBC Driver encrypts the password before storing the encrypted value in the Windows registry.requests that the UID keyword and PWD keyword be used in the ODBC client application. The driver passes the value of the PWD keyword as the user login password, and the value of the UID keyword as the user ID. For more information about using this option, see Userid/Password Override. -
Define a library for each data library that you want to access with this DSN. In addition to the libraries that you define, you have access to any libraries that are predefined on the
SAS/SHARE SAS/SHARE SAS/SHARE enter a name for an existing physical SAS library that you want to access. (If you are familiar with SAS, this field corresponds to the libref in the SAS LIBNAME statement.) The name can be up to eight characters. The first character must be a letter or an underscore. Subsequent characters can be letters, numeric digits, or underscores. Blank spaces and special characters are not allowed. For example, you might use the namecostto designate a library of cost accounting data. The SAS library can include SAS data files, SAS data views, or both.For more information, see Defining Libraries at Server Start-Up Time.enter the physical name of the library. This must be a valid pathname for the machine that is hosting theSAS/SHARE server. For example,e:\data \\acctsrv\customers provide a description of the library to remind yourself or other users what the library contains. Providing this value is optional.enter the name of the SAS engine that is required for writing to and reading from this library. This setting is necessary only if you do not want to use theV9engine that is the default for SAS 9.2. For information about other engines that might be available, see the description of the LIBNAME statement in the SAS Companion for Windows. Providing this value is optional. -
Provide a name in the Data Source Name field. Use the Server menu to select the correct server for the DSN. For more information about SQL options, see SQL Options on the General Tab.
Some SAS/SHARE
administrators start the server with syntax that specifies a network
port rather than syntax that specifies a service name. The syntax
is similar to the following example, where a SAS/SHARE server is started
on network port 8551:
This syntax
removes the requirement of editing the TCP/IP services file on the
machine that is hosting the SAS/SHARE server. However, on the client
machine, using the SAS ODBC Driver in this environment requires special
syntax for the server name on the Servers tab. You must specify the two-part name, such as
machine.__8551. On the client machine, create an entry in the TCP/IP services file
that is similar to the following:
Contact
your SAS/SHARE administrator for the network port to use. For more
information about creating entries, see TCP/IP Services File.

