Organize the Model Hierarchy

In this exercise, you create an organizational folder, a project, and a version for the modeling project.

Create a Folder

To provide an organizational folder to manage your modeling projects:
  1. Right-click the MMRoot node in the Project Tree and select New Folder. The New Folder dialog box appears.
  2. Specify the following folder properties and click OK.
    Name
    enter Tutorial6.
    Description
    enter an optional folder description. For example, enter Basel II Reports Tutorial.
The new folder appears in the Project Tree.

Create a New Project

To create a project that is associated with the classification model function:
  1. Right-click the Tutorial6 folder and select Newthen selectProject. The New Project Wizard appears.
  2. Specify the following project properties and click Next:
    Name
    enter PD for the project name.
    Description
    enter an optional description.
    Model Function
    select Classification.
  3. In Step 2 of the New Project Wizard, specify the project variables:
    1. Click the Import Variables button for the Project Input Variables table. Double-click Shared Datathen selectModel Managerthen selectTutorial6then selectPD. Select HMEQ_PROJECT_INPUT and click OK.
    2. For the PD classification project, click the Import Variables button for the Project Output Variables table. Select HMEQ_PROJECT_OUTPUT and click OK.
    3. Click Finish.
  4. Examine the Tutorial6 folder to verify that it contains the project.
To create a project that is associated with the prediction model function:
  1. Right-click the Tutorial6 folder and select Newthen selectProject. The New Project Wizard appears.
  2. Specify the following project properties and click Next.
    Name
    enter LGD-Interval for the project name.
    Description
    enter an optional description.
    Model Function
    select Prediction.
  3. In Step 2 of the New Project Wizard, specify the project variables:
    1. Click the Import Variables button for the Project Input Variables table. Double-click Shared Datathen selectModel Managerthen selectTutorial6then selectLGD. Select LGD_PROJ_INPUT and click OK.
    2. Click the Import Variables button for the Project Output Variables table. Double-click Shared Datathen selectModel Managerthen selectTutorial6then selectLGD. Select LGD_PROJ_OUTPUT and click OK.
    3. Click Finish.
  4. Examine the Tutorial6 folder to verify that it contains the project.

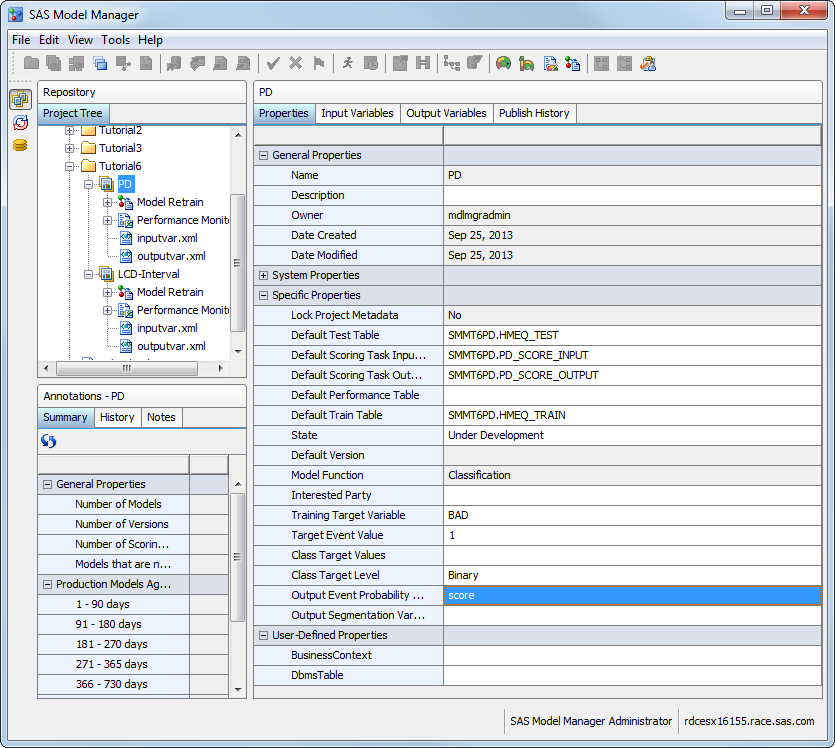
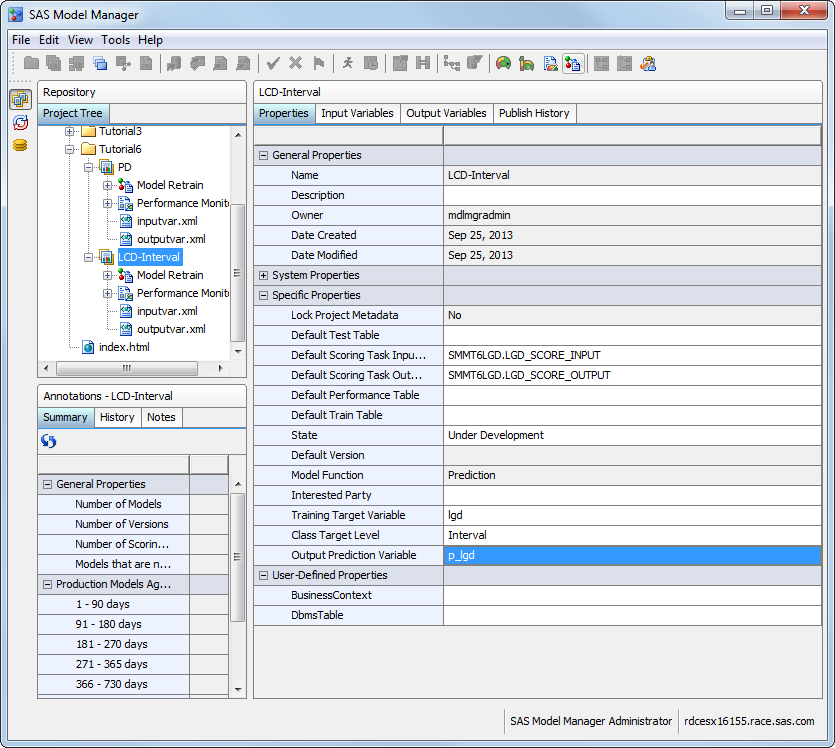
Define the Project Properties

To define the properties that SAS Model Manager uses to create reports and score models:
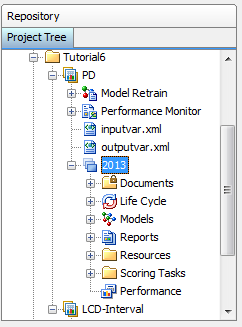
  1. Select the PD project in the Tutorial6 folder and expand Specific Properties in the right pane.
    Specify the default data tables and model variables for the PD project:
    Default Test Table
    select HMEQ_TEST.
    Default Scoring Task Input Table
    select PD_SCORE_INPUT.
    Default Scoring Task Output Table
    select PD_SCORE_OUTPUT.
    Default Train Table
    select HMEQ_TRAIN.
    Training Target Variable
    enter BAD for the PD project that has a model function type of classification.
    Target Event Value
    enter 1 for the PD project that has a model function type of classification.
    Class Target Level
    select Binary for the PD project that has a model function type of classification.
    Output Event Probability Variable
    select score for the PD project that has a model function type of classification.
    Here is an example of the PD project properties:
    Project tree display the PD project properties
  2. Select the LGD-Interval project in the Tutorial6 folder and expand Specific Properties in the right pane.
    Specify the default data tables and model variables for the LGD-Interval project:
    Default Scoring Task Input Table
    select LGD_SCORE_INPUT.
    Default Scoring Task Output Table
    select LGD_SCORE_OUTPUT.
    Training Target Variable
    enter lgd for the LGD-Interval project that has a model function type of prediction.
    Class Target Level
    select Interval for the LGD-Interval project that has a model function type of prediction.
    Output Prediction Variable
    select p_lgd for the LGD-Interval project that has a model function type of prediction.
    Here is an example of the LGD-Interval project properties:
    Project tree display the LGD project properties

Create a Version

Create a version for each project. The version folder contains life cycle information, auxiliary version documents, candidate model files, reports, resource files, scoring tasks, and model performance reports.
To create a new version:
  1. Right-click the PD project and select Newthen selectVersion. The New Version dialog box appears.
  2. Specify the following version properties and click OK.
    Name
    enter 2013.
    Life Cycle Template
    select the user-defined template Tutorial Life Cycle that you created in the first tutorial. For more information, see Create a Life Cycle Template.
    Note: If you are using a workflow process to track the progress of your version, you can select any life cycle template. You can then skip all tasks to update the life cycle.
  3. Examine the PD project to verify that it contains one version called 2013. Select Life Cycle. Verify that the Name property is Tutorial Life Cycle.
    Expanded 2013 version folder for PD project
  4. Repeat steps 1 through 3 for the LGD-Interval project.
Note: To use a workflow process to track the progress of your version, send a request to a SAS Model Manager administrator to create a workflow to use for the tutorials. Include the name and UUID of the version with which you want the workflow to be associated.