Create a Life Cycle Template

In this exercise, you use the SAS Model Manager Template Editor to create a user-defined life cycle template from a sample template. SAS Model Manager provides sample templates that you can use to start your user-defined template. This tutorial uses the Basic.xml template.

Start SAS Model Manager

To run SAS Model Manager, follow these steps:
  1. On your client machine, start the SAS Model Manager client.
  2. Log on to SAS Model Manager as a member of the Model Manager Advanced Users group or Model Manager Administrator Users group.
    SAS Model Manager opening dialog box

Create a New Life Cycle Template

This task uses the Basic.xml sample template that is provided by SAS Model Manager and modifies it to create a new life cycle template.
  1. Open the SAS Model Manager Template Editor (Template Editor). Select Toolsthen selectManage Templates in the SAS Model Manager window.
  2. In the Template Editor, open the Basic.xml sample life cycle template. Select Filethen selectBrowsethen selectBrowse Templatesthen selectBasic.xml and click Open.
  3. Modify the template properties. Specify the following properties:
    Name
    Replace the name with Tutorial Life Cycle.
    Description
    Replace the description with A life cycle for the tutorial.
    Version
    Replace the existing value with 1.
  4. Save the template to your local computer by selecting Filethen selectSave As. In the Save dialog box, select the location on your local computer. Enter TutorialLifeCycle.xml as the filename and click Save.
  5. Using a text editor, open the life cycle template XML file that you just saved. If the version attribute on the <LifeCycleTemplate> element does not have a value of
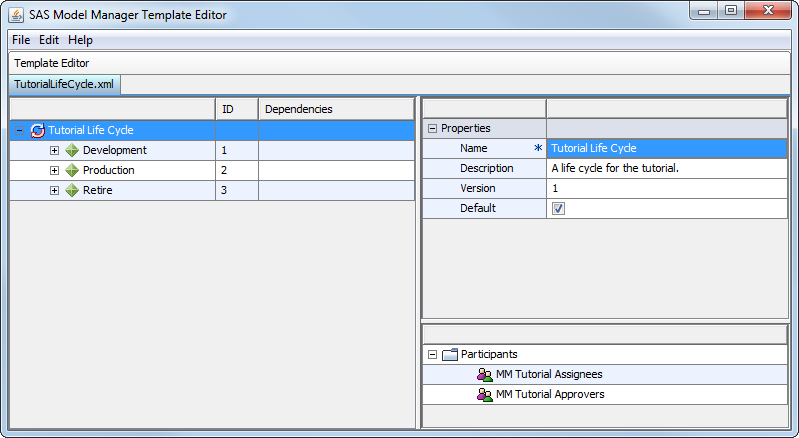
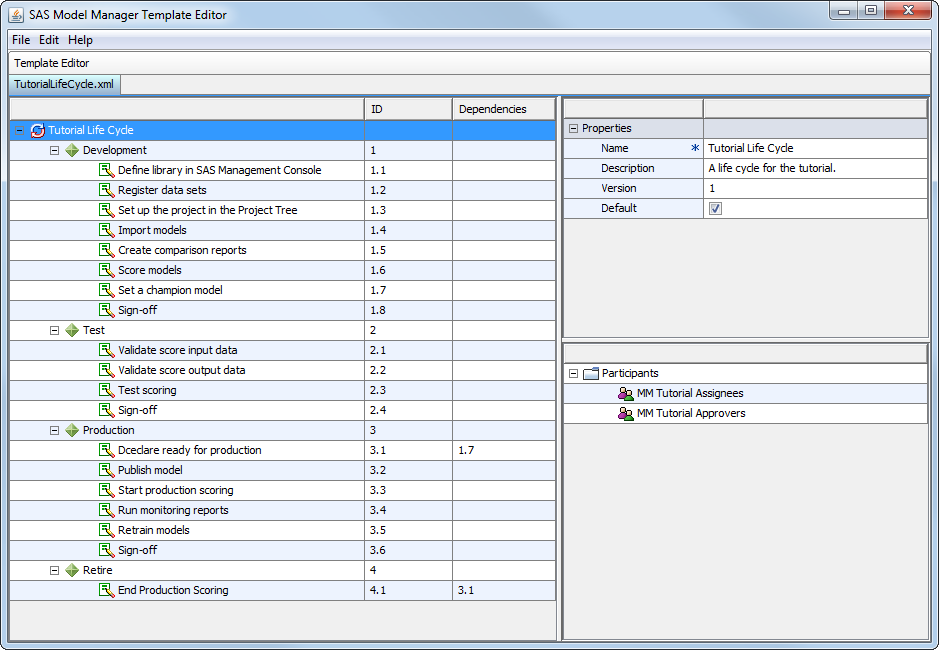
 1 enclosed in quotation marks, replace the value with the value 1 enclosed in quotation marks. Here is the <LifeCycleTemplate> element:
    <LifecycleTemplate name="Tutorial Life Cycle" 
       description="A life cycle for the tutorial" version="1" 
       isDefault="True">
    Rename the mdlmgrexampleassignees and mdlmgrexampleapprovers participants to MM Tutorial Assignees and MM Tutorial Approvers. The participants are enclosed in <Participants> </Participants> tags. Here are the final participants in the XML file:
    <Participants>
       <Participant id="1" name="MM Tutorial Assignees"></Participant>
       <Participant id="2" name="MM Tutorial Approvers"></Participant>
    </Participants>
    Save the file.
  6. In the SAS Model Manager Template Editor, select Filethen selectOpen. In the Open dialog box, select the template and click OK. The Participants list displays only MM Tutorial Assignees and MM Tutorial Approvers.
    Create a Life Cycle Template
Note: After the correct participants have been added to the template, it is not necessary to save the template to a local computer. You can upload the template from the SAS Model Manager Template Editor. This tutorial saves the template periodically to a local computer to create a backup of the template.

Add a Milestone to the User-defined Template

This exercise adds the milestone Test to the life cycle template.
  1. Right-click Tutorial Life Cycle and select New Milestone. In the New Milestone window, complete the Name and Type fields and click OK.
    Name
    enter Test.
    Type
    click the Type box and select Test.
    After you click OK, the Test milestone has an ID of 4.
  2. Right-click Test and select Move Up. Move the Test milestone once more, which places it after Development. It now has an ID of 2.
  3. Select Filethen selectSave to save the template. Click OK when the Warning dialog box appears.
Here is the template at the end of this exercise:
The life cycle template after adding milestones

Add Tasks to the Life Cycle Template Milestones

This exercise adds tasks to each milestone.
  1. Add tasks to the Development milestone.
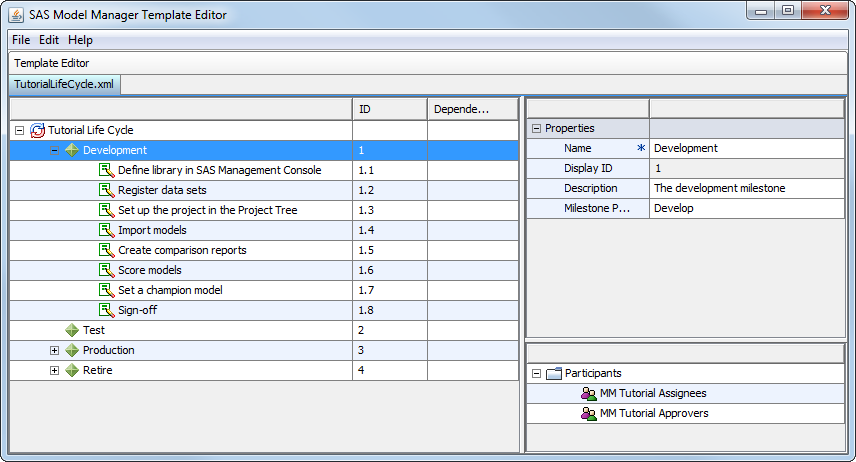
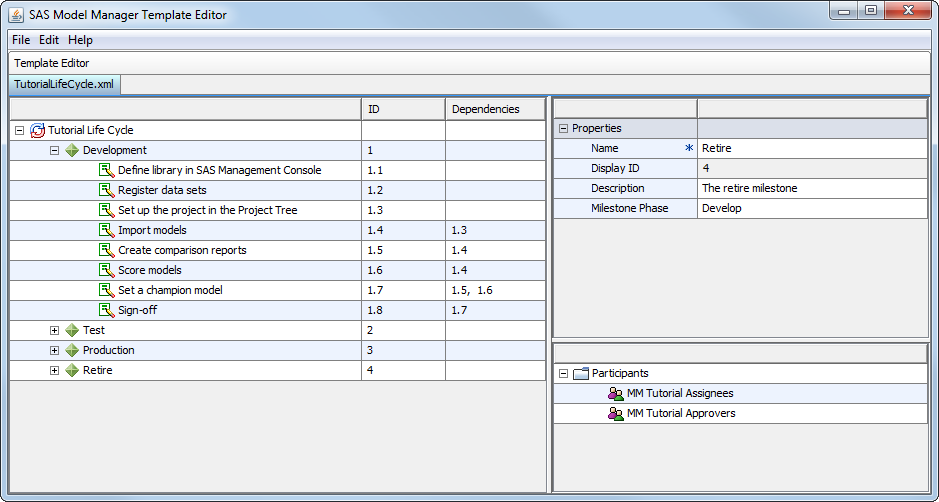
    For each task, right-click the Development milestone and select New Task. In the New Task window, complete the Name field and Type field using the following table. Click OK. The task names are descriptive. Therefore, a description is not necessary.
    Task Name
    Task Type
    Define library in SAS Management Console
    User-defined
    Register data sets
    User-defined
    Set up the project in the Project Tree
    User-defined
    Import models
    User-defined
    Create comparison reports
    User-defined
    Score models
    User-defined
    Sign-off
    Sign-off
    The task Select Champion existed in the Basic.xml sample life cycle template. Rename the task and move it after the Score models task:
    1. In the Name field, change the task name to Set a champion model.
    2. In the Task Type field, change the task type to Set Champion.
    3. Right-click Set a champion model and select Move Down. Repeat this until the task comes after Score models.
    Expand the Development milestone. Each task has an ID in the form milestone.task. The first number in the ID is the milestone ID. The second number in the ID identifies the specific task.
    Here is the template after adding the tasks for the Development milestone:
    The life cycle template with tasks for the Develop milestone
  2. Add tasks to the Test milestone.
    For each task, right-click the Test milestone and select New Task. In the New Task window, complete the Name field and Type field using the following table. Click OK. The task names are descriptive. Therefore, a description is not necessary.
    Task Name
    Task Type
    Validate score input data
    User-defined
    Validate score output data
    User-defined
    Test scoring
    User-defined
    Sign-off
    Sign-off
  3. Add tasks to the Production milestone.
    For each task listed below, right-click the Production milestone and select New Task. In the New Task window, complete the Name field and Type field using the following table. Click OK. The task names are descriptive. Therefore, a description is not necessary.
    Task Name
    Task Type
    Publish model
    User-defined
    Start production scoring
    User-defined
    Run monitoring reports
    User-defined
    Retrain models
    User-defined
    Sign-off
    Sign-off
  4. The Declare Ready For Production task was provided in the Basic.xml sample template. In the Name field, rename the task to Declare ready for production.
  5. Select Filethen selectSave to save the template. Click OK if the Warning dialog box appears.
Here is the template after all milestone tasks have been defined:
The Tutorial Life Cycle Milestones and Tasks

Add Task Dependencies

About Dependencies

Your model development process might require an order to complete some tasks. To each task, you can assign dependencies that indicate that one or more tasks must be completed before another one can be marked complete. You specify dependencies in the Dependencies property for a task.
This exercise assigns dependencies to milestone tasks.

Add Dependencies for the Development Milestone Tasks

  1. Select the Import models task. Click the Dependencies property value field and then click the ellipsis button. Select the box for Set up the project in the Project Tree. Click OK. The Import models task now has a dependency on task 1.3, Set up project in the Project Tree.
  2. Select the Create comparison reports task. Click the Dependencies property and then click the ellipsis button. Select the box for Import models. Click OK. The Create comparison reports task now has a dependency on task 1.4, Import models.
  3. Select the Score models task. Click the Dependencies property and then click the ellipsis button. Select the box for Import models. Click OK. The Score models task now has a dependency on task 1.4, Import models.
  4. Select the Set a champion model task. Click the Dependencies property and then click the ellipsis button. Select the box for Create comparison reports and Score models. Click OK. The Set a champion model task now has a dependency on task 1.5, Create comparison reports and task 1.6, Score models.
  5. Select the Sign-off task. Click the Dependencies property and then click the ellipsis button. Select the box for Set a champion model. Click OK. The Sign-off task now has a dependency on task 1.7, Set a champion model.
  6. Here is the template after the Development milestone task dependencies have been assigned:
    The life cycle template with dependencies for the Development milestone tasks

Add Dependencies for the Test Milestone Tasks

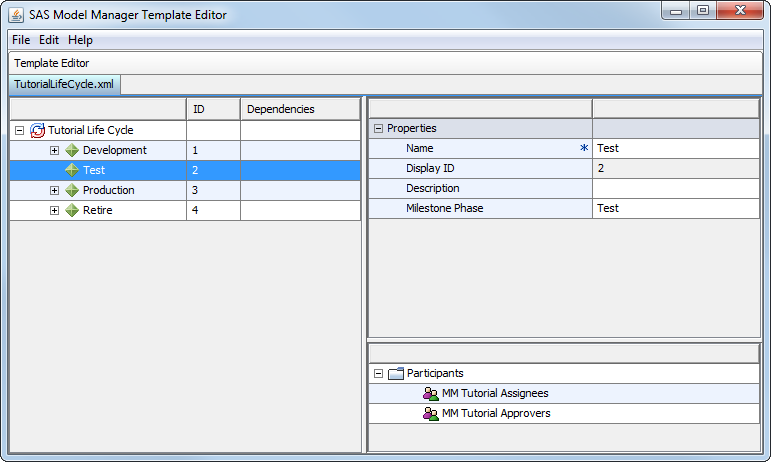
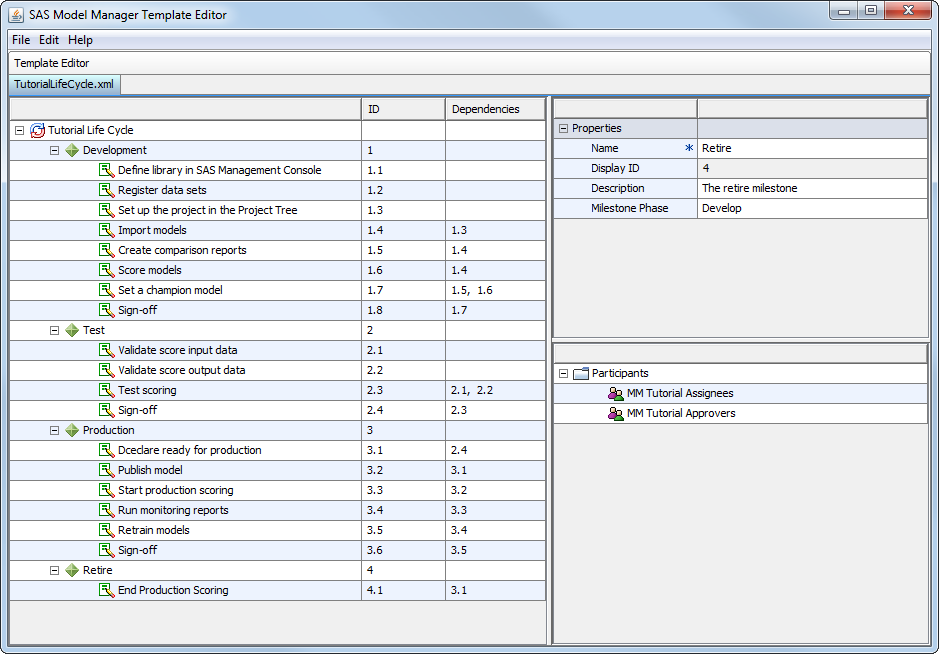
  1. Select the Test scoring task. Click the Dependencies property value field and then click the ellipsis button. Select the box for Validate score input data and Validate score output data. Click OK. The Test scoring task now has a dependency on task 2.1, Validate score input data, and task 2.2, Validate score output data.
  2. Select the Sign-off task. Click the Dependencies property and then click the ellipsis button. Select the box for Test scoring. Click OK. The Sign-off task now has a dependency on task 2.3, Test scoring.

Add Dependencies for the Production Milestone Tasks

  1. Select the Declare ready for production task. Click the Dependencies property value field and then click the ellipsis button. Select the box for Sign-off for ID 2.4. Click OK.
  2. Select the Publish model task. Click the Dependencies property value field and then click the ellipsis button. Select the box for Declare ready for production. Click OK. The Publish model task now has a dependency on task 3.1, Declare ready for production.
  3. Select the Start production scoring task. Click the Dependencies property value field and then click the ellipsis button. Select the box for Publish model. Click OK. The Start production scoring task now has a dependency on task 3.2, Publish model.
  4. Select the Run monitoring reports task. Click the Dependencies property and then click the ellipsis button. Select the box for Start production scoring. Click OK. The Run monitoring reports task now has a dependency on task 3.3, Start production scoring.
  5. Select the Retrain models task. Click the Dependencies property and then click the ellipsis button. Select the box for Run monitoring reports. Click OK. The Retrain models task now has a dependency on task 3.4, Run monitoring reports.
  6. Select the Sign-off task. Click the Dependencies property and then click the ellipsis button. Select the box for Retrain models. Click OK. The Sign-off task now has a dependency on task 3.5, Retrain models.
  7. Here is the template after all dependencies have been assigned:
    The life cycle template after adding task dependencies
  8. To save the template to your local computer, select Filethen selectSave.

Complete Task Properties

Complete the Development Task Properties

In this exercise, you complete the Development task properties.
Select each task and enter property values using the values in the following table.
To assign property values for the Assignees and Approvers properties, click the ellipsis button to open the Select Participants window. Select the box for the assignee or approver and click OK.
Task
Assignees Property
Approvers Property
Weight Property
Duration Property
Define library in SAS Management Console
MM Tutorial Assignees
MM Tutorial Approvers
10
1
Register data sets
MM Tutorial Assignees
MM Tutorial Approvers
10
1
Set up the project in the Project Tree
MM Tutorial Assignees
MM Tutorial Approvers
10
1
Import models
MM Tutorial Assignees
MM Tutorial Approvers
10
1
Create comparison reports
MM Tutorial Assignees
MM Tutorial Approvers
10
2
Score models
MM Tutorial Assignees
MM Tutorial Approvers
10
2
Set a champion model
MM Tutorial Assignees
MM Tutorial Approvers
30
4
Sign-off
MM Tutorial Assignees
MM Tutorial Approvers
10
1
Save the template.

Complete the Test Task Properties

In this exercise, you complete the Test task properties.
Select each task and enter property values using the values in the following table.
To assign property values for the Assignees and Approvers properties, click the ellipsis button to open the Select Participants window. Select the box for the assignee or approver and click OK.
Task
Assignees Property
Approvers Property
Weight Property
Duration Property
Validate score input table
MM Tutorial Assignees
MM Tutorial Approvers
25
1
Validate score output table
MM Tutorial Assignees
MM Tutorial Approvers
25
1
Test scoring
MM Tutorial Assignees
MM Tutorial Approvers
40
5
Sign-off
MM Tutorial Assignees
MM Tutorial Approvers
10
1
Save the template.

Complete the Production Task Properties

In this exercise, you complete the Production task properties.
Select each task and enter property values using the values in the following table.
To assign property values for the Assignees and Approvers properties, click the ellipsis button to open the Select Participants window. Select the box for the assignee or approver and click OK.
Task
Assignees Property
Approvers Property
Weight Property
Duration Property
Declare ready for production
MM Tutorial Assignees
MM Tutorial Approvers
10
1
Publish model
MM Tutorial Assignees
MM Tutorial Approvers
15
1
Start production scoring
MM Tutorial Assignees
MM Tutorial Approvers
20
2
Run monitoring reports
MM Tutorial Assignees
MM Tutorial Approvers
25
1
Retrain models
MM Tutorial Assignees
MM Tutorial Approvers
15
3
Sign-off
MM Tutorial Assignees
MM Tutorial Approvers
15
1
Save the template.