Prepare for Using SAS Workflow

Overview

SAS Workflow provides services that work together to model, automate, integrate, and streamline business processes. It provides a platform for more efficient and productive business solutions.
SAS Workflow is used by SAS solutions that benefit from business process management. SAS Workflow Studio is a desktop client application that is used to design and deploy workflow process definitions. The SAS middle tier hosts the workflow engine and the workflow services as part of the SAS Web Infrastructure Platform. The SAS Model Manager Workflow Console is used to manage the workflow processes that are associated with modeling projects and versions.
From the SAS Model Manager client application, you can view a workflow, create a new workflow for a version, and view your workflow inbox to work with activities, depending on the user permissions. The option that is selected and the user permissions determine the category view and content that are displayed when Workflow Console is launched. SAS Model Manager administrators can view the Workflow Definitions, Workflows, and Activities category views of Workflow Console. SAS Model Manager users and advanced users can view only the Activities category view. For more information about user permissions, see Configuring Users, Groups, and Roles in SAS Model Manager: Administrator's Guide.
To use SAS Workflow with SAS Model Manager tutorials, you must satisfy the following prerequisites:
  1. SAS Workflow Engine, SAS Workflow Services, and SAS Workflow Studio must be installed and configured. For more information, see SAS Intelligence Platform: Installation and Configuration Guide.
  2. If you want to receive the e-mail notifications for a tutorial workflow process, you must configure alert notifications using SAS Management Console. For more information, see Configure Alert Notifications.
  3. Workflow process definitions must be made available using SAS Workflow Studio. For more information, see Make the Workflow Process Definitions Available.

Configure Alert Notifications

About Alert Notifications

To enable workflow participants to receive alert notifications from SAS Workflow when performing the tutorials, you must configure the E-mail notification type in SAS Management Console. After you have configured the alert notifications, you can then use the Notify Participant policy and other workflow notification policies for workflow process activities in SAS Workflow Studio. The notifications setting in SAS Management Console is a global setting. Preferences and notifications can also be configured for individual users.
The Send Notification By Data Object policy in SAS Workflow Studio integrates with the SAS Web Infrastructure Platform's Notification Service. Recipients are notified according to their preferences (e-mail or portlets).

Global Alert Notifications

To enable the e-mail notification type for all users, follow these steps:
  1. Log on to SAS Management Console as a SAS administrator.
  2. On the Plug-ins tab, navigate to Application Managementthen selectConfiguration Managerthen selectSAS Application Infrastructure.
  3. Right-click SAS Application Infrastructure and select Properties.
  4. Click the Settings tab.
  5. Select Notifications in the left panel. Use the menus or text fields to set the property.
  6. Select the E-mail notification type from the Available list and click the right-arrow to add the selected notification type.
  7. Click OK.
  8. To apply this setting and make it available, restart the SAS Web Infrastructure Platform Services and applications that use the changed property, such as SAS Model Manager Workflow Console and SAS Workflow.

Individual User Alert Notifications

You can use SAS Preferences Manager to override the default notification delivery type for your user account. SAS Preferences Manager is a Web application that provides a central facility for users to manage their preferences and settings. The default notification type after the deployment of SAS 9.3 is the alerts portlet.
To modify your notification delivery preference, follow these steps:
Note: For the SAS Model Manager tutorials, you need only the e-mail notification delivery type.
  1. Enter the URL http://host-name:port/SASPreferences in your browser window to launch the SAS Preferences Manager. Replace the values for host-name and port based on the location of the configured SAS Web Infrastructure Platform.
  2. Enter the user ID and password for the user account that you use to access SAS Web applications and SAS Model Manager.
  3. Select General then selectNotifications.
  4. Select a format type for the E-mail notifications. The options are HTML-formatted e-mail and Plain-text e-mail.
  5. Select the notification types from the Available list and click Add Selected Columns to add the selected notification types. The available options are the following:
    • Via e-mail
    • My alerts portlet
    • Via SMS text message
    • Via digested e-mail
    Tip
    To remove a notification type, select the type from the list and click Remove selected items to remove the selected item.
  6. Click Apply to update the notification settings and click OK to save the changes.

Make the Workflow Process Definitions Available

Overview

To use SAS Workflow with tutorials, you must make the process definitions available to SAS Model Manager. After the process definitions are made available, the SAS Model Manager administrator can use Workflow Console to create workflows to be used with SAS Model Manager.
To save the tutorial workflow process definitions to the Workflow repository, follow these steps:
  1. From SAS Workflow Studio, select Filethen selectOpen and navigate to the location where you extracted the tutorial files (for example, C:\SMM121Tutorial\). Open the subfolder Workflow Process Definitions and select the file (for example, MMWorkflowExample1.xml).
    Workflow Studio Process Definition
  2. Log on to the server as a SAS administrator or SAS Model Manager administrator.
  3. Add the tag attribute of mmapi to the process definition file properties.
  4. Repeat steps 1 through 4 for each workflow process definition. There are workflow process definitions for tutorial 2, tutorial 3, tutorial 10 and some additional examples.
  5. Verify that the process definitions appear in the Process Definitions category view of SAS Model Manager Workflow Console.
For more information, see “Deploying and Maintaining Processes” in the SAS Workflow Studio 1.2: User’s Guide available at http://support.sas.com/documentation/onlinedoc/workflow/.

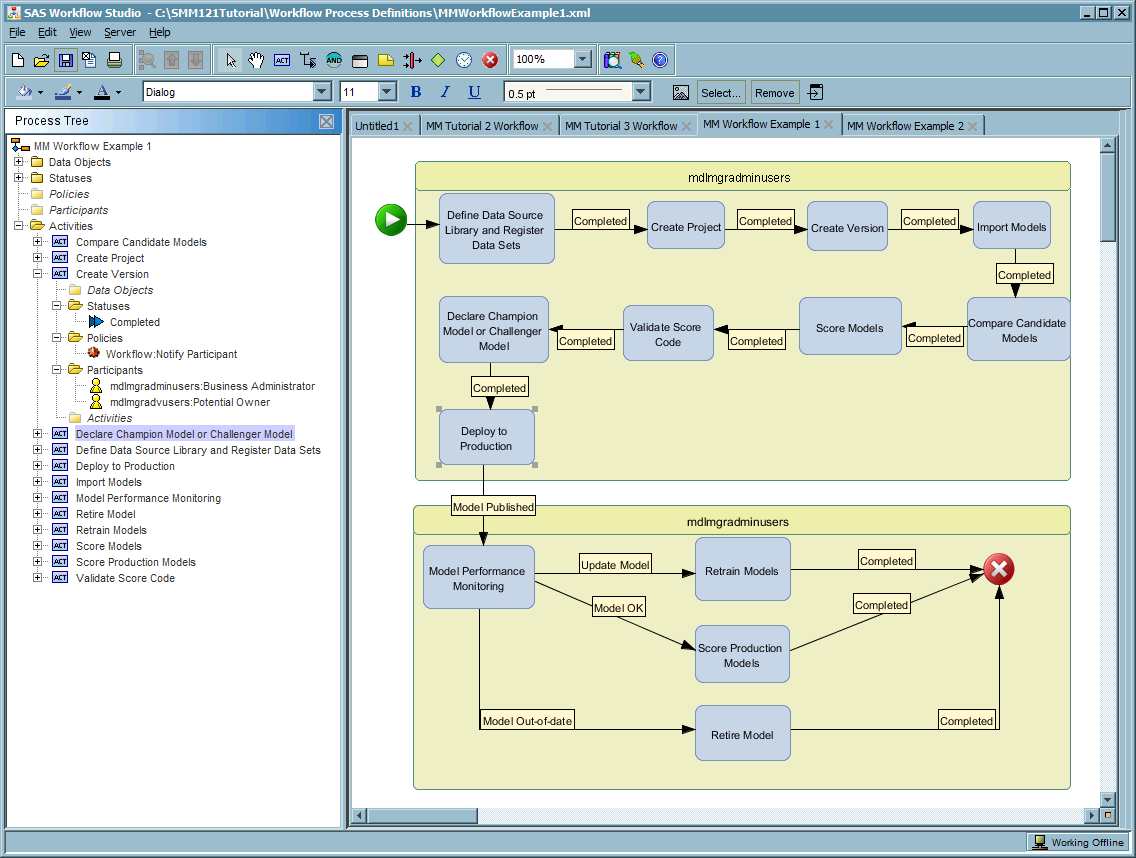
Log On to the Server

With SAS Workflow Studio, you can manage only locally stored workflow templates on your system until you have logged on to the server. After you are connected, you can access additional process templates that are stored in the SAS Content Server.
To log on to the server, follow these steps:
  1. From the Server menu, select Logon.
  2. In the Log On window, select the host-name from the SAS environment drop-down list.
  3. Enter a user ID and password, and click Log On.
Note: The available host parameters are configured in the environments.xml file.
<environment name="localhost" default="false">
   <desc>SAS Environment: localhost</desc>
   <service-registry>
      http://localhost:8080/SASWIPClientAccess/remote/ServiceRegistry
   </service-registry>
   <service-registry interface-type="soap">
      http://localhost:8080/SASWIPSoapServices/services/ServiceRegistry
   </service-registry>
</environment>
For details about this configuration, see SAS Intelligence Platform: Web Application Administration Guide.

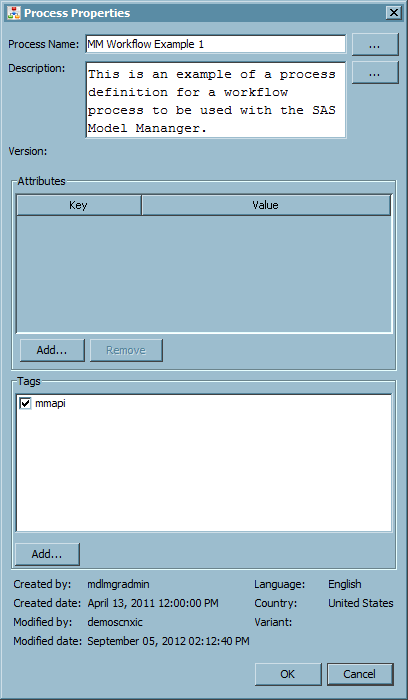
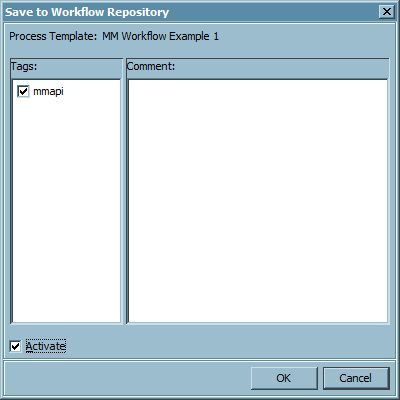
Add Tag Attributes to a Process Definition

Only the process definitions in the Workflow repository that have the mmapi tag attribute that is specified in the file properties are available to SAS Model Manager Workflow Console. The Workflow repository is located on the SAS Content Server.
To add a tag attribute to the file properties of a process definition template in SAS Workflow Studio, follow these steps:
  1. Select Filethen select Properties and click Add.
  2. Enter the tag value of mmapi.
    Note: The file properties are case sensitive. This value must be lowercase.
    Add Tag
  3. Click OK twice.

Upload a Process Definition

To upload a process, follow these steps:
  1. From the Server menu, select the Save to Repository menu option. The Save to Workflow Repository window appears.
  2. (Optional) Enter relevant comments to associate with the process definition.
  3. Select the Activate option if you want to make the current version of the workflow process definition available for use in the Workflow repository by applications, such as SAS Model Manager Workflow Console.
    Save to Workflow Repository
  4. Click OK.

Verify That the Process Definitions Are Available in the Workflow Console

To verify that the workflow process definitions are available in the Workflow Console, follow these steps:
  1. Enter the URL http://host-name:port/SASModelManagerWorkflow in your Web browser.
  2. Enter the user ID and password for a SAS Model Manager administrator.
  3. Verify that the uploaded process definition appears in the Process Definitions category view.
    Process Definitions category view