Converting Reports
About Converting Reports
A primary enhancement of SAS IT Resource Management 3.2
is the incorporation of world-class data management, reporting, and
report distribution capabilities that are available from SAS. In
previous releases, SAS IT Resource Management relied upon a custom
reporting interface to perform the following tasks:
SAS Enterprise Guide
has long been available to SAS IT Resource Management customers as
a reporting tool option, but the primary reporting capability was
the IT Resource Management report macros. Beginning with SAS IT Resource
Management 3.1.1, SAS Enterprise Guide became the primary reporting
tool for the SAS IT Resource Management solution. Legacy report macros
for SAS IT Resource Management are no longer delivered.
This document provides
a guideline for converting reports that are generated by the SAS IT
Resource Management 2.7 reporting tools (the report macros) to new
and enhanced reports using SAS IT Resource Management 3.2 and the
SAS Enterprise Guide reporting tool. Here are some similarities between
reporting with SAS IT Resource Management 2.7 and reporting with SAS
IT Resource Management 3.2 using SAS Enterprise Guide:
However, there are differences
between using the SAS IT Resource Management 2.7 reporting tool and
using SAS Enterprise Guide to generate reports in SAS IT Resource
Management 3.2:
-
The SAS IT Resource Management 2.7 reporting tools performed data manipulation tasks that were sometimes time consuming. Whenever possible, data manipulation tasks are now accomplished while data is staged and aggregated by SAS IT Resource Management. This results in information map data sources that are report ready and can serve as input to SAS Enterprise Guide and SAS Web Report Studio.
SAS Enterprise Guide
supports reporting from report-ready data that is accessible through
information maps. Using information maps is the recommended method
for accessing data in SAS IT Resource Management 3.2.
The following table shows the SAS IT Resource
Management 2.7 macros and the SAS Enterprise Guide tasks that can
be used to generate equivalent reports in SAS IT Resource Management
3.2. Much of the existing functionality that is available through
SAS IT Resource Management 2.7 reporting macros is provided by SAS
Enterprise Guide. The data manipulation capabilities are now handled
by staging and aggregation processes of SAS IT Resource Management.
Global and Individual Report Tasks and Options
About Report Tasks and Options
Global Report Task Options
In SAS Enterprise Guide,
there are a few report task options that can be set for all report
tasks in your project. To set one of these options, select Tools Options from the menu bar. Then, on the left pane of the Options window, select the category of report options
that you want to configure. The following list shows some of the global
options that you can set.
Options from the menu bar. Then, on the left pane of the Options window, select the category of report options
that you want to configure. The following list shows some of the global
options that you can set.
Global Color, Pattern, and Symbol Options Using SAS Templates
In SAS Enterprise Guide,
pattern and symbol options can be set at the individual report task
level. However, you can set these options once for the entire project
using SAS templates and style sheets. Global options can be set using
this method and can still be overridden in an individual report task
for a specific task. To set these global graph options, perform the
following steps:
Reports that do not
have these graph options set for the report task will use the colors,
patterns, and symbols that are set in your SAS template. For details about how to create a custom SAS Template and
style sheet, see About Templates and Style Sheets.
Individual Report Task Options
Top N and Bottom N Reporting
In SAS IT Resource Management
2.7, some report types support the Top N and Bottom N reporting option.
For other report types, using the macro %CPIDTOPN is required.
You can use SAS Enterprise
Guide to report on the top or bottom contributors for a specific column
in SAS IT Resource Management 3.2. To do so, you can use a filter
to select the top or bottom contributors for a specific rank column
that is created when data is aggregated by SAS IT Resource Management.
Information map filters can be defined (using Information Map transformations
in SAS IT Resource Management or using SAS Information Map Studio)
and selected (using the Filter tab of the Information Map window) in SAS Enterprise Guide. Filters
can also be specified within SAS Enterprise Guide Query tasks.
Report Output
In SAS Enterprise Guide, you can generate graph output
to the SAS Enterprise Guide window or to
a local browser. You can specify your preference by selecting Tools Options from the menu bar. You can also generate graph output
by publishing to a Web server or to a file system.
You can use the ITRM
Gallery task to create report definitions that are submitted in report
jobs. The report jobs generate reports in the SAS content server and
are displayed with the Gallery Manager.
You can also use SAS
Management Console to define channels and then select a channel when
publishing from SAS Enterprise Guide. In addition, if you use the
SAS Report format, a report can be published to a repository and SAS
Web Report Studio. For more information about publishing SAS Enterprise
Guide reports, see SAS Enterprise Guide Help.
Print a Report
To print a report from the SAS Enterprise
Guide window select FilePrint or right-click on the SAS Enterprise Guide report window and select Print. You can also use your Web browser print capabilities
to print reports when viewing them from a browser in SAS Enterprise
Guide, SAS Information Delivery Portal, and Gallery Manager.
Stack Columns Task (Reference 1)
The Stack Columns task in SAS Enterprise Guide enables
you to stack your data so that multiple columns of data can become
multiple rows of data. This step is required for recreating certain
charts and plots that are available in SAS IT Resource Management
2.7.
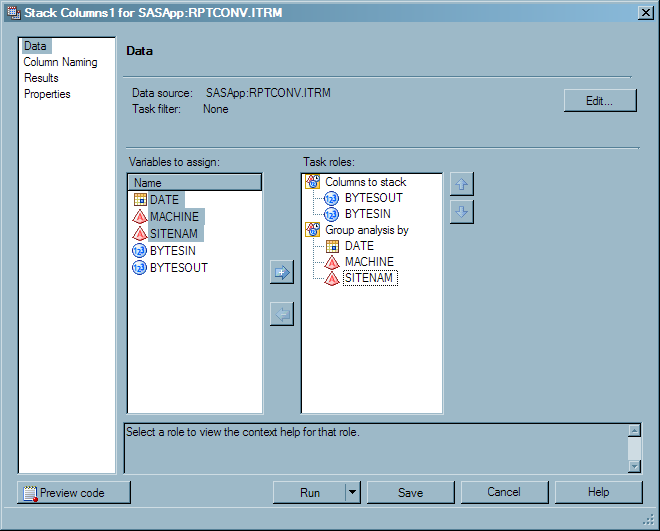
The following example
shows where two analysis variables are stacked. Assign the variables
from the Variables to assign box to the appropriate
role in the Task roles box.
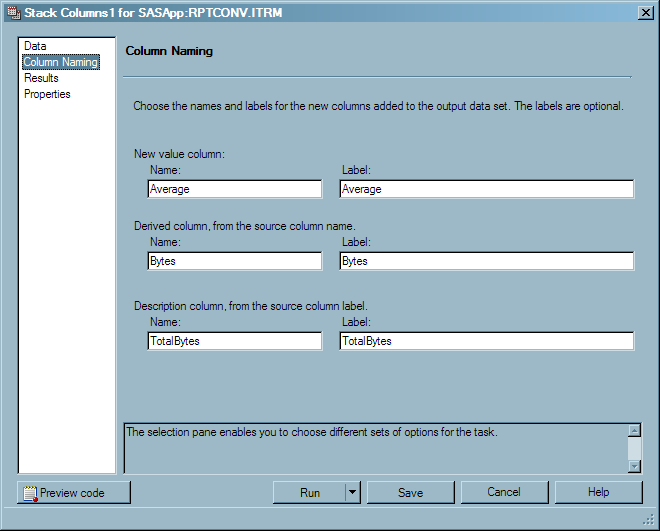
Next, select Column Naming to open the Column Naming window and change the default column names and labels for the new
columns that are created. This step is optional. However, changing
the default column labels is recommended because they are very long
and can cause unexpected errors for some graph types.
Custom User Code to Accumulate Stacked Data (Reference 2)
The Stack Columns task
in SAS Enterprise Guide enables you to reshape your data so that multiple
columns of data can become multiple rows of data. This step is required
for re-creating certain charts and plots that are available in SAS
IT Resource Management 2.7.
However, custom user
code is required if you also want to accumulate the data. This step
is required for re-creating stacked plots that are available in SAS
IT Resource Management 2.7.
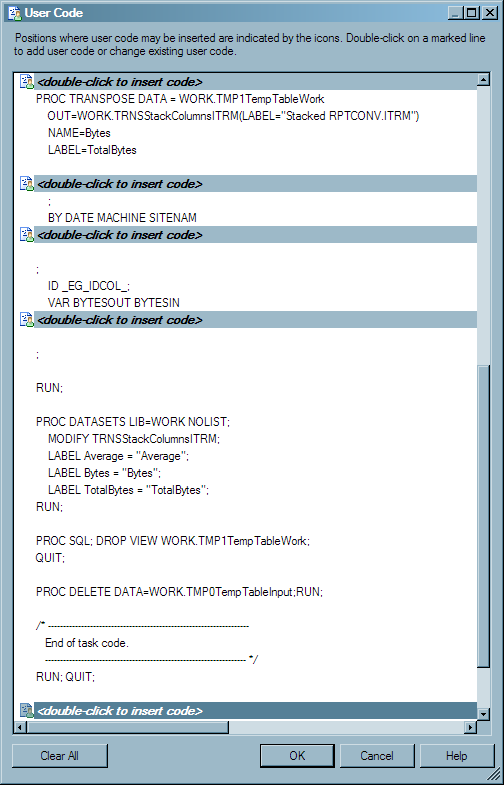
You can add custom user
code to the Stack Columns task by selecting Preview codeInsert Code. Your custom code must follow the RUN statement that
follows the TRANSPOSE procedure code that is generated by SAS Enterprise
Guide.
The following image
shows the User Code window. You can insert
custom user code wherever an “insert code” icon appears.
The “insert code” icon at the bottom of the image shows
where you should insert your custom user code to accumulate your data.
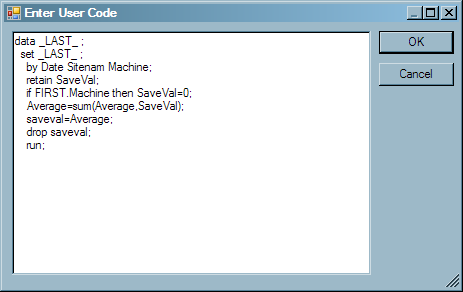
The custom user code
that is required to accumulate your data is a DATA step that accumulates
the output from PROC TRANSPOSE. The next display shows a code fragment
that includes PROC TRANSPOSE and a DATA step for accumulating your
stacked data.
Note that when writing
the DATA step, some information is derived from PROC TRANSPOSE. The
following information is derived from PROC TRANSPOSE:
The following example shows how to accumulate an analysis
variable.
-
The required variable for the FIRST function will be derived from the BY variable list of PROC TRANSPOSE. The variable that is selected determines how your data is accumulated. Use the following rules to determine which variable to select for the FIRST function:
-
If you want to accumulate analysis variables (as shown in Example 16), then select the last BY variable from PROC TRANSPOSE for the FIRST function of your DATA step.
-
If you want to accumulate a class variable (as shown in Example 18), then use the next to last BY variable from PROC TRANSPOSE for the FIRST function of your DATA step.
-