Working with IT Data Marts

Introduction to Working with IT Data Marts

You can create, delete, erase, modify, purge, and rename an IT data mart. For best results, perform these functions from the IT Data Marts view.

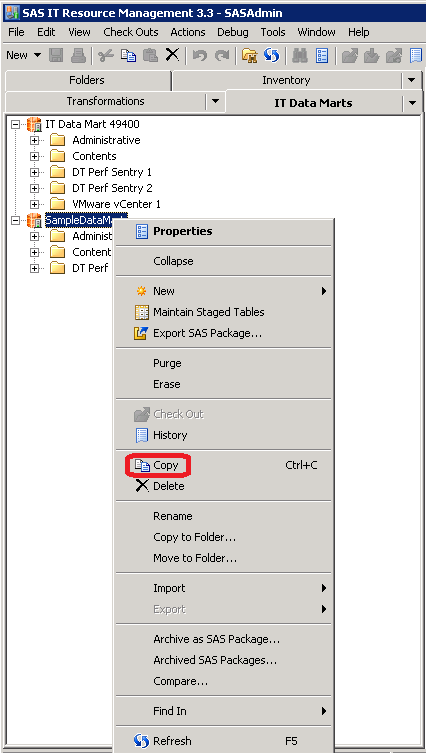
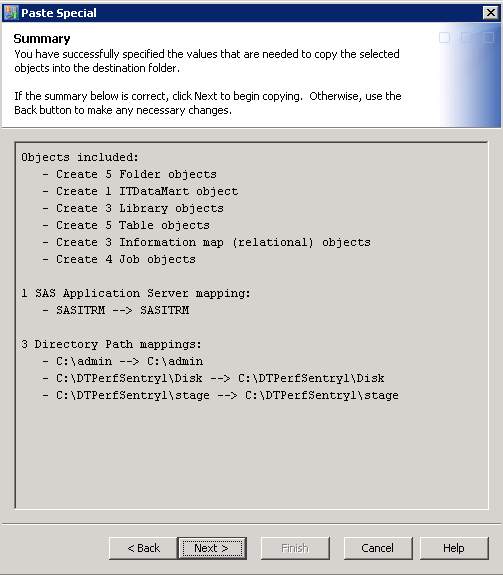
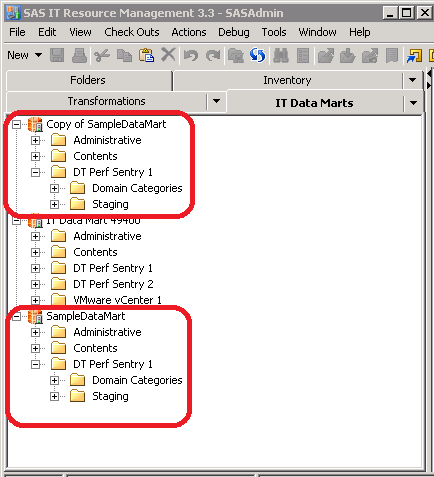
Copy and Paste an IT Data Mart

To copy an IT data mart and then paste it into another location, perform the following steps:
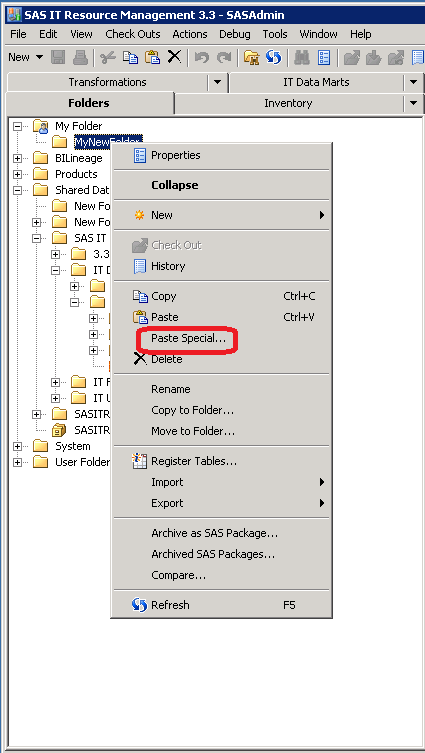
  1. Determine the folder into which you want to paste the IT data mart. If you want to create a new folder for the IT data mart, from the Folders tree, click New. From the drop-down list, select Folder. The New Folder wizard appears. You can retain the default name of the new folder, or you can enter a new name. You can also retain the default location, or you can click Browse to navigate to another location. Select the location that you want to use. Click OK to create the new folder.
    CAUTION:
    Copy IT data marts only into Foundation repositories.
    Copying an IT data mart into a repository that is not Foundation causes processing errors.
  2. Copy the IT data mart.
    To do so, from either the Folders tree or the IT Data Marts tree, right-click the IT data mart that you want to copy and select Copy.
    Property Dialog Box of an IT Data Mart
    Property Dialog Box of an IT Data Mart
  3. Paste the IT data mart into its new location.
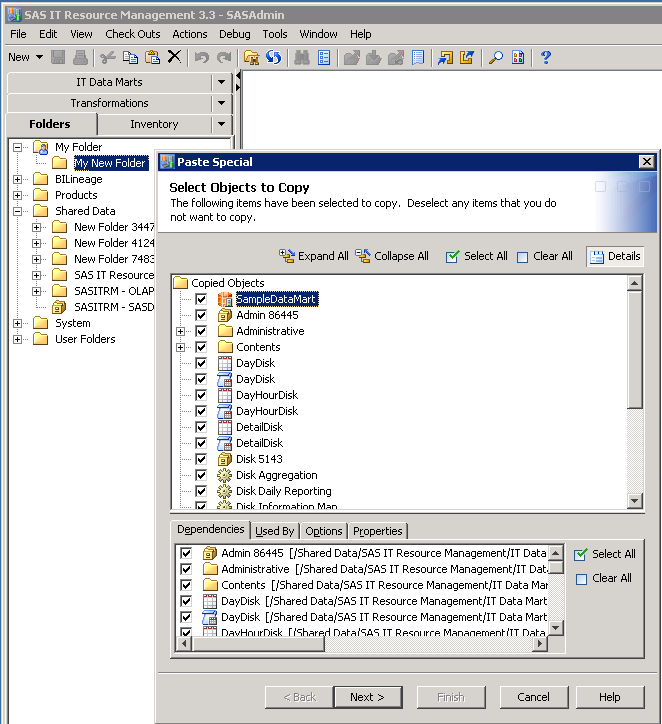
    To do so, in the Folders tree, right-click the folder into which you want to paste the IT data mart. Then select one of the following actions:
    • Select Paste to paste the IT data mart into the selected folder. (The Paste action pastes only the IT data mart itself and a limited number of associated objects, such as the Administrative folder.)
      Then click Finish to create the new IT data mart.
    • If you want to create a new IT data mart that contains other (or all) contents of the IT data mart that you copied, perform the following steps:
      1. In the Folders view, navigate to the folder where you want to copy the IT data mart. Right-click the folder and select Paste Special.
        Paste Special Action of an IT Data Mart
        Paste Special Action of an IT Data Mart
      2. The Paste Special wizard appears. The first page of this wizard prompts you to select the libraries, tables, and other objects that you want to copy.
        First Page of the Paste Special Wizard
        First Page of the Paste Special Wizard
      3. The next page of the wizard describes the changes you might need to make to servers and target directory paths. However, it is more convenient to make such changes by invoking the %RMDMPATH after this wizard has completed.
        About Metadata Connections
        About Metadata Connections
        Click Next two times to skip changing the servers and target directory paths in this wizard.
      4. The next page of the wizard shows a summary of your specifications. If you need to make changes, click Back. Otherwise, click Next to complete the wizard.
        Summary of the Paste Special Wizard Specifications
        Summary of the Paste Special Wizard Specifications
      5. When the Copy Complete page appears, click Finish to create the new IT data mart.
      6. When the Paste Special wizard is finished, the IT Data Marts view shows the original copy and the new copy of the IT data mart that you copied.
        Tip
        You might have to select Viewthen selectRefresh to view the IT data mart that you just copied.
        Copied SampleDataMart
        Copied SampleDataMart
        Many objects might be named “Copy of [previous]” to avoid name duplications. You can rename the IT data mart at this time and you can also rename libraries, table, and other objects.
      7. Run %RMDMPATH to change the paths of the IT data mart and its contents so that they reflect their new locations.

Create an IT Data Mart

To create an IT data mart, perform the following steps:
  1. From the SAS IT Resource Management menu bar, select Newthen selectIT Resource Management. From the list that is displayed, select IT Data Mart. The New IT Data Mart wizard appears.
  2. On the General information page of the wizard, specify the name, description, and location of the IT data mart.
    • The name of the new data mart is required. The Name field can contain a maximum of 60 characters. The wizard does not permit you to enter invalid characters. The name must be unique within its parent folder. For best results, the name should be unique within the metadata server.
    • A value is optional in the Description field. The Description field can contain a maximum of 200 characters.
    • The Location field contains the default location for the IT data mart. A value is required in this field. This location is typically in the Shared Data\SAS IT Resource Management folder of the repository where you are logged on. You can modify this field to specify any location to which you have Write privileges. The wizard does not permit you to enter invalid characters.
      Note: Make sure that the folder where the IT data mart is stored is not the root folder (that is, in the/Users/<userID> folder). If you want to store the IT data mart in the /Users/ folder, make sure that you specify the folder location as /Users/<userID>/MyFolders.
      CAUTION:
      Create IT data marts only in Foundation repositories.
      Creating an IT data mart in a repository other than Foundation causes processing errors.
  3. On the Application server information page, specify the default application server.
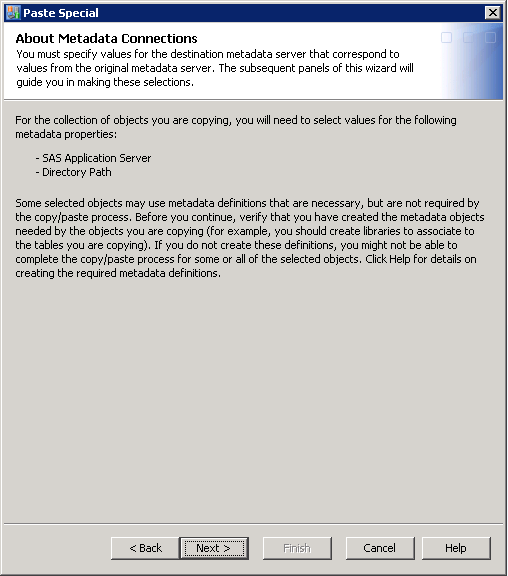
    Application servers store and execute SAS code. The default application server that is specified with this wizard accesses metadata, DBMS tables, and external files on remote hosts so that it can build and support an IT data mart. A value is required in this field.
    Select the default application server from the drop-down list of currently defined SAS Application servers. Then click Test Connection to make sure that you are connected to the server that you specified. If you are not connected at this time, you are prompted to enter your user ID and password in order to access the server.
    Note: Application servers are defined when the SAS IT Resource Management software is installed and configured. Use SAS Management Console to modify this list of available servers.
  4. On the Root path information page, specify the path that will be used for the creation of the physical libraries. The path that you specify should be a fully qualified path; relative paths are not supported. A value is required in this field. You can enter the path in the field. Alternatively, you can click Browse and select a root path from the Select a Directory dialog box that displays the directory structure on your file system. IT data marts with invalid root path will not be created and an error message that explains the problem will be displayed. This physical path is not validated. Make sure that each IT data mart uses a different path. The value for this field cannot contain the single quotation character (').
    Browse is disabled when the selected application server is running on a machine that uses the z/OS operating system. When entering a z/OS path manually, you can use either a prefix for a traditional z/OS filesystem path (MY.DATAMART) or a root directory in the UFS hierarchical file system (/u/myname/datamart).
    Note: The documentation for SAS on z/OS has traditionally used the terms UNIX System Services (USS) and hierarchical file system (HFS) to refer to the UNIX file system on z/OS. The SAS 9.3 documentation uses the terms UNIX file system and UFS to refer to this file system. In addition to the original HFS implementation, the z/OS operating system also provides another UNIX file system known as the z/OS file system (zFS). zFS, which provides certain performance and manageability benefits, is functionally equivalent to HFS from the perspective of a SAS user.
  5. On the Summary page, the wizard displays the specifications that will be used to create the new IT data mart. If they are satisfactory, click Finish to create the new IT data mart.

Delete an IT Data Mart

Deleting an IT data mart removes all the metadata that is associated with the IT data mart. It does not remove the physical tables. To delete an IT data mart and all its contents, perform the following steps:
  1. On the IT Data Marts tree of SAS IT Resource Management, right-click the IT data mart that you want to delete. (Make sure that the jobs that are located in that IT data mart are not open in a Diagram tab of the Job Editor window.)
    Note: You can also access the Delete function from the Folders tree of SAS IT Resource Management. However, performing tasks on the IT data mart from any tree other than the IT Data Marts tree is not recommended because the metadata that is associated with the IT data mart might not be properly updated.
  2. Click Delete . A message box appears that asks you to confirm that you want to delete the objects from the selected IT data marts and all their contents.
  3. To continue with the deletion, click Yes. To cancel the deletion, click No.
CAUTION:
Do not delete an IT data mart from the Folders tree.
If you want to delete an IT data mart, always do so from the IT Data Marts tree.

Erase an IT Data Mart

Erasing an IT data mart deletes all the SAS libraries and their contents from the metadata. It also deletes all empty directories at the root level of the IT data mart. (The Erase action does not delete any directories that have contents.) It also deletes all the metadata that is in the IT data mart. To erase an IT data mart and all its contents, perform the following steps:
  1. On the IT Data Marts tree of SAS IT Resource Management, right-click the IT data mart that you want to delete. (Make sure that the jobs that are located in that IT data mart are not open in a Diagram tab of the Job Editor window.)
    Note: You can also access the Delete function from the Folders tree of SAS IT Resource Management. However, performing tasks on the IT data mart from any tree other than the IT Data Marts tree is not recommended because the metadata that is associated with the IT data mart might not be properly updated.
  2. Click Erase . A message box appears that asks you to confirm that you want to erase the objects from the selected IT data marts and all their contents.
  3. To continue with the deletion, click Yes. To cancel the erase action, click No.

Modify an IT Data Mart

You can modify some of the properties of an IT data mart.
To do so, perform the following steps:
  1. On the IT Data Marts tree of SAS IT Resource Management, right-click the IT data mart that you want to modify. Select Properties. (Make sure that the jobs that are located in that IT data mart are not open in a Diagram tab of the Job Editor window.)
    • Select the General tab to view and modify the Name, Description, and Location fields.
      Note: If you rename an IT data mart to the same name as an existing IT data mart within the same application server, the following message is displayed: “IT Data Mart folder with this name already exists in the selected folder location. Change the name or select a different folder location.”
      CAUTION:
      IT data marts should be located only in Foundation repositories.
      Selecting a repository that is not Foundation causes processing errors.
    • Select the Extended Attributes tab to view and modify the fields on this tab.
      Use the Add and Delete buttons to add and delete fields. In general, you should not change or delete any supplied fields on this tab.
    • Select the Advanced tab to view metadata for the IT data mart. In general, modifying these fields can cause processing errors. However, you can modify the Name and Description fields.
  2. Click OK to save your changes.
Note: If you change anything about a job, you should redeploy all the jobs that are contained in the IT data mart. These changes can include adding or deleting tables or columns, changing the locations of tables, and changing a parameter on a transformation.

Purge the Tables of an IT Data Mart

Purging an IT data mart removes the contents of the tables in that IT data mart. It does not remove the metadata or the physical tables. To purge the tables of an IT data mart, perform the following steps:
  1. On the IT Data Marts tree of SAS IT Resource Management, right-click the IT data mart whose table you want to purge.
  2. From the drop-down menu that displays, click Purge.
  3. Review the list of tables that are displayed in the confirmation dialog box. Click Yes to delete the tables. Otherwise, click No.

Rename an IT Data Mart

Note: If the renaming of the IT data mart includes moving it to another folder, perform the Move to Folder task in the Folders view. Then, perform the renaming task in the IT Data Marts view.
To rename an IT data mart, perform the following steps:
  1. On the IT Data Marts tree of SAS IT Resource Management, right-click the IT data mart that you want to rename. (Make sure that the jobs that are located in that IT data mart are not open in the Diagram tab of the Job Editor window.)
  2. From the drop-down menu, click Rename. The name of the IT data mart is highlighted.
  3. Enter the new name of IT data mart in the highlighted area.
    Note: If you rename an IT data mart to the same name as an existing IT data mart within the same application server, the following message is displayed: “IT Data Mart folder with this name already exists in the selected folder location. Change the name or select a different folder location.”
Alternatively, you can rename the IT data mart by right-clicking the IT data mart and selecting Properties. Select the General tab. Enter the new name of the IT data mart in the Name field. If you rename an IT data mart to the same name as an existing IT data mart, a message is displayed that warns that the new name is already in use for another IT data mart.
Note: In any job, if you have explicitly specified the path to an IT data mart, and you subsequently rename that IT data mart, then you should change the name of the IT data mart in that explicitly specified path. In addition, if you change any other folder name that is used in an explicit path reference, you should ensure that the explicitly specified path uses the changed folder name.
CAUTION:
Redeploy the jobs that are contained in the IT data mart.
Redeploying jobs is necessary because renaming an IT data mart changes the metadata path of anything that is associated with that IT data mart.