Working with Staged Tables
What is a Staged Table?
A staged table contains
data that has been extracted from an input data store by a staging
transformation and has been rendered into a SAS data set that is suitable
for further transformation. The structure and metadata for most staged
tables that SAS IT Resource Management provides are based on corresponding
template tables for specific adapters and domain categories. For more information about template tables, see Working with Template Tables.
The data in a staged
table is accumulated according to rules that are specified by a staging
transformation. The IT performance data resides in the staged table
after the data is refined and loaded into a SAS data set that is ready
for aggregation and reporting. Likewise, the staged table determines
how the data appears after it has completed the staging process.
You can create a staged
table by using the Adapter Setup wizard,
the Staged Table wizard, or a user-written
staging transformation. When a staged table is created, it is associated
with a staging transformation in a staging job and stored in the same
subfolder of the IT Data Marts tree as the staging job by default.
This enables you to keep track of the staged tables and their corresponding
jobs as they are stored together.
Note: If you manually create your
own user-defined tables using the Source Designer or Target Designer,
then consider saving these tables in a similar manner to maintain
consistency.
When a staging job executes,
the staging transformation reads the raw IT performance data from
an input data source, processes it, and loads it into the corresponding
staged tables. These tables can then be input into Aggregation transformations.
The staged table is
generally used as input to an Aggregation transformation. However,
a user can change this process flow by using the manual methods that
are available in SAS IT Resource Management.
SAS IT Resource Management
supplies adapters that provide staging transformations, template tables,
and staged tables for many diverse data sources.
Note: The New Table wizard of SAS Data Integration Studio can create other tables that
stage raw data from any other input data sources.
For information about
the adapters that SAS IT Resource Management supports, see Supported Adapters.
Properties of a Staged Table
The metadata about a
staged table, such as how raw data is computed and formed into a SAS
data set structure, is available from the Properties dialog box of a staged table.
Note: You can also right-click
the staged table in the tree view of SAS IT Resource Management to
access the staged table properties. However, the set of properties
that are available when using this method differs slightly from the
properties that are available from the process flow diagram. For best
results when viewing and modifying relevant properties, access the
properties from the staged table object in the process flow diagram
as explained in the preceding steps.
The following list
includes all of the staged table properties and indicates whether
a property is available only from the staged table in the tree view
or the staged table in the process flow diagram:
-
The Columns tab displays the metadata for each column in the staged table. For more information about the properties that are available from the Columns tab of a staged table, see Columns in Staged Tables.
Task List for Staged Tables
When you right-click
a staged table, you gain access to several actions that you can perform
for that table such as analyze, update metadata, delete, copy, move,
export, and so on. The tasks that are available differ depending on
whether you right-click the staged table in the tree view or the process
flow diagram. For information about these tasks, see the Help that
is available for these topics in SAS IT Resource Management.
Create Staged Tables
SAS IT Resource Management
does not enable you to create a staged table without associating it
to a staging transformation. Thus, you must have a staging job that
includes a staging transformation before creating a staged table.
If you want to create
staged tables for the BMC Perf Mgr, DT perf Sentry, or SNMP adapters,
other than the tables that are included in the staged table templates
for those adapters, you can specify and then run macros to do so.
These macros create the metadata for the staged table and attach that
metadata to the staging transformation in your job.
Note: For best results, always
create or add staged tables to a job from the Staged Table wizard as described in this topic. If you copy an existing table
from another IT data mart or job and move it into a different job,
or if you attempt to reattach a staged table to its original staging
transformation after it was removed, then you might lose valuable
components of the table, such as computed columns.
-
Open a staging job that includes a staging transformation. For more information about creating a staging transformation, see Add a Staging Transformation to a Staging Job.
-
-
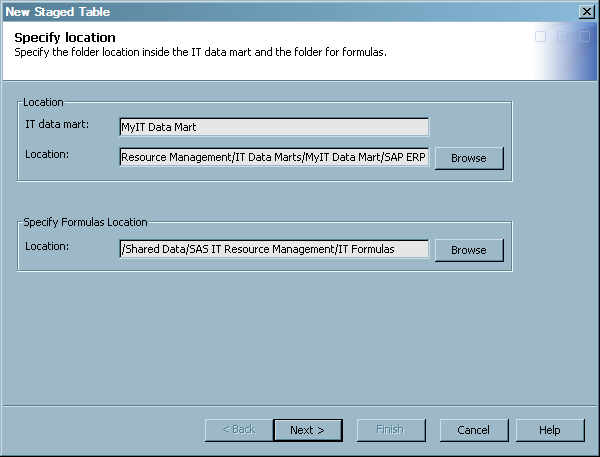
Confirm and specify the IT data mart and the location where the staged tables will be stored. The IT Data Mart and Location fields default to the IT data mart name and location of the current staging job. You must specify a location for the staged table that is within the IT data mart that is specified in the IT Data Mart field.You can use the Browse option to select a different location for the staged table or to create subfolders inside the IT data mart for storing the staged tables. However, the Adapter Setup wizard creates and stores staged tables in the same folder as the staging job so you might choose to accept the default values for consistency.
-
Specify the location for any user-written formulas that you want the Staged Table wizard to use in addition to those supplied by SAS IT Resource Management. The default location directs the Staged Table to the supplied formulas. This field does not allow manual entries. Use Browse to navigate to the appropriate folder as needed.
-
-
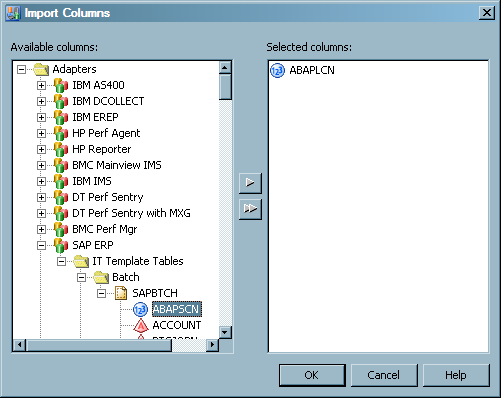
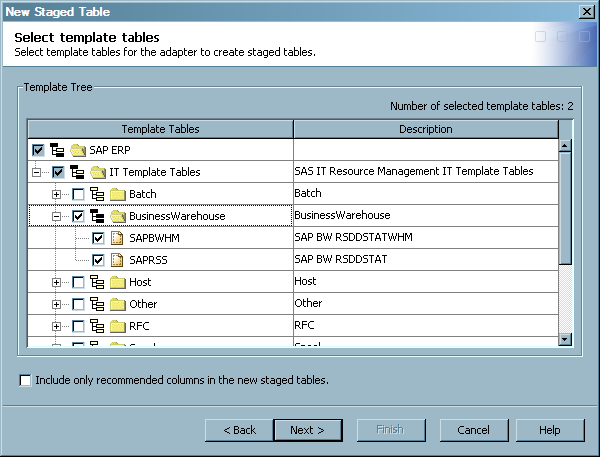
Select template tables. Based on the adapter for the staging transformation, a list of available template tables and their descriptions are displayed within domain categories of table types.
-
Use the check boxes to select the template tables that you want to use to generate staged tables. (You can click + to expand a folder or click – to collapse a folder.) If you select a folder, all of the subfolders and template tables within that folder are automatically selected and the check box displays a check (
 ) next to the folder and its template tables. If you
select an individual template table within a folder, but not all template
tables within the given folder, then the check box for the parent
folder shows a darkened box with a check (
) next to the folder and its template tables. If you
select an individual template table within a folder, but not all template
tables within the given folder, then the check box for the parent
folder shows a darkened box with a check ( ). This indicates that some, but not all, template
tables within the folder are selected.
The Number of selected template tables maintains a real-time count of the template tables that you select.
). This indicates that some, but not all, template
tables within the folder are selected.
The Number of selected template tables maintains a real-time count of the template tables that you select. -
Select Include only recommended columns in the new staged tables if you want only the recommended columns to be included in the staged tables that you are creating. Recommended columns are those that SAS IT Resource Management has predefined as critical or relevant for reporting and analysis in the performance area of the staged table. If this option is not checked, the staged tables will include all available columns.Note: You can view the recommended columns in a template table from the Columns tab of the Properties dialog box for a given template table. For more information about how to access and view the recommended columns of a template table, see Columns in Template Tables.
-
-
Note: This page appears only if you are creating the first staged tables for a staging transformation. If you have already created staged tables for the staging transformation, then the wizard skips this page. Library parameters are set once for a staging transformation and all staged tables for that transformation use the same library parameters. However, if all staged tables are later removed from the staging transformation and new staged tables are subsequently added, then the Specify SAS Library page is displayed again in the wizard. In this case, the staged tables in the subsequent iteration are placed in a different library from the first set of tables.
-
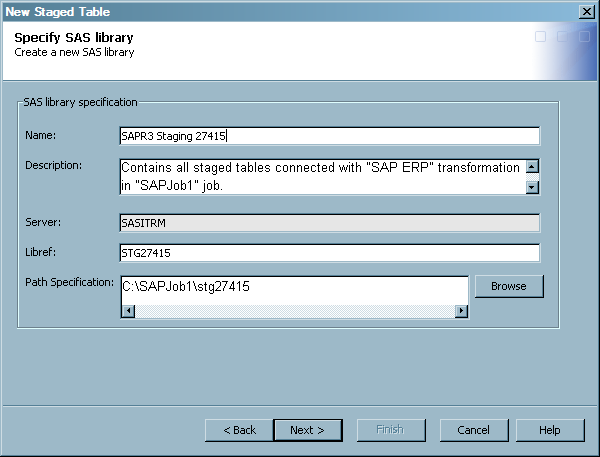
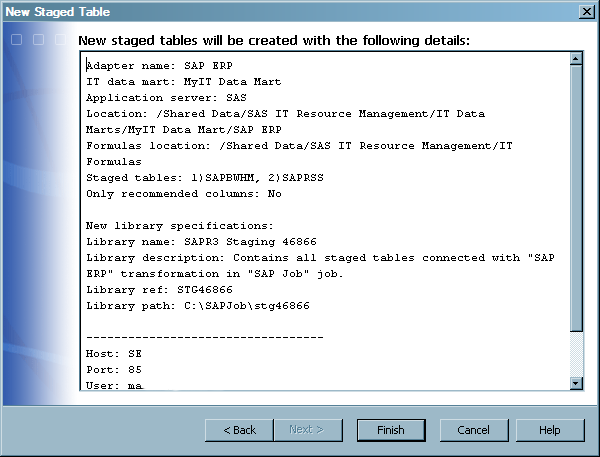
Specify the Name and Description for the SAS library. The SAS library name must be unique within its folder in the application server. The Staged Table wizard uses the naming convention <adapter name> + Staging <unique number> to name SAS libraries. You can accept the default name or enter a new name for the library. However, library names must be unique within the application server.
-
Specify the Libref that is associated with the staged table library. The Staged Table wizard uses the naming convention STG + <the same number generated for the library> to name the libref. You can accept the default name or enter a new libref name.
-
Specify the Path Specification for the location of the library and thus where the tables for this library are stored. The default value is based on the combination of the default path that is specified for the IT data mart, and the operating system of the server. The characters
stg<unique number> are also appended to the path, where the unique number is the same as that generated for the preceding library.For example, if the default path for an IT data mart on Windows isC:\SAPJob1C:\SAPJob1\stg27416,/u/<user ID>/Sample52, then the default value for a new staging library might be/u/<user ID>/Sample52/stg27416.Note: Browse is disabled when the selected application server is running on a machine using thez/OS z/OS path manually, you can use either a prefix for a traditionalz/OS MY.DATAMART) or a root directory in the UFS hierarchical file system( /u/myname/datamart).
-
-
Specify the
z/OS attributes that allocate file space in the operating environment if the application server is running onz/OS . The Staged Table wizard skips this page for operating environments that are notz/OS . For more information about these parameters, see the Help for SAS IT Resource Management.

Add an Existing Staged Table to a Job
SAS IT Resource Management
does not enable you to create a staged table without associating it
to a staging transformation. For best results, always create or add
staged tables to a job from the Staged Table wizard. If you copy an existing table from another IT data mart
or job, copy or move it into a different job, or attempt to reattach
a staged table to its original staging transformation, then you might
lose valuable components of the table, such as computed columns. For more information about using the Staged
Table wizard to add a staged table to an existing job,
see Create Staged Tables.
Erase a Staged Table
CAUTION:
If you
erase a staged table that serves as a source table in other jobs,
then these associated jobs might not execute because they are missing
a source table.
Simply erasing a staged
table does not affect the metadata of the associated aggregation or
information map jobs. However, if you erase a staged table and then
re-run the staging job, then the data for the deleted staged table
is not created. Thus, the jobs that used that table will fail due
to a missing source table.
Delete a Staged Table from a Tree View
Deleting a staged table
from the tree view in SAS IT Resource Management removes the metadata
object. This action does not delete the physical data set or the library
that is associated with the staged table.
CAUTION:
If you
delete a staged table that serves as a source table in other jobs,
then these associated jobs might not execute because they are missing
a source table.
Simply deleting a
staged table does not affect the metadata of the associated aggregation
or information map jobs. However, if you delete a staged table and
then re-run the staging job, then the data for the deleted staged
table is not created. Thus, the jobs that used that deleted table
will fail due to a missing source table.
Delete a Staged Table from a Job
Deleting a staged table
from a job removes it from the job so that it is no longer associated
with the transformation in the job. This action removes the staged
table from the job but does not delete the table's metadata, the physical
table, or the library that is associated with the staged table.
CAUTION:
If you
delete a staged table that serves as a source table in other jobs,
then these associated jobs might not execute because they are missing
a source table.
Simply deleting a
staged table from a job does not affect the metadata of the associated
aggregation or information map jobs. However, if you delete a staged
table and then re-run the job, then the data for the deleted staged
table is not created. Thus, the jobs that used the deleted staged
table (or any existing tables that used the deleted staged table)
will fail due to a missing source table.
Purge the Content of a Staged Table
Modify a Staged Table
To modify a staged
table, navigate to and open the job that contains the staged table
that you want to modify.