Maintaining Template Tables and Staged Tables Based on Adapter Changes
Working with the Maintain Staged Tables Wizard
About the Maintain Staged Tables Wizard
The data collectors on which
template tables are based might change over time. These changes can
require new columns in a template table or revisions to existing columns,
such as label or character length. Therefore, when SAS IT Resource
Management provides a new software release or update, the definitions
for some template tables might also change. After a software update
is installed, a preexisting staged table can differ from the new version
of its corresponding template table.
The Maintain
Staged Tables wizard enables you to perform the following
tasks with software updates to template tables:
If there are no staged tables to maintain, the HTML
report is not produced.
Note: After operations with the Maintain Staged Tables wizard, you must redeploy any
staging jobs that were updated. (Aggregation jobs do not require redeployment
because the wizard does not affect the metadata of the aggregated
tables.)
SAS IT Resource Management
identifies affected template tables and their associated staged tables
by the DataModelVersion field for each table.
For example, a template table and a staged table are eligible for
impact analysis and updates if the current DataModelVersion field of the table does not match the version that is associated
with the software update.
For more information
about using the Maintain Staged Tables wizard
to maintain staged tables within an IT data mart, see Using the Maintain Staged Tables Wizard to Update Staged Tables within an IT Data Mart. For
more information about using the Maintain Staged Tables wizard to maintain staged tables across all IT data marts, see Using the Maintain Staged Tables Wizard to Update Staged Tables across All IT Data Marts. For more information about
maintaining staged tables using a batch process, see Maintaining Staged Tables in Batch Mode.
Using the Maintain Staged Tables Wizard to Update Staged Tables within an IT Data Mart
After you install software updates for SAS IT Resource
Management, you can use the Maintain Staged Tables wizard to see whether any software changes to the template tables
affect the staged tables that you use and propagate these template
table changes to their corresponding staged tables. To do so, perform
the following steps:
-
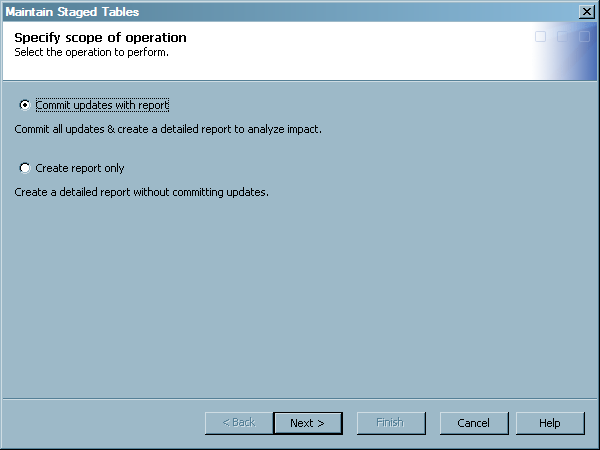
Note: This page is not displayed when accessing the wizard from a specific template table to commit updates across all IT data marts. For more information about using the Maintain Staged Tables wizard to maintain staged tables across all IT data marts, see Using the Maintain Staged Tables Wizard to Update Staged Tables across All IT Data Marts.
-
-
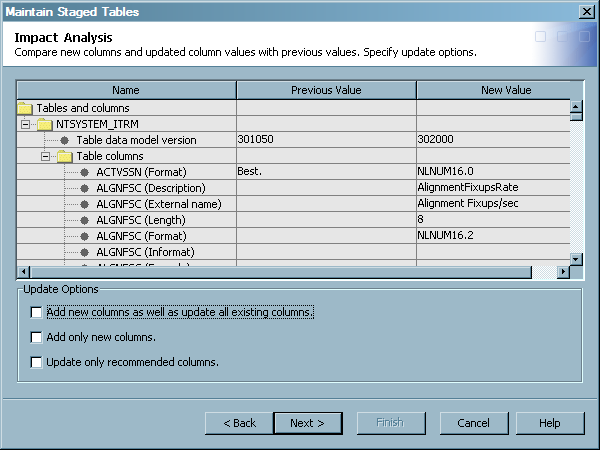
Compare table updates with the previous value of the tables and columns and specify the commit options.
-
Expand the folders in the grid to view the version of the tables and the table columns that have been modified or added to the corresponding template tables. The rows in the grid include the table name, version, description, or columns that are affected by the update. This comparison list also shows previous values before the update and the corresponding new values after the update.New columns that are added to the template table display the previous value as blank because the column did not exist in the previous version. New columns are also preceded by an asterisk (*) in the HTML report that the wizard generates.Note: Within a specific table, columns are matched by SASColumnName and SASColumnType (numeric or character). Therefore, if a column's SASColumnName or SASColumnType has been changed by the user, the column might not be recognized as a supplied column. Also, if a supplied column needs to have its SASColumnName or SAS ColumnType changed in the supplied template table definition, then it is treated as a new column.
-
If you choose to commit the updates that are detailed on this page, select one or more of the following Update Options that enable you to refine the scope of changes that you commit:
-
Update only recommended columns commits only the updates that affect the recommended columns in the associated template tables. For more information about recommended columns in template tables and determining which columns are recommended for a given template table, see Columns in Template Tables.
Note: The Update Options are interdependent and the availability of each option in this window depends on whether the other options are selected or deselected. For example, if Add new columns as well as update existing columns is selected, then the other options are not available. If this option is deselected, then the other options are available. Likewise, if Add only new columns or Update only recommended columns is selected, then Add new columns as well as update existing columns is not available for selection.
-
-
-
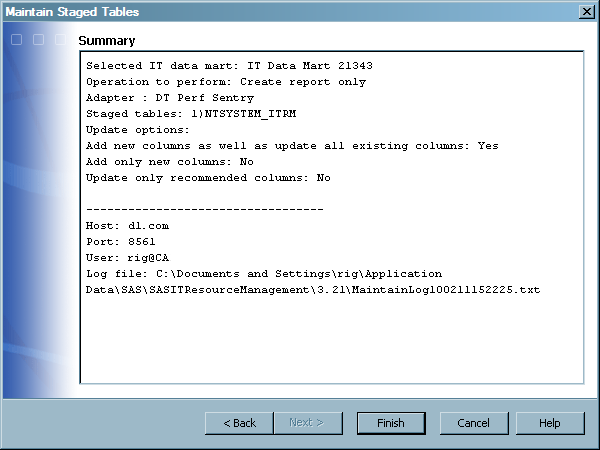
On the client, the report is located in a directory that is determined based on the APPDATA environment variable.If you selected Commit updates with report previously in the wizard, then the metadata for the selected staged tables is updated immediately. The physical data sets for these tables are then updated when the associated staging jobs are run.

Using the Maintain Staged Tables Wizard to Update Staged Tables across All IT Data Marts
The Maintain Staged Tables wizard enables
you to see whether any software changes to the template tables affect
the staged tables that you use. You can also propagate these template
table changes to their corresponding staged tables across all IT data
marts at once. To do so, perform the following steps:
-
In the Folders tree view of SAS IT Resource Management, expand the following folders to locate the template table: Products
 SAS IT Resource ManagementAdapters <adapter name>IT Template
Tables<domain category> that corresponds to the template table for which
you want to propagate updates to its corresponding staged tables.
SAS IT Resource ManagementAdapters <adapter name>IT Template
Tables<domain category> that corresponds to the template table for which
you want to propagate updates to its corresponding staged tables.
-
Complete the Maintain Staged Tables wizard. When you access the wizard from a specific template table as described in the previous steps, you are able to view and commit staged table updates across all IT data marts instead of within a single IT data mart. For more information about how to complete the Maintain Staged Tables wizard, see Using the Maintain Staged Tables Wizard to Update Staged Tables within an IT Data Mart. This topic includes instructions for reading and completing each page of the wizard.
Maintaining Staged Tables in Batch Mode
About Maintaining Staged Tables in Batch Mode
In order to run the Maintain
Staged Tables process in batch mode that you need to invoke the command
from the server tier where the SAS IT Resource Management data tier
has been installed. You cannot perform this action from a client install.
Note: You must use the Maintain Staged Tables wizard if you want to update
selected staged tables that are affected by an update. The BatchMaintainTable
command does not provide the ability to specify staged tables to update. For more information
about maintaining specific staged tables, see Using the Maintain Staged Tables Wizard to Update Staged Tables within an IT Data Mart.
-
TipFor best results, set all the options as needed but set the commit option to
N. This setting produces a report that lists the actions that might be performed under the current settings of the command. However, if there are no staged tables to maintain, no HTML report is produced. After reviewing the report, if you are satisfied with the additions or updates that might be performed by using the options that you specified, simply change the commit option toYand rerun the command.
Syntax for the Batch Maintain Table Command Line
BatchMaintainTable -Commit Y | N
-AdapterName “adapter-name”
<-ITDataMartName “ITDataMartName”>
<-TemplateTableName “TemplateTableName”>
<-AddAndUpdateColumns Y | N>
<-AddNewColumnsOnly Y | N>
<-UpdateRecommendedColumnsOnly Y | N>
<-profile profile>
<-user userID>
<-password password>
<-host hostname>
<-port port>
<-domain domain>
<-?>
<–help>
To invoke the BatchMaintainTable
command, use the following code:
"C:\Program Files\Java\jre1.5.0_12\bin\java.exe"
   -Djava.system.class.loader=com.sas.app.AppClassLoader
   -Dsas.ext.config="C:\Program Files\SASHome\SASPlatformObjectFramework
                       \9.3\sas.java.ext.config"
   -Dsas.app.launch.config="C:\Program Files\SASHome
                              \SASITResourceManagementDataTier\3.21
                              \plugins\itrmdatatier\picklist"
   -Dsas.app.repository.path="C:\Program Files\SASHome
                                \SASVersionedJarRepository\eclipse"
   -Dlog4j.configuration="file:///C:\Program Files\SASHome
                                    \SASDataIntegrationStudioServerData\4.3
                                    \log4j.properties"
   -Xmx1024m
   -Xss1m
   -classpath
     "C:\Program Files\SASHome\SASVersionedJarRepository\
      \eclipse\plugins
      \sas.launcher.jar"
   com.sas.solutions.itms.batch.maintaintable.BatchMaintainTable
Examples of the Batch Maintain Table Command Line
This example shows how
to run the Batch Maintain Table command on Windows. The command examines
the staged tables in an IT data mart called “My IT Data Mart”
that were generated for the BMC Performance Manager adapter. Any new
or changed columns that apply to the staged tables for the BMC Performance
Manager adapter are not performed, but are included in the report
that is produced by the Batch Maintain Table command.
"C:\Program Files\Java\jre1.5.0_12\bin\java.exe"
   -Djava.system.class.loader=com.sas.app.AppClassLoader
   -Dsas.ext.config="C:\Program Files\SASHome\SASPlatformObjectFramework
                       \9.3\sas.java.ext.config"
   -Dsas.app.launch.config="C:\Program Files\SASHome\SASITResourceManagementDataTier
                              \3.21\plugins\itrmdatatier\picklist"
   -Dsas.app.repository.path="C:\Program Files\SASHome\SASVersionedJarRepository\eclipse"
   -Dlog4j.configuration="file:///C:\Program Files\SASHome\
               SASDataIntegrationStudioServerData\4.3\log4j.properties"
   -Xmx1024m
   -Xss1m
   -classpath "C:\Program Files\SASHome\SASVersionedJarRepository\eclipse\plugins
     \sas.launcher.jar"
   com.sas.solutions.itms.batch.maintaintable.BatchMaintainTable
   -Commit N
   -Adapter "BMC Perf Mgr"
   -ITDataMartName "My IT Data Mart"
   -AddAndUpdateColumns Y
   -profile MyMetadataServerProfile
This example shows how
to run the Batch Maintain Table command in Windows. The command examines
tables across all IT data marts on the application server that were
generated for the BMC Performance Manager adapter and the PTCACHE
template table. Only changes to the recommended columns are made.
A report of these updates is produced.
"C:\Program Files\Java\jre1.5.0_12\bin\java.exe"
   -Djava.system.class.loader=com.sas.app.AppClassLoader
   -Dsas.ext.config="C:\Program Files\SASHome\SASPlatformObjectFramework
                       \9.3\sas.java.ext.config"
   -Dsas.app.launch.config="C:\Program Files\SASHome\SASITResourceManagementDataTier
                              \3.21\plugins\itrmdatatier\picklist"
   -Dsas.app.repository.path="C:\Program Files\SASHome\SASVersionedJarRepository\                                \eclipse"
   -Dlog4j.configuration="file:///C:\Program Files\
                  SASHome\SASDataIntegrationStudioServerData\4.3\log4j.properties"
   -Xmx1024m
   -Xss1m
   -classpath "C:\Program Files\SASHome\SASVersionedJarRepository\eclipse\plugins
     \sas.launcher.jar"
   com.sas.solutions.itms.batch.maintaintable.BatchMaintainTable
   -Commit Y
   -Adapter "BMC Perf Mgr"
   -TemplateTableName PTCACHE
   -AddNewColumnsOnly Y
   -UpdateRecommendedColumnsOnly Y
   -profile MyMetadataServerProfile
Sample Batch Maintain Table Commands for Windows, UNIX and z/OS
Batch Maintain Table Command for Windows Operating Environments
"C:\Program Files\Java\jre1.5.0_12\bin\java.exe"
   -Djava.system.class.loader=com.sas.app.AppClassLoader
   -Dsas.ext.config="C:\Program Files\SASHome\SASPlatformObjectFramework
                       \9.3\sas.java.ext.config"
   -Dsas.app.launch.config="C:\Program Files\SASHome\SASITResourceManagementDataTier
                              \3.21\plugins\itrmdatatier\picklist"
   -Dsas.app.repository.path="C:\Program Files\SASHome\SASVersionedJarRepository
                                \eclipse"
   -Dlog4j.configuration="file:///C:\Program Files\SAS
                                    \SASDataIntegrationStudioServerData\4.3
                                    \log4j.properties"
   -Xmx1024m
   -Xss1m
   -classpath "C:\Program Files\SASHome\SASVersionedJarRepository\eclipse\plugins
     \sas.launcher.jar"
   com.sas.solutions.itms.batch.maintaintable.BatchMaintainTable
   -host <host-name>
   -port (port-number)
   -user <userID>
   -password <password>
   -domain DefaultAuth
   -Commit N
   -AdapterName "<adapter-name>"
   -TemplateTableName <template-table-name>
   -AddAndUpdateColumns Y
   -AddNewColumnsOnly N
   -UpdateRecommendedColumnsOnly N
Batch Maintain Table Command for UNIX Operating Environments
#!/bin/sh

export SASHOME=<full-path-to-SASHOME directory>
echo $SASHOME is $SASHOME
export DISPLAY=<hostname:displaynumber.screennumber>
echo DISPLAY is $DISPLAY

cd $SASHOME/SASITResourceManagementDataTier/3.21

$JAVA_HOME/jre1.5.0.08/bin/java \
-Djava.system.class.loader=com.sas.app.AppClassLoader \
-Dsas.ext.config=$SASHOME/SASPlatformObjectFramework/9.3/sas.java.ext.config \
-Dsas.app.launch.config=$SASHOME/SASITResourceManagementDataTier
                        /3.21/plugins/itrmdatatier/picklist \
-Dsas.app.repository.path=$SASHOME/SASVersionedJarRepository/eclipse \
-Dlog4j.configuration="file://$SASHOME/SASITResourceManagementDataTier
                              /3.21/log4j.properties" \
-Djava.awt.headless=false \
-Xmx1024m \
-Xss1m \
-classpath $SASHOME/SASVersionedJarRepository/eclipse
           /plugins/sas.launcher.jar \
com.sas.solutions.itms.batch.maintaintable.BatchMaintainTable \
-host <metadata-server-hostname> \
-port <metadata-server-port-number> \
-user <unrestricted-metadata-server-userID> \
-password <password-for-specified-user> \
-domain DefaultAuth \
-Commit N \
-AdapterName "BMC Perf Mgr" \
-TemplateTableName PTCACHE \
-AddAndUpdateColumns Y \
-AddNewColumnsOnly N \
-UpdateRecommendedColumnsOnly N
Batch Maintain Table Command for z/OS Operating Environments
#!/bin/sh

echo JAVA_HOME is $JAVA_HOME
export SASHOME=<full-path-to-SASHOME-directory>
echo $SASHOME is $SASHOME
export DISPLAY=<hostname:displaynumber.screennumber>

echo DISPLAY is $DISPLAY

cd $SASHOME/SASITResourceManagementDataTier/3.21
$JAVA_HOME/bin/java \

-Djava.awt.headless=false \
-Djava.system.class.loader=com.sas.app.AppClassLoader \
-Dsas.ext.config=$SASHOME/SASIntelligencePlatformLogicalTypes
                 /9.3/sas.java.ext.config \
-Dsas.app.launch.config=$SASHOME/SASITResourceManagementDataTier
                        /3.21/plugins/itrmdatatier/picklist \
-Dsas.app.repository.path=$SASHOME/SASVersionedJarRepository/eclipse \
-Dlog4j.configuration="file://$SASHOME/SASITResourceManagementDataTier
                              /3.21/log4j.properties" \
-Xmx1024m \
-Xss1m \
-classpath $SASHOME/SASVersionedJarRepository/eclipse/plugins/sas.launcher.jar \
com.sas.solutions.itms.batch.maintaintable.BatchMaintainTable \
-host <metadata-server-hostname> \
-port <metadata-server-port-number> \
-user <unrestricted-metadata-server-userID> \
-password <password-for-specified-user> \
-domain DefaultAuth \
-Commit N \
-AdapterName "BMC Perf Mgr" \
-TemplateTableName PTCACHE \
-AddAndUpdateColumns Y \
-AddNewColumnsOnly N \
-UpdateRecommendedColumnsOnly N