Customizing Your SAS Session
Selecting Fonts
To change the font for button text
and descriptive text elements, use the SYSGUIFONT system option either
in the configuration file or at the command prompt when you start
SAS.
To choose a different
font or point size for text in SAS windows, open the Fonts dialog box by using the DLGFONT command or by selecting Tools OptionsFonts.
To change the font in
the Enhanced Editor, select ToolsOptionsEnhanced Editor and click the Appearance tab.
The fonts that are available
for SAS windows depend on the monospace fonts that you have installed
under Windows. For example, you might have the Courier font and Lucida
Console font available.
When you select a font
or point size, the Font dialog box and the Enhanced Editor Options dialog box display a sample
of the font that you have selected. For more information about selecting
fonts for the Enhanced Editor, select HelpUsing This Window or press
F1 when the Enhanced Editor is the active window.
When you install SAS,
the Setup program automatically installs a TrueType font, named SAS
Monospace, that is designed specifically for use with SAS. This font,
in combination with the Sasfont display font, ensures that tabular
output is formatted properly whether you view it in the Output window, print it, or copy it to another Windows
application.
By default, SAS uses
the SAS Monospace font to produce printed output. In addition, any
text that you cut, copy, or drag from a SAS window to paste into another
Windows application will be formatted with the SAS Monospace font.
CAUTION:
Beware
of changing certain display characteristics on low-resolution displays.
If you select large
font sizes on some monitors, you might not be able to see all the
text in your SAS windows at one time. In windows that have no scroll
bars, large font sizes can hide some choices, causing them to be invisible.
For these types of displays, large font sizes are not recommended.
This same problem can occur if you change the Windows Appearance properties
and select a thick window border. On low-resolution displays, you
should not use thick window borders.
Setting Session Preferences
Introduction to Setting Session Preferences
Using the Preferences Dialog Box
The Preferences dialog box contains tabs that separate the session settings into
categories. Click the tabs for each sheet to navigate to the settings
that you want to change, and then select the options that you want.
When you are finished, click OK.
The settings that you
select are saved from session to session in the Sasuser.Profile catalog
by their respective pages, except for the Results tab. The entries in the Sasuser.Profile are GENWSAVE, VIEWWSAVE,
EDITWSAVE, WEBWSAVE, and ADVWSAVE. The Results tab settings are saved in the SAS registry, so they are not moved
to another machine when the Sasuser.Profile catalog is copied.
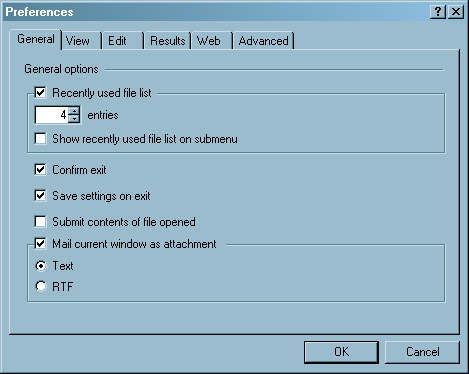
General Preferences
The
General tab enables you specify the general options that control how
your SAS session works. The following are the General options:
specifies whether SAS
retains a list of the files that you have accessed. If this option
is selected, you can specify in the entries field up to 30 files that you want to retain. Show recently
used file list on submenu specifies whether the files
will be displayed from the Recent Files submenu
that you access from the File menu. If Show recently used
file list on submenu is not selected, the files are displayed
in the File menu. Each time you access a file from an editor window,
the filename is added to the list.
specifies whether the
active window should be automatically included as an e-mail attachment
when you initiate electronic mail from within SAS. If you select this
option, then you can also specify whether the attachment should be
formatted as plain text or as RTF (rich text format, which retains
font and color information).
View Preferences
The View
tab lets you specify the options that control the appearance of your
SAS session. The View options include
specifies whether your
SAS windows contain scroll bars and a command line. You can also enable
or disable ScreenTips (the helpful hints that appear when you position
your mouse pointer over window controls).
specifies whether to
show certain aspects of the SAS interface, including the following
settings:
specifies whether to
enable the docking area so that windows that can be docked appear
on the left side of the main SAS window.
specifies which aspects
of the status bar, if any, you want to have visible in your session. Display message lines specifies whether to display the
message area of the status bar. Display current folder specifies whether to display the SAS current folder area. Display cursor position specifies whether to display
the line and column position of the Enhanced Editor insertion point.
Edit Preferences
The Edit tab controls
options that affect the SAS text editors, including:
specifies whether to
insert text or type over on existing text when you type text in a
SAS application window. You can also toggle the overtype mode by pressing
the Insert key on your keyboard. Overtype
mode is not available for the Enhanced Editor.
specifies whether to
automatically save the contents of the editor, and how often to save
it.
The Enhanced Editor
contents are saved as
Autosave of filename.$AS in the operating environment Application Data folder. Under Windows
Vista, the pathname for the Application Data folder is c:\Users\ user ID\AppData. Under all other Windows
operating environments, the pathname for the Application Data folder
is c:\Documents and Settings\user ID\Application Data.
Results Preferences
The Results tab
enables you to configure how you would like to view your program output
results. The Results tab options include
the following:
specifies a folder
to store HTML output files. You can either type a folder name or click Browse to search for a folder. This setting is available
only when the Use WORK folder setting is
not selected.
specifies to store
HTML output files in the
Work folder.
The Work folder is a temporary folder
that is deleted when SAS closes.
enables you to choose
the appearance of the program output. For more information about styles,
see the TEMPLATE Procedure: Creating a Style Template in SAS Output Delivery System: User's Guide.
Web Preferences
The Web tab enables you to specify your preferred Web browser
for use within your SAS session. These preferences are used whenever
you issue the WBROWSE command (either directly or by selecting a Help
menu item or toolbar button that issues the command). For more information,
see WBROWSE Command: Windows. You can specify the following Web options:
specifies the preferred
Web browser to use when accessing Web information from within SAS.
By default, SAS uses the browser that is installed on your system
and registered with Windows as the default browser. To use a browser
other than the default, select the Other radio
button and either type a path to the Web browser or click Browse to search for the path to the Web browser.
Advanced Preferences
The Advanced
tab enables you to specify options that can affect your SAS session,
including scrolling policy and other miscellaneous behavior. The Advanced
options include
specifies the number
of lines that the Log and Output windows scroll when information is
written to them. The default value for the Log window is 12.
When you select Scroll page, the Output window
will not display any lines until an entire page is written.
When Scroll
max is selected, no output will be written to the window
until the procedure is complete.
If Scroll
lines is selected and the Output window is full, the Output window scrolls
the number of lines specified in the Scroll lines box. The default value is 0. If the value is 0, no output is written
to that window while statements are executing, thus providing the
best performance.
Scrolling can increase
the length of time that SAS takes to run your program. The less that
the Log and Output windows have to scroll, the faster your program
will run.
You can also set these
values by using the Editor Options window
or the AUTOSCROLL command. For more information, see AUTOSCROLL Command: Windows and the SAS Help and Documentation.
Customizing Your Windowing Environment with Commands
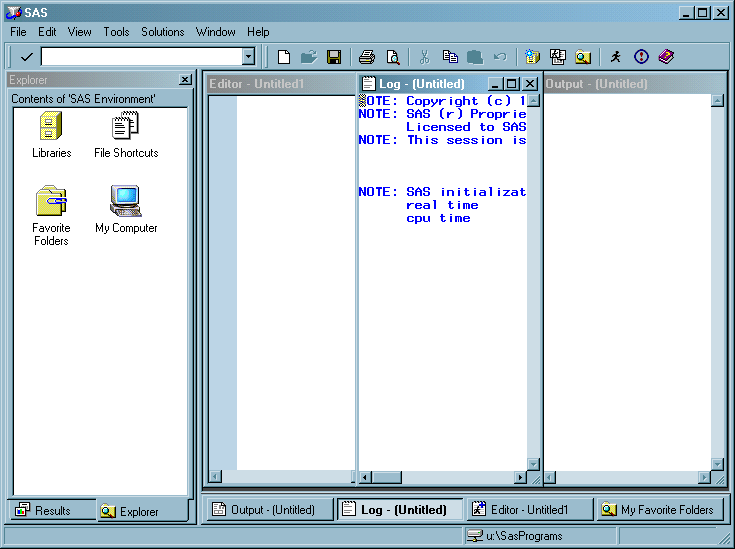
Customizing Window Positions
In the default display configuration of
an interactive session (shown in The Main SAS Window) the main SAS window displays the Explorer and Results
windows as docked windows, and the Log, Enhanced Editor, and Output
windows in the remaining SAS workspace.
Using the Windows menu,
you can position SAS windows in the same manner as other Windows applications:
While the default configuration
is sufficient for efficient SAS use, you can open more windows for
easy access and rearrange the windows within the main SAS window.
For example, you can keep the My Favorite Folders window open, but minimized, and the windows arranged in a mosaic
pattern so you can see all of them at once.
In addition, you can
undock windows so that all windows can be positioned where you want
them or you can minimize the docking view. For more information about
the docking view, see Using the Docking View .
For a list of SAS commands
used to control the appearance of the main SAS window, see SAS Commands That Control the Main SAS Window.
Changing the Window Colors
Changing the color of window components is a shared responsibility
of Windows and SAS. You change the color of most standard window parts
by changing the properties of the Windows desktop. Several window
element colors are controlled by SAS (such as the color of error message
text in the Log).
Customizing Your Windowing Environment with System Options
Several SAS system
options are available to control the default windowing environment
within SAS. The most commonly used options are the following:
specifies the location
and dimensions of the main SAS window when SAS initializes. See Changing the Size and Placement of the Main SAS Window.
specifies the text
for the main SAS window title bar. See Changing the Title of Your SAS Session.
enables you to add
Help to the main SAS window Help menu in order to access custom Help.
See HELPREGISTER System Option: Windows.
enables you to add
applications to the main SAS window Tools menu so that you can execute
them by clicking their names. See Adding Applications to the Tools Menu.
specifies the pathnames
to set for the current folder and the default folder for the Open and Save As dialog boxes when SAS starts. See SASINITIALFOLDER System Option: Windows.
specifies the pathname
or the dynamic link library name of the logo screen that is to appear
at the start of a SAS session, or it specifies to suppress the logo
screen. See Displaying a Custom Logo Screen during SAS Invocation.
specifies user-defined
icons to be incorporated into SAS/AF applications. See Adding User-Defined Icons to SAS.
specifies to enable
use of the pointer to select an object and a single click to invoke
the object's default action. See Enabling Web Enhancements in SAS.
These system options
can be specified in your SAS configuration file or in the SAS command
when you start SAS from a command prompt. Some are also valid in an
OPTIONS statement. For details about the syntax of these options and
about where you can specify them, see SAS System Options under Windows. For a comprehensive list of these options, see SAS System Options That Control the Main SAS Window.
Main SAS Window
Changing the Size and Placement of the Main SAS Window
The AWSDEF system option enables
you to control the placement and size of the main SAS window when
SAS initializes. If you want your SAS session always to occupy the
upper left quarter of your screen, specify the following AWSDEF option
in your SAS configuration file:
-awsdef 0 0 50 50
For more information,
see AWSDEF System Option: Windows.
Changing the Title of Your SAS Session
By default, the main SAS title bar contains the text SAS. If you want a different title, you can use the
AWSTITLE system option. For example, to set the title to My SAS Session, specify the following option in your
SAS configuration file:
-awstitle "My SAS Session"
For more information,
see AWSTITLE System Option: Windows.
Adding Help to the Help Menu
The HELPREGISTER system option enables you to access
customized help from the main SAS window Help menu. You can add up
to 20 WinHelp (.hlp), HTML (.htm), or Microsoft HTML Help (.chm) files
to the Help menu. HELPREGISTER system option arguments enable you
to
Note: WinHelp (WinHlp32.exe) is
no longer supported by Microsoft and is excluded from Windows Vista.
The preferred method is Microsoft HTML Help (.chm).
To add multiple Help
files to the Help menu, use multiple HELPREGISTER system options either
in your configuration file or at the command prompt when you start
SAS.
The following example
adds the Help file My Help.htm to the Help menu:
sas -helpregister "My Help" c:\mysashelp\myHelp.htm html
For more information,
see HELPREGISTER System Option: Windows.
Minimizing Your SAS Session
The ICON system option causes SAS to be minimized at
invocation. If you are running a batch job, you might want to use
this system option to save space on your screen. For more information,
see ICON System Option: Windows.
Adding Applications to the Tools Menu
The REGISTER system option enables you
to add names of applications to the Tools menu of the main SAS window.
You can execute one of these applications by clicking its name. The
REGISTER system option takes as arguments a menu name and an operating
environment command or a path specification for an executable file.
You can also specify a working folder.
The following is an
example that adds a command to print the contents of the SAS folder:
-register "Contents of SAS"
          "dir c:\program files\sas"
When you click Contents of SAS in the Tools menu, the output of the
Windows DIR command is displayed in a command prompt window.
The following is an
example of adding an .EXE file to the menu along with a specification
of a working folder of
C:\EXDATA:
-register "Excel" "excel.exe" "c:\exdata"
The REGISTER system
option is valid only as an invocation option (that is, in a SAS configuration
file or in the SAS invocation command). For more information, see
REGISTER System Option: Windows.
Setting the Initial Path For the Current Folder and the Paths Specified in the Open and Save Dialog Boxes
If you want to start SAS with a current folder other
than the default current folder, use the SASINITIALFOLDER system option
when you start SAS. The pathname that you specify in the SASINITIALFOLDER
option sets the initial current folder as well as the initial pathname
for the Open and Save As dialog boxes.
You can specify the
SASINITIALFOLDER option either on the command line when you start
SAS or in a configuration file. For example, you might specify
sas -sasinitialfolder "c:\mySasFiles" to start SAS.
For more information,
see SASINITIALFOLDER System Option: Windows.
Displaying a Custom Logo Screen during SAS Invocation
For example, if your
logo is stored in
C:\MYBMPS\SPLASH.BMP specify the following SPLASHLOC system option: -splashloc c:\mybmps\splash.bmp
If your logo is stored
in
C:\MYDLLS\OPENING.DLL as resource
101, you specify the following SPLASHLOC system option: -splashloc c:\mydlls\opening.dll 101
For more information,
see SPLASHLOC System Option: Windows.
Adding User-Defined Icons to SAS
The USERICON system option enables you
to add your own icons to SAS. These icons can be used with SAS/AF
and SAS/EIS applications. The syntax for the USERICON system option
is as follows:
-USERICON icon-resource-file number-of-icons
The icon-resource-file argument specifies the full
path to a dynamic link library (DLL) file that contains the user icons.
The number-of-icons argument
specifies the number of icons found in the resource file. For example,
the following system option specifies that there are four icons located
in an icon resource file named ICONS.DLL found in the
C:\JUNK folder: -usericon c:\junk\icons.dll 4
The DLL that is used
as the icon resource file must be created using the Win32 Software
Development Kit (and must therefore be 32-bit). For more information
about how to build a resource file, refer to the documentation for
the Microsoft Win32 Software Development Kit.
You can incorporate
icons into your SAS/AF and SAS/EIS applications using a FRAME entry.
For more information, see USERICON System Option: Windows and refer to the SAS Help and Documentation for SAS/AF
software and SAS/EIS software.
Enabling Web Enhancements in SAS
If you have Microsoft Internet Explorer 5.0 (IE) or
greater installed, the WEBUI system option enables some SAS windows,
such as the SAS Explorer window, to work
like an IE web page where pointing to an object selects the object
and a single mouse-click invokes the default action.
Customizing the Toolbar
Introduction to Customizing the Toolbar
Setting General Toolbar Preferences
The Toolbars tab has settings to control the behavior and appearance of the toolbar.
Tool options include:
Customizing a Toolbar
The Customize tab, as shown in the following display, enables you to add, delete,
and modify commands on the toolbar.
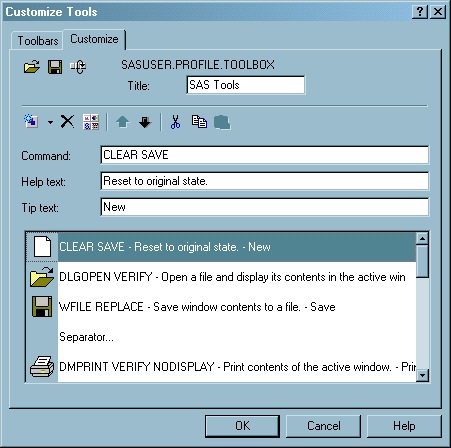
The following explains
each of the buttons (commands) and fields:
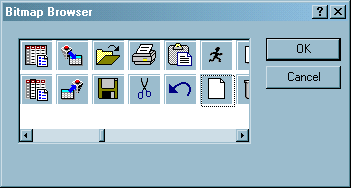
Adds a tool or a separator
space to the toolbar. This tool has two parts. When you click the
left button a blank tool is added to the toolbar. When you click the
down arrow, you can select to add either a Blank tool or Separator. Windows that define an action
set (for example, Explorer) have a selection for Action.
displays the command
for the tool that is selected in the toolbar list. You can modify
the command in the Command box.
displays the Help text
that appears in the status bar message area when the pointer is placed
over the button in the toolbar. You modify the Help text in the Help Text box.
Adding a Tool to the Toolbar
-
Do one of the following:
-
For windows that have a set of predefined tools, such as the Explorer window or the My Favorite Folders window, click the Add tool down arrow and select Action. From the Add Action dialog box, select an action. This selection adds a new action to the toolbar. You can enter multiple commands separated by semicolons.
Customizing and Saving a Toolbar for Use with a Particular Application or Window
Before you add a command to a toolbar, ensure that the
command is available from a menu. Buttons are enabled only if the
command is available from a menu, with the exception of the Print
and Copy commands, which are always enabled.
-
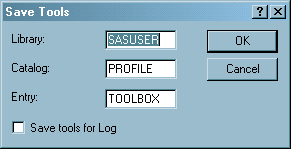
When you are finished customizing the toolbar, click Save. The Save Tools dialog box appears (as shown in Save Tools Dialog Box ).
-
SAS completes the libref, catalog, and entry fields. Select the
Save tools for windowcheck box, where window is the active window, and then click OK.When you select theSave tools for windowcheck box, the toolbar is associated with the particular application or window by using the same library, catalog, and entry name as the PMENU entry for the application or window. SAS first looks for toolbox entries in Sasuser.Profile before searching the application catalog.
If you save the toolbar
so that it is associated with a particular application, SAS automatically
loads the tools when that application's window is active.
You can use the TOOLLOAD
command to load your custom toolbar manually. For more information,
see TOOLLOAD Command: Windows.
Resetting the Tools to the Default Settings
Examples of Useful Tools That You Can Create
Suppose that you want to
create a tool that opens the SAS Web page to the sample programs for
Base SAS when the Enhanced Editor is the active window. You would
perform the following steps:
The following are some
examples of other tools that you might find useful to create:
includes and submits
a SAS program to sign on to a remote system. For example, to sign
on to a remote MVS session, the SIGNON.SAS program might contain:
options comamid=tcp remote=mytso; libname remtdata 'mylib.mydata.monthly'; signon;For more information about signing on to remote sessions, see the SAS/CONNECT User's Guide.
includes and submits
a SAS program to download a data set from a remote session. Assuming
that you have already signed on to the remote session, DOWNLOAD.SAS
might contain:
proc download data=remtdata.june; /* where libname 'remtdata' is */
    /* already defined*/
run;
For more information about signing
on to remote sessions, see the SAS/CONNECT User's Guide.