| Window Reference |
Model Viewer Window
This resizable window provides plots and tables of actual values, model predictions, forecasts, and related statistics. The various plots and tables available are referred to as views. The section View Selection Icons explains how to change the view.
You can access Model Viewer in a number of ways, including the View Model Graphically icon of the Develop Models and Model List windows, the Graph button of the Automatic Model Fitting Results window, and the Model item under the View menu in the Manage Forecasting Project window. In addition, you can go directly to a selected view in the Model Viewer window by selecting Model Predictions, Prediction Errors, Statistics of Fit, Prediction Error Autocorrelations, Prediction Error Tests, Parameter Estimates, Forecast Graph, or Forecast Table from the View menu or corresponding toolbar icon or pop-up menu item in the Develop Models, Model List, or Automatic Model Fitting Results windows.
The state of the Model Viewer window is controlled by the current model and the currently selected view. You can resize this window, and you can use other windows without closing the Model Viewer window. By default, the Model Viewer window is automatically updated to display the new model when you switch to working with another model (that is, when you highlight a different model). You can unlink the Model Viewer window from the current model selection by selecting the Link/Unlink icon from the window’s horizontal toolbar. See "Link/Unlink" in the section Toolbar Icons.
For more information, see the section Model Viewer.
Toolbar Icons
The Model Viewer window contains a horizontal row of icons called the Toolbar. Corresponding menu items appear under various menus. The function of each icon is explained in the following list.
- Zoom in
In the Model Predictions, Prediction Errors, and Forecast Graph views, the Zoom In action changes the mouse cursor into cross hairs that you can use with the left mouse button to define a region of the graph to zoom in on. In the Prediction Error Autocorrelations and Prediction Error Tests views, Zoom In reduces the number of lags displayed.- Zoom out
reverses the previous Zoom In action.- Link/Unlink viewer
disconnects or connects the Model Viewer window to the model table (Develop Models window, Model List window, or Automatic Model Fitting Results window). When the viewer is linked, selecting another model in the model table causes the model viewer to be updated to show the selected model. When the Viewer is unlinked, selecting another model does not affect the viewer. This feature is useful for comparing two or more models graphically. You can display a model of interest in the Model Viewer, unlink it, then select another model and open another Model Viewer window for that model. Position the viewer windows side by side for convenient comparisons of models, or use the Next Viewer icon or F12 function key to switch between them.- Save
saves the contents of the Model Viewer window. By default, an HTML page is created. This enables you to display graphs and tables by using the Results Viewer or publish them on the Web or your intranet. See also "Save Graph As" and "Save Data As" under "Menu Bar" below.
prints the contents of the viewer window.- Close
closes the Model Viewer window and returns to the window from which it was invoked.
View Selection Icons
At the right hand side of the Model Viewer window is a vertical toolbar to select the view—that is, the kind of plot or table that the viewer displays. Corresponding menu items appear under View in the menu bar. The function of each icon is explained in the following list.
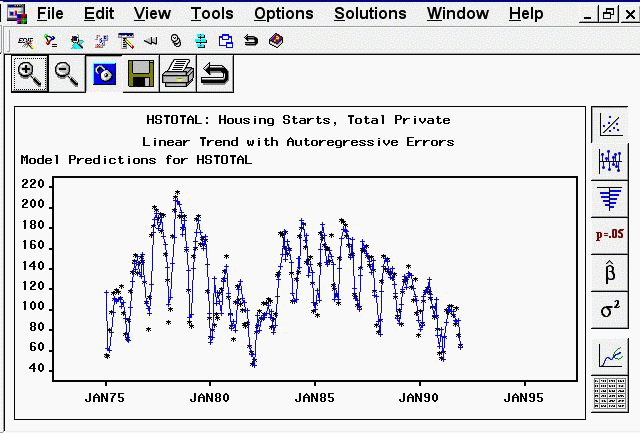
- Model Predictions
displays a plot of actual series values and model predictions over time. Click individual points in the graph to get a display of the type (actual or predicted), ID value, and data value in the upper right corner of the window.- Prediction Errors
displays a plot of model prediction errors (residuals) over time. Click individual points in the graph to get a display of the prediction error value in the upper right corner of the window.- Prediction Error Autocorrelations
displays horizontal bar charts of the sample autocorrelation, partial autocorrelation, and inverse autocorrelation functions for the model prediction errors. Overlaid line plots represent confidence limits computed at plus and minus two standard errors. Click any of the bars to display its value.- Prediction Error Tests
displays horizontal bar charts that represent results of white noise and stationarity tests on the model prediction errors. The first bar chart shows the significance probability of the Ljung-Box chi-square statistic computed on autocorrelations up to the given lag. Longer bars favor rejection of the null hypothesis that the series is white noise. Click any of the bars to display an interpretation.The second bar chart shows tests of stationarity of the model prediction errors, where longer bars favor the conclusion that the series is stationary. Each bar displays the significance probability of the augmented Dickey-Fuller unit root test to the given autoregressive lag. Long bars represent higher levels of significance against the null hypothesis that the series contains a unit root. For seasonal data, a third bar chart appears for seasonal root tests. Click on any of the bars to display an interpretation.
- Parameter Estimates
displays a table showing model parameter estimates along with standard errors and t tests for the null hypothesis that the parameter is zero.- Statistics of Fit
displays a table of statistics of fit for the selected model. The set of statistics shown can be changed by using the Statistics of Fit item under Options in the menu bar.- Forecast Graph
displays a plot of actual and predicted values for the series data range, followed by a horizontal reference line and forecasted values with confidence limits. Click individual points in the graph to get a display of the type, date/time, and value of the data point in the upper right corner of the window.- Forecast Table
displays a data table with columns containing the date/time, actual, predicted, error (residual), lower confidence limit, and upper confidence limit values, together with any predictor series.
Menu Bar
- File
- Save Graph
saves the plot displayed in viewer window as a SAS/GRAPH grseg catalog entry. When the current view is a table, this menu item is not available. See also "Save" in the section Toolbar Icons. If a graphics catalog entry name has not already been specified, this action functions like "Save Graph As."- Save Graph As
saves the current graph as a SAS/GRAPH grseg catalog entry in a SAS catalog that you specify and/or as an Output Delivery System (ODS) object. By default, an HTML page is created, with the graph embedded as a gif image.- Save Data
saves the data displayed in the viewer window in a SAS data set, where applicable.- Save Data As
saves the data in a SAS data set that you specify and/or as an Output Delivery System (ODS) object. By default, an HTML page is created, with the data displayed as a table.- Import Data
is available if you license SAS/Access software. It opens an Import Wizard, which you can use to import your data from an external spreadsheet or data base to a SAS data set for use in the Time Series Forecasting System.- Export Data
is available if you license SAS/Access software. It opens an Export Wizard, which you can use to export a SAS data set, such as a forecast data set created with the Time Series Forecasting System, to an external spreadsheet or data base.- Print Graph
prints the contents of the viewer window if the current view is a graph. This is the same as the Print toolbar icon. If the current view is a table, this menu item is not available.- Print Data
prints the data displayed in the viewer window, where applicable.- Print Setup
opens the Print Setup window, which allows you to access your operating system print setup.- Print Preview
opens a preview window to show how your plots will appear when printed.- Close
closes the Model Viewer window and returns to the window from which it was invoked.
- Edit
- Edit Model
enables you to modify the specification of the current model and to fit the modified model, which is then displayed in the viewer.- Refit Model
refits the current model by using data within the current fit range. This action also causes the ranges to be reset if the data range has changed.- Reevaluate Model
reevaluates the current model by using data within the current evaluation range. This action also causes the ranges to be reset if the data range has changed.
- View
See View Selection Icons. It describes each of the items available under "View," except "Zoom Way Out."- Zoom Way Out
zooms the plot out as far as it will go, undoing all prior zoom in operations.
- Tools
- Link Viewer
See "Link/Unlink" in the section Toolbar Icons.
- Options
- Time Ranges
opens the Time Ranges Specification window to enable you to change the period of fit, period of evaluation, or forecast horizon to be applied to subsequently fit models.- Statistics of Fit
opens the Statistics of Fit Selection window, which presents a list of statistics that the system can display. Use this action to customize the list of statistics shown in the statistics of fit table and available for selection in the Model Selection Criterion menu.- Forecast Options
opens the Forecast Options window, which enables you to control the widths of forecast confidence limits and control the kind of predicted values computed for models that include series transformations.- Residual Plot Options
Provides a choice of four methods of computing prediction errors for models which include a data transformation.- Prediction Errors
computes the difference between the transformed series actual values and model predictions.- Normalized Prediction Errors
computes prediction errors in normalized form.- Model Residuals
computes the difference between the untransformed series values and the untransformed model predictions.- Normalized Model Residuals
computes model residuals in normalized form.
- Number of Lags
opens a window to enable you to specify the number of lags shown in the Prediction Error Autocorrelations and Prediction Error Tests views. You can also use the Zoom In and Zoom Out actions to control the number of lags displayed.- Correlation Probabilities
controls whether the bar charts in the Prediction Error Autocorrelations view represent significance probabilities or values of the correlation coefficient. A check mark or filled check box next to this item indicates that significance probabilities are displayed. In each case the bar graph horizontal axis label changes accordingly.- Include Interventions
controls whether intervention effects defined for the current series are automatically added as predictors to the models considered by the automatic selection process. A check mark or filled check box next to this item indicates that the option is turned on.- Print Audit Trail
prints to the SAS log information about the models fit by the system. A check mark or filled check box next to this item indicates that the audit option is turned on.- Show Source Statements
controls whether SAS statements submitted by the forecasting system are printed in the SAS log. When the Show Source Statements option is selected, the system sets the SAS system option SOURCE before submitting SAS statements; otherwise, the system uses the NOSOURCE option. Note that only some of the functions performed by the forecasting system are accomplished by submitting SAS statements. A check mark or filled check box next to this item indicates that the option is turned on.
Mouse Button Actions
You can examine the data values of individual points in the Model Predictions, Model Prediction Errors, and Forecast Graph views of the Model Viewer by clicking the point. The date/time and data values as well as the type (actual, predicted, and so forth) are displayed in a box that appears in the upper right corner of the Viewer window. Click the mouse elsewhere or select any action to dismiss the data box.
Similarly, you can display values in the Prediction Error Autocorrelations view by clicking any of the bars. Clicking bars in the Prediction Error Tests view displays a Recommendation for Current View window which explains the test represented by the bar.
When you select the Zoom In action in the Predicted Values, Model Prediction Errors, and Forecasted Values views, you can use the mouse to define a region of the graph to zoom. Position the mouse cursor at one corner of the region, press the left mouse button, and move the mouse cursor to the opposite corner of the region while holding the left mouse button down. When you release the mouse button, the plot is redrawn to show an expanded view of the data within the region you selected.
Copyright © 2008 by SAS Institute Inc., Cary, NC, USA. All rights reserved.