Adding a User Written Code Transformation to a Job
Problem
You want to add user-written code to a job. One method is to use the User Written Code transformation that is provided in Transformations
tree. After you place this transformation in a job, you can add user-written code
on the Code tab of its properties window and map its columns to the target table. This approach works particularly well with jobs that need quick custom code
or that require only one input and output and no parameters. More complicated situations
are handled more effectively with the Transformation
Generator wizard.
Solution
You can create a job that includes the User Written Code transformation. You need
to add the code to the
job in the User Written Code transformation. Then, you need to map the columns from
the transformation to the target table. Perform the following tasks:
Tasks
Create and Populate the Job
Perform the following tasks to create a job that uses the User Written Code transformation:
-
Create a new job and give it an appropriate name. The Job Editor window for the new job is displayed.
-
Drop the User Written Code transformation from the Data folder in the Transformations tree into the Diagram tab of the Job Editor window.
-
Connect the source table to the input port of the User Written Code transformation.
-
Because you want a permanent target table to contain the output for the transformation, right-click the temporary work table that is attached to the transformation and click Replace in the pop-up menu. Then, use the Table Selector window to select the target table for the job. The target table must be registered in SAS Data Integration Studio. For more information about temporary work tables, see Working with Default Temporary Output Tables.
The flow for the sample job is shown in the following display.
Sample User Written Code Transformation in a Job

Note that the sample job includes a source table named EMP_GENDER and a target table
named CONVERTED_EMP_DATA.
Add User-Written Code to the User Written Code Transformation and Map Columns
Perform the following steps to add user-written code to the User Written Code transformation
in a job:
-
Write SAS code and test it to ensure that it produces the required output. The following code was written for the sample job:
data
&_OUTPUT;
  set &SYSLAST;
  length sex $1;
  if gender = "Male" then
    sex = "M";
  else if gender = "Female" then
    sex = "F";
  else
  sex="U";
run;
In this case, the code changes the gender identification in the Gender column from the words Male and Female to the initials M and F. -
Open the Code tab in the properties window for the User Written Code transformation on the Diagram tab of the Job Editor window. Code is generated for the transformation and displayed on the Code tab. The Code generation mode field defaults to User written body.
-
Select the code generation mode. The Code generation mode field defaults to User written body. Note that any non-user-written portion of the code is dimmed when you select User written body. You cannot modify this part of the code.
-
Place the cursor in an editable section of the Code tab.
-
Enter the SAS code.
-
Click Save or Save As on the toolbar for the tab. The Save option enables you to save the code in the editor as a metadata object (instead of saving the code into a file). The Save As option opens the Save File window, where you can either save a name and description for the metadata object (code in the editor) or save the contents of the editor as a file.Note: The Save and Save As options apply your changes to the current session. To make your changes persist after the current session, you must save the entire job. To save the entire job, select File
 Save from
the menu bar on the desktop.
Save from
the menu bar on the desktop.
-
Click OK to save the changes and close the properties window.
-
Make sure that the User Written Code transformation is selected on the Diagram tab of the Job Editor window. Then, click the Mappings tab in the Details section.
-
Create column mappings between the source table and the target table.Note: When SAS Data Integration Studio generates all of the code for a job, it can automatically generate the metadata for column mappings between sources and targets. However, when you specify user-written code for part of a job, you must manually define the column metadata for that part of the job that the user-written code handles. SAS Data Integration Studio needs this metadata to generate the code for the part of the job that comes after the User Written Code transformation. This mapping is also needed for impact analysis.
At this point, you have updated the User Written Code transformation so that it can
retrieve the appropriate code when the job is executed.
Note: If a job contains a User
Written Code transformation, and the source or target is an external
file, then the generated code contains additional macro variables
to access that file. Those macros include the following:
Regardless of the source or target type, code is generated
for macro variables _INPUT_filetype and _OUTPUT_filetype with a value
of either PhysicalTable or ExternalFile. Other generated macro variables
include _INPUTn_filetyper, _OUTPUTn_filetype, _INPUTn, and _OUTPUTn.
-
%LET _INPUT (for source) or _OUTPUT (for target): contains the full path to the file location of the external file
-
%LET for _INPUTn and _OUTPUTn (where n represents the nth source or target): contains the path to the file location of the external file
Run the Job
Perform the following steps to submit and run the job:
-
Run the job. If you are prompted to do so, enter a user ID and password for the default SAS Application Server that generates and run SAS code for the job. The server executes the SAS code for the job.
-
If the job completes without error, go to the next section. If error messages appear, read and respond to the messages.
View the Output
You can verify that the job created the desired output by reviewing the View Data window. The View
Data window for the sample job is shown in the following
display.
Output from the Sample Job
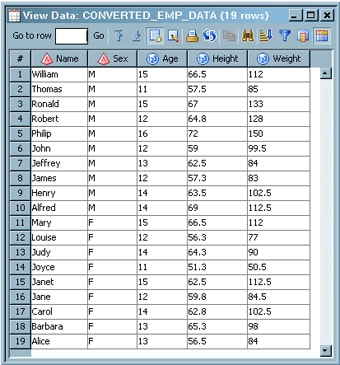
Note that the Gender column in the source table has been mapped to the Sex column
in the target. The words Male and Female in the Sex column have been replaced with
M and F.
Copyright © SAS Institute Inc. All Rights Reserved.
Last updated: January 16, 2018