Creating and Using a Generated Transformation
Problem
You need
a custom transformation that enables you to process multiple outputs
or inputs, macro variables, and parameters.
Solution
Use the Transformation Generator wizard to create a custom transformation. The wizard
guides you through the steps of creating the transformation and registering it on
the metadata server. The new transformation displays in the Transformations tree, where it is available
for use in any job.
Perform
the following tasks:
Tasks
Create a Generated Transformation
Perform the following steps to create a generated transformation:
-
Right-click the destination folder for the generated transformation.Then, select New
 Transformation to access the Transformation Generator page in the
New Transformation wizard.
Transformation to access the Transformation Generator page in the
New Transformation wizard.
-
Enter an appropriate name for the transformation. Then, verify that the destination folder for the transformation is populated in the Location field. You can also enter a description and select a category for the transformation. Click Next to access the SAS Code page.
-
Enter the SAS code generated by the transformation. You can either enter code manually or paste in SAS code from an existing source. The following display shows the SAS code for a sample generated transformation.Sample Transformation Code Page
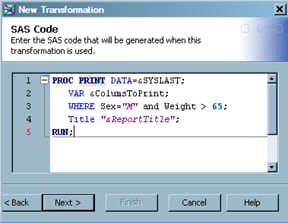 A number of macro variables appear in this sample code. One of these macro variables, &SYSLAST, is normally available and refers to the last data set created. The transformation also includes other macro variables, such as &ColumnsToPrint and &ReportTitle. The type of each such variable is defined in the Options screen of the wizard. You can supply values for these user-defined variables when the transformation is included in a job. Click Next to access the Options page.
 -
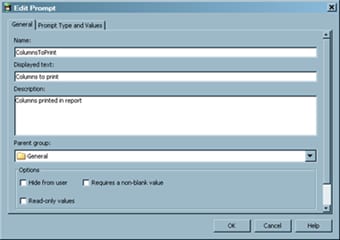
Click New Prompt to access the New Prompt window. Define an option that corresponds to the first macro variable that is listed on the SAS code screen. The following display shows the General tab in the New Prompt window for the first macro variable in the sample transformation.General Prompt Tab for the Columns to Print Option
 Prompt Type and Values Tab for the Columns to Print Option
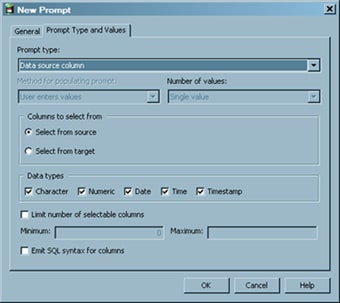 Each prompt window contains a General tab where you can enter general information about the option. Each prompt window also contains a Prompt Type and Values tab where you can select settings that are appropriate for each prompt type. For example, the second macro variable for the sample transformation, ReportType, requires an option that uses the text prompt type, as shown in the following display.Sample Prompt Type and Value Tab for the ReportTitle Option
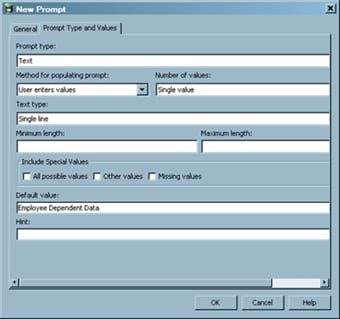 You need to define each of the macro variables that are included in the transformation as an option. These options display on the Options tab of the transformation when it is used in a job. The completed Options page for the sample transformation is depicted in the following display.Completed Options Page
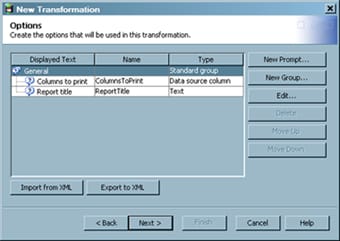 When you have defined options for each of the macro variables, click Next to access the Transform properties page.
 -
Use the Transform properties screen to specify the number of inputs and outputs for the generated transformation. The Transform properties page for the sample transformation is depicted in the following display.Sample Transform Properties Page
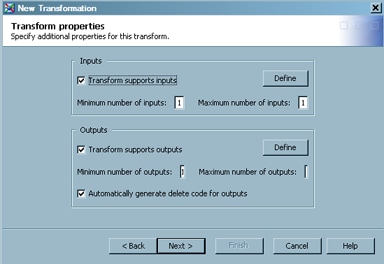 These values determine how many inputs can be fed into the generated transformation. Note that if you later update the transformation to increase this minimum number of inputs value, any jobs that have been submitted and saved use the original value. The increased minimum number of inputs is enforced only for subsequent jobs. This feature enables you to increase the minimum number of inputs without breaking existing jobs.The increased maximum number of inputs is used to allow you to feed additional inputs into the transformation. (In the sample transformation, you can have up to six inputs because you set the maximum to six.) The same rules apply to outputs. The report that is generated by this transformation is sent to the Output tab of the Process Designer window. Therefore, you do not need to add an output to the transformation by using the controls in the Outputs group box.
 -
Click Next to access the Finish page. Verify that the metadata is correct, and then click Finish. Your transformation is created and saved.
-
Verify that the generated transformation is available in the destination folder.
Use a Generated Transformation in a Job
Perform the following steps to create and run a job that contains the generated transformation:
-
Create an empty job.
-
Drop the generated transformation into the Job Editor window for the empty job.
-
Drop the source table for the job into the Job Editor window.
-
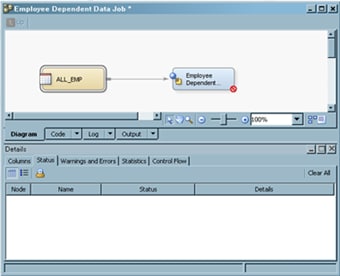
If you enabled an output table, then drop the target table into the Job Editor window. You can also send the output to the Output tab of the Job Editor window. The appropriate option on the General tab of the Options window must be set so that the Output tab appears in the Job Editor window. The sample job shown in the following display uses the Output tab in this way.Generated Transformation in a Sample Job
-
Drag the cursor from the output port of the transformation to the target table, if you have an output table. This action connects the transformation to the target.
-
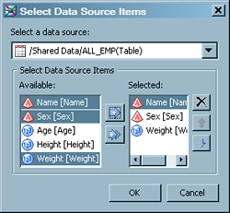
Open the Options tab in the properties window for the generated transformation. Enter appropriate values for each of the options that are created for the transformation. Then, set the properties for the first option in the transformation. The following display shows the Select Data Source Items window, which is used to select the columns that are printed in the report.Sample Select Data Source Items Window
 The following display shows the completed Options tab.Sample Completed Options Page
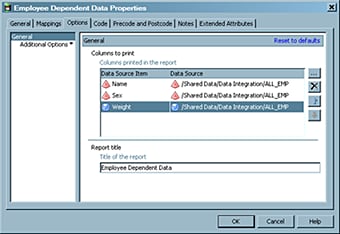 Note that the report title is already entered in the sample job. It was entered when the prompt was created.Click OK to close the properties window and save the settings.
 -
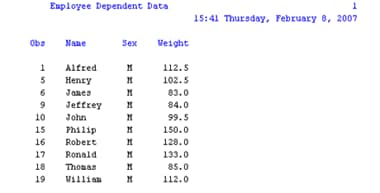
Run the job by right-clicking inside the Job Editor and selecting Run from the pop-up menu. SAS Data Integration Studio generates and runs the following code:
%let ColumnsToPrint = Name Sex Weight;
%let ColumnsToPrint_count = 3;
%let ColumnsToPrint0 = 3;
%let ColumnsToPrint1 = Name;
%let ColumnsToPrint2 = Sex;
%let ColumnsToPrint3 = Weight;
%let ReportTitle = %nrquote(Employee Dependent Data);
%let ColumnsToPrint_dsc = ;
%let GenerateIndexesOnTargets "" %nrquote(YES);

PROC PRINT DATA=&SYSLAST;
 	VAR &ColumnsToPrint;
 	WHERE Sex="M" and Weight > 65;
 	Title "&ReportTitle;";
 run;
-
After the code has executed, check the Job Editor window Output tab for the report that is shown in the following display.Sample Output Report
Copyright © SAS Institute Inc. All Rights Reserved.
Last updated: January 16, 2018