Integrating a SAS Enterprise Miner Model with Existing SAS Data
Overview
You can use a Model Scoring transformation to integrate a SAS Enterprise Miner model
with data sources in your SAS Data Integration Studio data warehouse. Using the Model
Scoring transformation enables you to associate a SAS Enterprise Miner model with
a job and use that job to create an output table that applies the model to the source data.
Note: One or more SAS Enterprise
Miner models must be registered in your metadata repository before
you can use the Model Scoring transformation.
Problem
You want to create a job that creates a target table from a SAS Enterprise Miner model.
Solution
You can use the Model Scoring transformation to create a job that creates a target
table from a SAS Enterprise Miner model.
In this example, a statistician uses SAS Enterprise Miner and historical home equity
data to build a data mining model to predict if a customer might default on a home
equity loan. After the statistician builds the model, it is registered in a SAS metadata repository that a SAS Data Integration Studio developer can use. Additional customer data is
collected using SAS Data Integration Studio. The new data has the same customer information
but does not contain the predictions about a customer's probability for defaulting
on a home equity loan. The SAS Data Integration Studio developer applies the SAS Enterprise
Miner model to the new data source to generate the prediction of the customer's probability to default on a home equity
loan.
To use the Model Scoring transformation, your SAS Enterprise Miner models must be
registered in the same metadata repository that contains the sources for your job.
You can use the SAS Enterprise Miner Configuration Wizard to associate your SAS
Enterprise Miner metadata repository with the metadata server that is used for your SAS Data Integration Studio application. See the SAS Enterprise
Miner online Help for more information about how to use this wizard.
Note: It is recommended that you
group your models in trees to make them easier to find when using
the Model Scoring transformation.
For best performance, the target of a Model Scoring transformation should have only
those columns that are required.
These columns include the required input variables from the source table and the output
results that are specified in the SAS Enterprise Miner model.
Perform the following
steps:
Tasks
Create and Populate the Job
Perform the following steps to create and populate the job:
-
Create an empty SAS Data Integration Studio job.
-
Select and drag a Model Scoring transformation from the Transformations tree in the Data Transforms folder. Then, drop it in the empty job on the Diagram tab in the Job Editor window.
-
Drag the cursor from the source table to the input port of the Model Scoring transformation. This action connects the source to the transformation.Note that the source file for the sample job is named HMEQ.
Associate the SAS Enterprise Miner Model with the Job
Perform the following
steps to associate the SAS Enterprise Miner model with the Model Scoring
transformation:
-
Display the transformation properties window.
-
Click the Models tab.
-
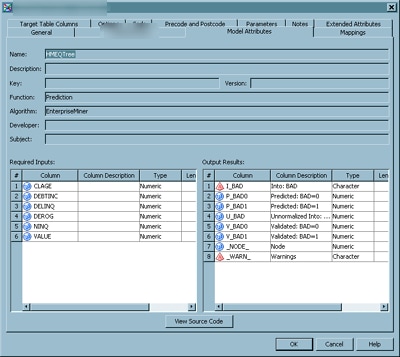
Select the data mining tree model. Note that the Mining Results folder always contains all tree models, regardless of their assigned trees. Therefore, you can always find all available trees in the folder. Metadata about the selected tree model is displayed on the tab. The tree model used in the sample job in HMEQTree.
-
Click the Model Attributes tab. Use this tab to view the required input variables and output results that were defined for the model in SAS Enterprise Miner. You can also click View Source Code to view the SAS source code that is generated by the model. The Model Attributes tab for the sample job is shown in the following display.Sample Model Attributes Tab
-
Click the Mapping tab. The columns in the source and table tables are displayed.
-
Manually map the columns in the source table to the same columns in the target table. The mappings in the sample job are shown in the following display.Sample Mapping Tab
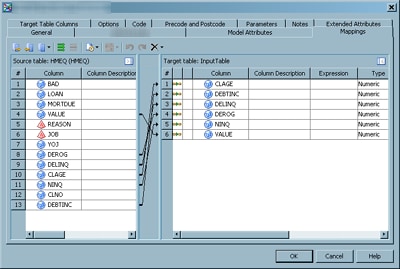 Note: The Input Table label on the Target table field is not displayed until a permanent target table is added to the job.
 -
Click the Target Table Columns tab. In this tab, the Available field displays all columns in the source table and output table. It also displays all output results and any generated columns that are defined for the model.
-
Move the columns that you want to include in the target table into the Selected field. The Target Table Columns tab for the sample job is shown in the following display.Sample Target Table Columns
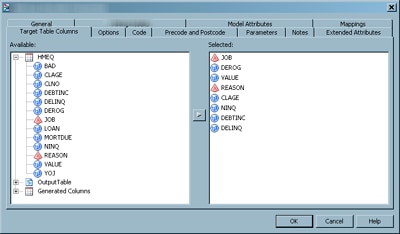 By default, only the columns that you must select from the source table are the required inputs and the model key columns, such as customer ID. From the output table, you can select columns starting with EM_ , P_, I_, or D_ that represent the SAS Enterprise Miner model predictions. You might want to include the ModelKey column and Date or DateTime columns also.Note: For better performance, you should include only the required input variables and an identifier (such as Job) from the source table.
 -
Click OK to save the settings and close the properties window.
-
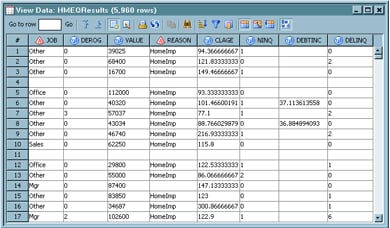
Right-click the temporary output table attached to the Model Scoring transformation. Then, click Register Table to change the temporary output table into a permanent physical table. This permanent table is displayed on the Diagram tab of the Job Editor window and added to the Inventory tree.In the sample job, this permanent target table is named HMEQResults.
Run the Job and View the Output
Perform the following steps to run the job and verify that the job created the desired
output:
-
Right-click on an empty area of the job, and click Run in the pop-up menu. SAS Data Integration Studio generates code for the job and submits it to the SAS Application Server for execution.
-
If error messages display, read, and respond to the messages as needed.
-
Right-click the target table in the Diagram tab. Then, click Open in the pop-up menu. The following display shows the target table data for the sample job.Sample Target Table in the View Data Window
Copyright © SAS Institute Inc. All Rights Reserved.
Last updated: January 16, 2018