Creating a Publish to Email Report from Table Data
Overview
Use a Publish to Email
transformation to create and email an HTML report. You can control
many aspects of how the report is created, such as the following:
-
the title of the report
-
the location of the report and the archive
-
which columns are analyzed
-
where the report is emailed
The following types
of output are available:
-
a report that can be viewed within an email message
-
a report in an archive (.spk) file as an email attachment
-
notification that a report was published
The Publish to Archive transformation uses the Publishing Framework feature of SAS
Integration Technologies. This framework provides a complete and robust publishing
environment for enterprise-wide information delivery. It consists of SAS CALL routines,
application programming interfaces (APIs), and graphical user interfaces that enable
both users and applications to publish SAS files (including data sets, catalogs, and database views), other digital content,
and system-generated events to a variety of destinations such as email addresses,
message queues, publication channels and subscribers, WebDAV-compliant servers, and archive locations.
The Publishing Framework
also provides tools that enable both users and applications to receive
and process published information. For example, users can receive
packages with content, such as charts and graphs, that is ready for
viewing. SAS programs can receive packages with SAS data sets that
might in turn trigger additional analyses on that data.
Note that email must be enabled for the SAS Workspace Server that executes the job that includes the Publish to Email transformation. For more information, administrators
should see the section called "Add or Modify E-Mail Settings for SAS Application Servers"
in the SAS Intelligence
Platform: Application Server Administration Guide.
Problem
You want to create and
print an HTML report. Then, you want to send it by email to a designated
recipient.
Solution
You can use a Publish to Email transformation in a job creates and emails an HTML
report. For example, you can create a job similar to the
sample job featured in this topic. This sample job generates a report that is based
on a table that contains information about business invoices and emails it to a specified
address. The sample job includes the following tasks:
Tasks
Create and Populate the Job
Perform the following steps to create and populate the job:
-
Create an empty SAS Data Integration Studio job.
-
Select and drag a Publish to Email transformation from the Publish folder in the Transformations tree. Then, drop it in the empty job on the Diagram tab in the Job Editor window.
-
Right-click the Publish to Email transformation and select Ports
 Add Input Port.
-
Select and drag the source table out of the Inventory tree. Then, drop it before the Publish to Email transformation on the Diagram tab.
-
Drag the cursor from the source table to the input port of the Publish to Email transformation. This action connects the source to the transformation.
-
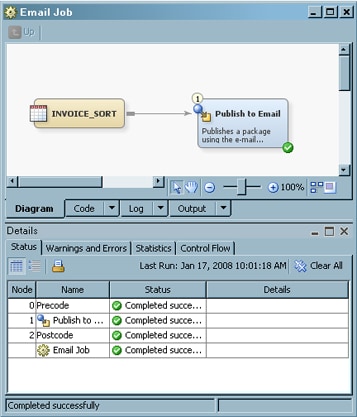
Ensure that the output of the job can be sent to the Output tab of the Job Editor window. (If the Output tab is not displayed, enable it with the Show Output tab check box in the General tab of the Options item in the Tools menu.) The following display shows a sample process flow diagram for a job that contains the Publish to Email transformation.Sample Process Flow
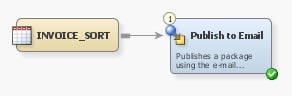
Note that the source table for the sample job is named INVOICE_SORT.
Configure SAS Table and Reporting Options
Use the Options tab in the properties window for the Publish to Email transformation to configure
the SAS tables that are generated in the job and shape the output of your analysis.
Note that the Options tab is divided into two parts, with a list of
categories on the left-hand side and the options for the selected
category on the right-hand side. Perform the following steps to set
the options that you need for your job:
-
Open the properties window for the Publish to Email transformation in the Diagram tab in the Job Editor window. Then, click the Options tab.
-
Click Email specifications to access the email specifications page. Enter the email address for the report destination in the Specify email addresses field. Click Adds a new item to add the address to the list.
-
Click Columns to report on to access the Columns to report on columns page. Use the column selection prompts to access the columns that you need in the SAS tables included in your job. For example, you can click
 for the Select other columns to print
(VAR statement) to access the Select Data
Source Items window, as shown in the following display.
Sample Select Data Source Items Window
for the Select other columns to print
(VAR statement) to access the Select Data
Source Items window, as shown in the following display.
Sample Select Data Source Items Window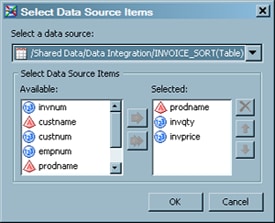 In the sample job, the VAR statement columns are prodname, invqty, and invprice. The column assignment options are shown in the following display.Sample Options Properties
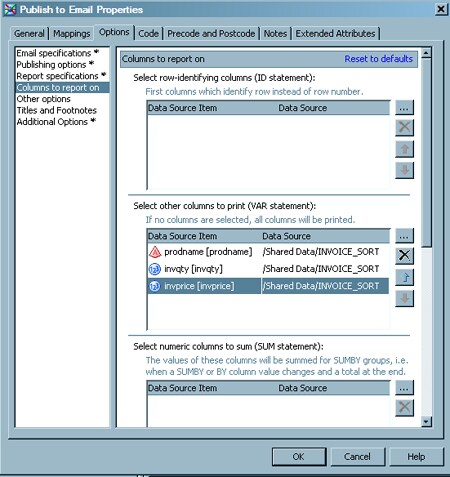
-
Set the publication options for the report on the Publishing options page. The options for the sample job are shown in the following display.Sample Publication Options
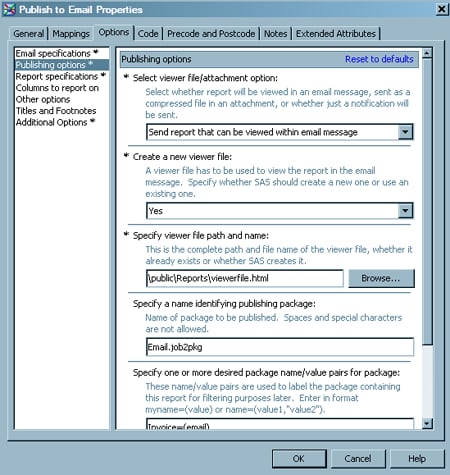 Note that the first three options on this page are required. They configure the viewer file for the email used to transmit the report. In the sample job, the output is sent in an email message (email.html). You can also send the output in an archive file that is attached to an email message or send an email notification that the output was published.
 -
Set the remaining options for your analysis in the appropriate fields. For example, the path and filename for the report generated by the sample job are specified in the Specify path and filename for generated report field on the Report specifications page. (Make sure that you click Generate PROC PRINT from input table in the Generate PROC PRINT or send existing report field). A title for the sample job report is set on the Titles and Footnotes page.
Run the Job and View the Output
Perform the following steps to run the job and view the output:
-
Right-click on an empty area of the job, and click Run in the pop-up menu. SAS Data Integration Studio generates code for the job and submits it to the SAS Application Server for execution. The following display shows a successful run of a sample job.Sample Publish to Email Job
-
If error messages are displayed on the Status tab, read and respond to the messages as needed.
-
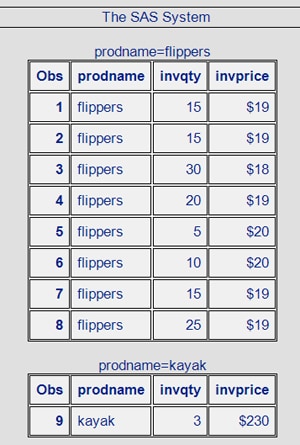
To view the generated reports, click the Output tab in the Job Editor window. The following display shows a portion of the report for the sample job.Sample E-mail Output
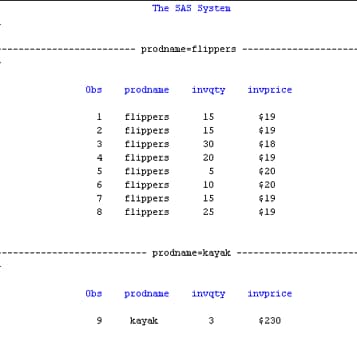
-
The same output is saved to a directory that you designate in the Publishing Option section of the Options tab. It is also sent to the email address that you designate in the email specifications section of the Options tab. The following display shows a portion of the emailed report for the sample job.
Copyright © SAS Institute Inc. All Rights Reserved.
Last updated: January 16, 2018