Creating Standardized Statistics from Table Data
Overview
The Standardize transformation is an interface to the STANDARD procedure. The STANDARD
procedure standardizes variables in a SAS data set to a given mean and standard deviation,
and it creates a new SAS data set containing the standardized values. You can use
it to create a target table that contains standardized data. You can control many aspects of how the target
table is created, which can include the following:
-
the type of standardization
-
which columns are analyzed
Solution
You can use the Standardize transformation in a SAS Data Integration Studio job. This transformation uses the STANDARD procedure to standardize variables in a SAS
data set to a given mean and standard deviation. Then, it creates a new SAS data set
that contains the standardized values.
For example, you can create a job similar to the sample job featured in this topic.
This sample job generates a standardized
analysis based on a table that contains information about test scores. Note that the
output for this job is sent to a target table. The sample job includes the following
tasks:
Tasks
Create and Populate the Job
Perform the following steps to create and populate the job:
-
Select and drag the source table out of the Inventory tree. Then, drop it before the Standardize transformation on the Diagram tab.
-
Because you want to have a permanent target table to contain the output for the transformation, right-click the temporary work table attached to the transformation and click Replace in the pop-up menu. Then, use the Table Selector window to select the target table for the job. The target table must be registered in SAS Data Integration Studio.
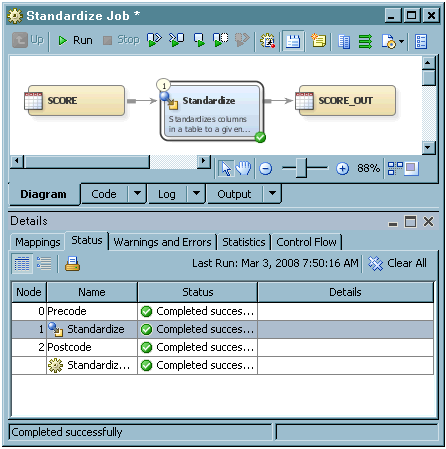
The following display shows a sample process flow diagram for a job that contains
the Standardize transformation:
Note that the source table for the sample job is named SCORE, and the target table
is named SCORE_OUT.
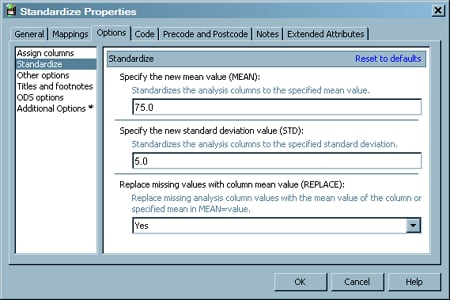
Configure Analytical Options
Use the Options tab in the properties window for the Standardize
transformation to configure the output for your analysis. Note that
the Options tab is divided into two parts, with a list of categories on the left-hand side and
the options for the selected category on the right-hand side. Perform the following
steps to set the options that you need for your job:
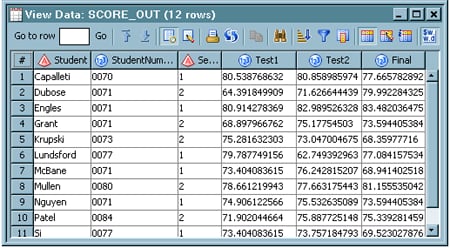
Run the Job and View the Output
Perform the following steps to run the job and view the output:
-
Right-click on an empty area of the job, and click Run in the pop-up menu. SAS Data Integration Studio generates code for the job and submits it to the SAS Application Server for execution. The following display shows a successful run of a sample job:
Copyright © SAS Institute Inc. All rights reserved.


