Using Match Codes to Improve Record Matching
Solution
There are a number of
ways to use match codes in SAS Data Integration Studio jobs. You can
select Use Match Definition when this option
is available for a transformation, as described in Configure the Apply Lookup Standardization Transformation. You can create
a data service in DataFlux Data Management Studio that generates match
codes and clustering information, and then call that service in a
SAS Data Integration Studio job. For more information, see Using a DataFlux Data Service in a Job.
Tasks
Verify Prerequisites
The Create Match Code
transformation that is used in this topic requires SAS Data Quality
Server 9.3. One or more locales must be available to SAS Data Integration
Studio, as described in Global Options on the Data Quality Tab. Locales have
a set of default match definitions that can be used to generate match
codes. Assume that the sample job for this topic uses the standard
match definitions for the ENUSA locale.
Create and Populate the Job
Match codes can be used
to identify members of the same household in a set of demographic
data. In order to do that, you could create a job flow that reads
a table of demographic data (CONTACTS); generates match codes and
cluster numbers for records that have the same last name and street
address, and then writes the match codes and cluster numbers to a
target table (CONTACTS_OFFICE_CLUSTER). The flow would look similar
to the following figure.

-
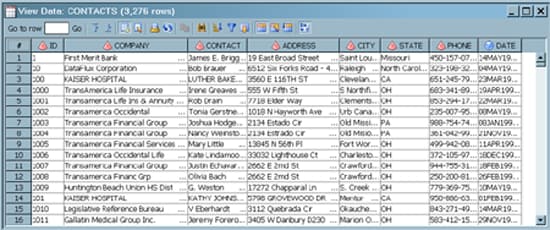
Drag the cursor from the source table to the input port of the Create Match Code transformation. This action connects the transformation to the source. In this example, the source is a table of contact information called CONTACTS, which contains a large number of records. The data has not been standardized, so the spelling of names and addresses might differ while still referring to the same entities. The following display depicts the source data. When the job is run, rows 1004 and 1005 receive the same cluster number, as do rows 1007 and 1008, despite the fact that the data varies in the COMPANY and ADDRESS rows.
-
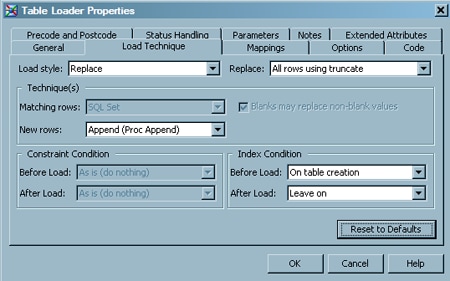
Select and drag from the transformation's temporary output table to the Table Loader transformation. This action connects the output of the transformation to the Table Loader. The Table Loader is used to ensure that the target is always completely overwritten each time the job is run. This default configuration for the Table Loader is depicted in the following display of the Table Loader's Load Technique tab.
-
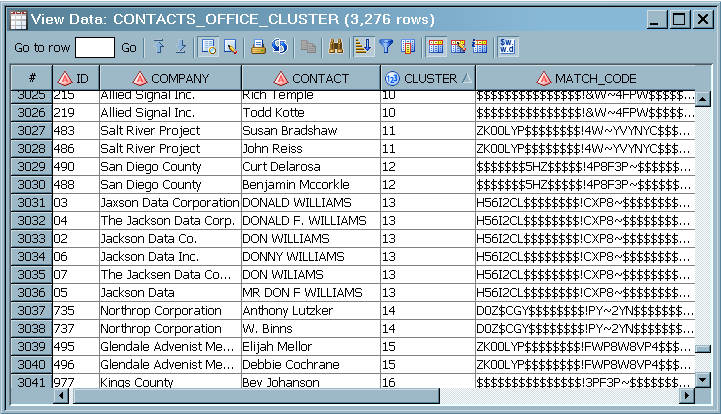
Select and drag the target table from its folder and drop it after the Table Loader transformation on the Diagram tab. In this example, the target is named CONTACTS_OFFICE_CLUSTER. The target contains the same columns as the source, plus a numeric column named CLUSTER and a character column named MATCH CODE (length 120).
-
To propagate and map columns, right-click the Create Match Codes transformation and select Propagate Columns
 To Selected Transformation's
Sources SourcesFrom Targets. This action maps the source columns to the target
and propagates the new columns in the target into the Create Match
Codes transformation.
The job flow should now look similar to Create Match Code Job Flow.
To Selected Transformation's
Sources SourcesFrom Targets. This action maps the source columns to the target
and propagates the new columns in the target into the Create Match
Codes transformation.
The job flow should now look similar to Create Match Code Job Flow.
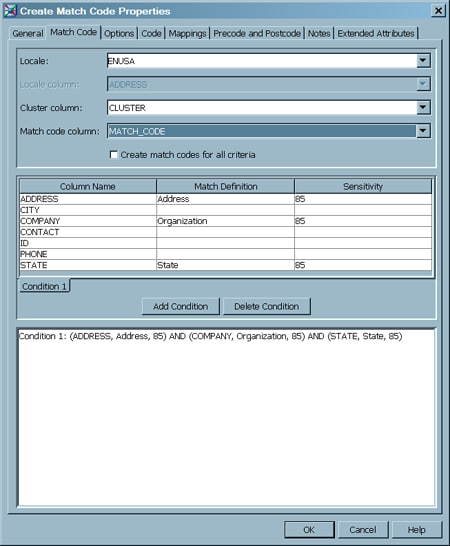
Configure the Create Match Code Transformation
-
Set up one or more conditions that determine the assignment of cluster numbers. For this example, in the Match Definition column, for the ADDRESS column, pull down the list of available match definitions and select Address. In the Sensitivity column, leave the default value of 85 . A lower number is a less-exact match.
Usage Notes
ERROR:
Failure in the clustering engine. If you run
a job that generates clustering information, and the job fails with
this error in the log, try increasing the amount of memory that is
allocated to the SAS Application Server that executes the job. To
increase the memory allocation, set the option –maxmemquery
to a higher value in the sasv9_usermods.cfg file. For example, you
might set the option as follows:-maxmemquery 600M
Copyright © SAS Institute Inc. All rights reserved.