Standardizing Values with a Standardization Scheme
Solution
Tasks
Identify Incorrect Values
You can use DataFlux
Data Management Studio to get detailed information about problems
with source data. For example, you could identify all of the incorrect
spellings of a company name in a table column. Detailed information
about incorrect values will help you create an effective standardization
scheme. For
more information, see Analyzing the Quality of Data Sources.
Create a Standardization Scheme
Use DataFlux Data Management
Studio or the DQMATCH procedure in SAS Data Quality Server to create
a standardization scheme that will map incorrect values to the correct
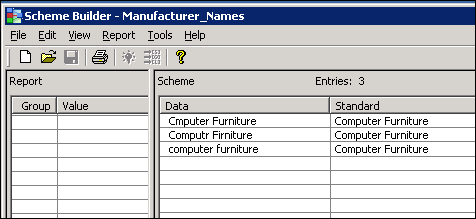
ones. The next figure shows a scheme in DataFlux Data Management Studio
that can be used to correct misspellings for the Computer
Furniture company.
Verify Prerequisites
The Apply Lookup Standardization
transformation that is used in this topic requires SAS Data Quality
Server 9.3. In SAS Data Integration Studio, verify that the appropriate Scheme
Repository Type and Scheme Repository are
selected, as described in Global Options on the Data Quality Tab. The scheme repository must contain the standardization
schemes that you want to use in SAS Data Integration Studio.
Note: On the Data Quality tab,
if you change an existing value in the fields Scheme Repository
Type or Scheme Repository, then
you must replace any instances of the Apply Lookup Standardization
transformation in any existing jobs that you intend to run using your
current metadata profile. Replacement is required because scheme metadata
is added to these jobs when they are run for the first time. To update
a job to use a different scheme repository, add a new Apply Lookup
Standardization transformation to the job, configure the new transformation,
delete the old transformation, and move the new transformation into
place.
Create and Populate the Job
The example job that
is described in this section uses an Apply Lookup Standardization
transformation. This transformation applies one or more standardization
schemes to one or more columns in a source table. Applying schemes
modifies your source data according to rules that are defined in the
schemes. The specific process of scheme application varies based on
your input. However, in general, when you apply a scheme to a source
column, each value in that column is compared to all data values in
the scheme. If the source value matches a scheme data value, the associated
standardization value in the scheme is written into the target as
a replacement for the source value. If no match is found, the source
value is written into the target without change.
The first task is to
create a job flow that reads a table with nonstandard data (MANUFACTURERS),
uses a standardization scheme to correct the data, and then writes
the corrected output to a target table (MANUFACTURERS_STANDARDIZED).
The flow would look similar to the following figure:

-
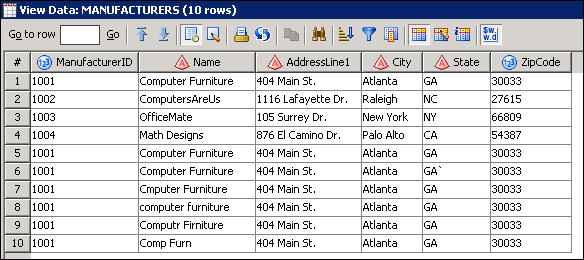
Select and drag a source table from its folder and drop it before the Apply Lookup Standardization transformation. In this sample job, the name of the source is MANUFACTURERS. The source provides contact information for suppliers of computer equipment. In the MANUFACTURERS table, the Name column contains inconsistent values for the supplier named
Computer
                                    Furniture
, as depicted in the following display: -
Drag the cursor from the output port of the Table Loader transformation to the target table. This action connects the transformation to the target. The job flow should now look similar to Example Job with an Apply Lookup Standardization Transformation.
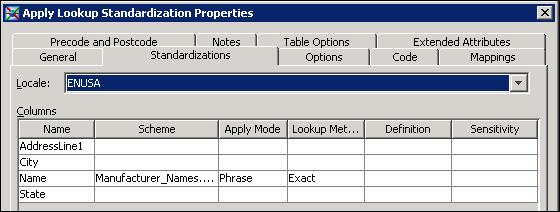
Configure the Apply Lookup Standardization Transformation
The goal for this task
is to associate the standardization scheme to the column or columns
in the source that contain inconsistent values. This is done by selecting
options on the Standardizations tab in the
Apply Lookup transformation. An example set of options is shown in
the next figure.
-
Select the scheme to be applied to the column. For the sample job, this is a scheme named
Manufacturer_Names, which was created as described in Create a Standardization Scheme.. -
(Optional step associated with match codes) Click the Definition column to display a list of available match definitions. A match definition aims to help you decide whether two or more pieces of data might refer to the same real-life entity. To facilitate this, the definition generates a special string called a match code for each input. Any two inputs that generate the same match code are considered a match. Select a definition that is appropriate for the current column.
Run the Job and View the Output
-
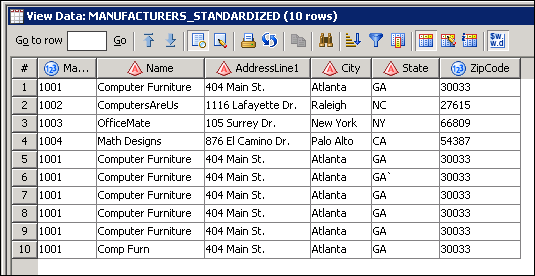
After the completion of the job, right-click the target and select Open to view the standardized contents of the Name column. Note that one source value (Comp Furn) was not mapped in the standardization scheme that was created in Create a Standardization Scheme. All the other values were standardized. The following figure shows the target table data for the sample job.
Copyright © SAS Institute Inc. All rights reserved.