Validating Product Data

Overview

Use a Data Validation transformation to improve the quality of operational data before you load that data into a data warehouse or data mart. You can detect error conditions and specify actions that alleviate those errors. Error conditions include blank or missing values, duplicate values, and invalid values. The actions that you can take in response to erroneous values include stopping the job, changing the value, or writing the row to an error table instead of to the target.
Custom validation enables you to apply source values to user-written expressions. You then define the actions that are taken in response to true and false results. Custom actions include the replacement of source values in the target. Replacement values can be generated by a second expression, or they can be obtained from a translation table.
Each of the validation actions sends information to an exception report, which you can create on the Error and Exception Tables tab. You can specify the name and path of the exception report on the Status Handling tab.

Problem

You want to create a job that validates operational data before that data is loaded into a data warehouse or data mart.

Solution

You can use a Data Validation transformation to improve data quality by identifying and acting on duplicate values, invalid values, and missing values. Perform the following tasks to create the job:
You can also develop your own validation process that translates source values by using expressions or translation tables. The expressions can include the data quality functions that are available in the Expression Builder. In this example, source data on product revenues is validated before it is loaded into an enterprise data warehouse. Source rows with duplicate product numbers or with invalid product names are written to an error table, and valid rows are written to a table in the warehouse.

Tasks

Create and Populate the Job

Perform the following steps to create and populate the job:
  1. Create an empty SAS Data Integration Studio job.
  2. Select and drag a Data Validation transformation from the Data folder in the Transformations tree. Then, drop it in the empty job on the Diagram tab in the Job Editor window.
  3. Select and drag the source table from the Inventory tree. Then, drop it before the Data Validation transformation on the Diagram tab. The source table for this sample job is Product_transact.
  4. Drag the cursor from the source table to the input port of the Data Validation transformation. This action connects the source to the transformation.
  5. Because you want to have a permanent target table to contain the output for the transformation, right-click the temporary work table attached to the transformation. Then click Replace in the pop-up menu. Finally, use the Table Selector window to select the target table for the job. The target table must be registered in SAS Data Integration Studio.
    The following display shows a sample process flow diagram for a job that contains the Data Validation transformation.
    Sample Process Flow
    Sample Process Flow
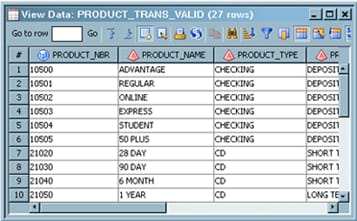
In the sample job, the lookup table is a SAS data set named PRODUCT_FACT. It contains the same columns as the source and target and contains valid values in the PRODUCT_NAME column. The source table is named Product_transact, and the target table is named PRODUCT_TRANS_VALID. When the job is 
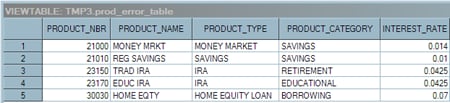
run, invalid values are found in source rows that contain a product name that does not appear in the lookup table. These rows are written to an error table instead of the target table. The error table is new, so a new table is created.

Configure Data Validation Settings

You can use the properties windows for the Data Validation transformation to perform the necessary configuration to validate your data. For example, the locations of the error and exception tables are specified in the sample job. Then, status handling conditions and actions are specified. Finally, the processing of duplicate and invalid values is configured for the job. Perform the following steps to complete this configuration:
  1. Open the properties window for Data Validation transformation on the Diagram tab in the Job Editor window.
  2. Click the Error and Exception Tables tab. Then, select the Create error table and Create exception table check boxes to create error and exception tables. Click the Choose columns buttons for both tables to select appropriate columns.
  3. Click the Status Handling tab. Then, click New to add a new data exception row to the table.
  4. Select Email Exception Report from the Action column for the table to access the Action Options window. The exception report stores messages that describe the actions that take place when you run the job.
  5. Enter the e-mail address of the error report destination in the Email Address field. Click OK to save the address.
  6. Click the Duplicate Values tab. Then, click New column to display the Duplicate Values window.
  7. Move the appropriate column from the Available Columns field to the Selected Columns. The sample job uses the PRODUCT_NBR column.
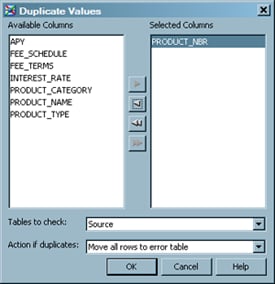
  8. Select appropriate values in the Tables to check and Action if duplicates fields. The sample job retains the default values of Source and Move all rows to error table. These values ensure that source rows with duplicate values are moved to the error table that is specified on the Error and Exception Tables tab. The Duplicate Values window for the sample job is shown in the following display.
    Sample Duplicate Values Window
    Sample Duplicate Values Window
  9. Click the Invalid Values tab. Then, click New column to display the Invalid Values window.
  10. Select the appropriate column in the Column Name field. The sample job uses the PRODUCT_NAME column.
  11. Click the Lookup a table and a column button to access the Lookup Table and Column window.
  12. Navigate to the appropriate table and select the column that you need. The sample job uses the PRODUCT_FACT table and the PRODUCT_NAME column. Click OK to save the table and column settings and return to the Invalid Values window.
  13. Make sure that the value in the Action if invalid field is correct. The sample job keeps the default Move row to error table value.
  14. Click OK to save the invalid values settings. Then, click OK again to save the properties window settings for the Data Validation transformation.

Run the Job and View the Output

Perform the following steps to run the job:
  1. Right-click on an empty area of the job, and click Run in the pop-up menu. SAS Data Integration Studio generates code for the job and submits it to the SAS Application Server for execution.
  2. If error messages display, read and respond to the messages as needed.
  3. To view rows that are validated and displayed in the target table, right-click the table and click Open. The following display shows the target table for the sample job.
    Sample Validated Data
    Sample Validated Data
  4. Check the error table, which contains the rows that fail validation. The following display shows the error table for the sample job.
    Sample Error Table
    Sample Error Table
  5. Verify that the e-mail notification of the data exception has been sent. The following display shows a portion of the notification for the sample job.
    Sample E-mail Notification
    Sample E-mail Notification
    You can also review the exceptions table, which contains the rows that generate exceptions.