Creating a Publish to Archive Report from Table Data
Overview
Use a Publish to Archive
transformation to create an HTML report and an archive file so that
the report can be re-created using SAS Package Retriever. You can
control many aspects of how the report is created, including the following:
The Publish to Archive
transformation uses the Publishing Framework feature of SAS Integration
Technologies. This framework provides a complete and robust publishing
environment for enterprise-wide information delivery. It consists
of SAS CALL routines, application programming interfaces (APIs), and
graphical user interfaces that enable both users and applications
to publish SAS files (including data sets, catalogs, and database
views), other digital content, and system-generated events to a variety
of destinations such as e-mail addresses, message queues, publication
channels and subscribers, WebDAV-compliant servers, and archive locations.
The Publishing Framework
also provides tools that enable both users and applications to receive
and process published information. For example, users can receive
packages with content, such as charts and graphs, that is ready for
viewing. SAS programs can receive packages with SAS data sets that
might in turn trigger additional analyses on that data.
Solution
You can use a Publish
to Archive transformation in a job that creates and archives an HTML
report. For example, you can create a job similar to the sample job
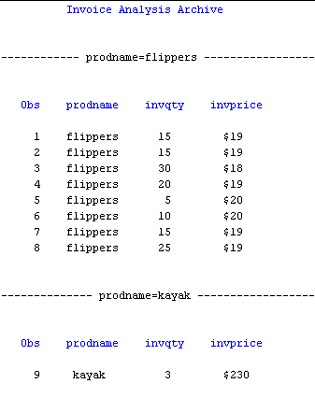
featured in this topic. This sample job generates a report that is
based on a table that contains information about business invoices.
The sample job includes the following tasks:
Tasks
Create and Populate the Job
-
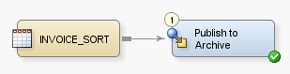
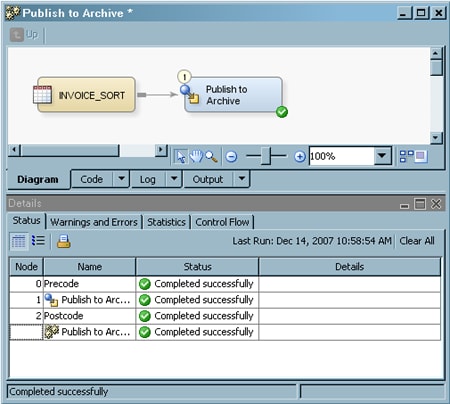
Ensure that the output of the job can be sent to the Output tab of the Job Editor window. (If the Output tab is not displayed, enable it with the Show Output tab check box on the General tab of the Options item in the Tools menu.) The following display shows a sample process flow diagram for a job that contains the Publish to Archive transformation.
Configure SAS Table and Reporting Options
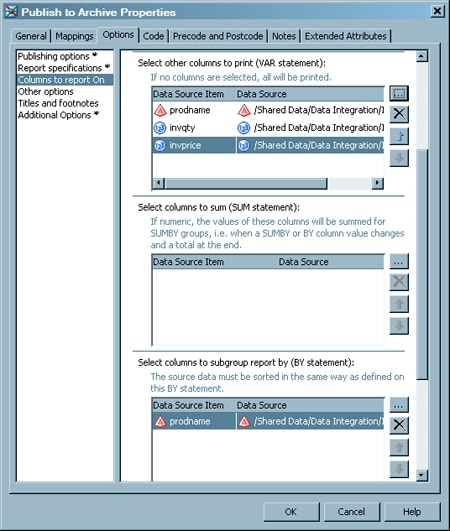
Use the Options tab in the properties window for the Publish
to Archive transformation to configure the SAS tables that are generated
in the job and shape the output of your analysis. Note that the Options tab is divided into two parts, with a list of
categories on the left-hand side and the options for the selected
category on the right-hand side. Perform the following steps to set
the options that you need for your job:
-
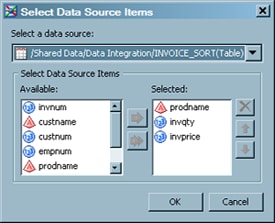
Click Columns to report on to access the Columns to report on columns page. Use the column selection prompts to access the columns that you need in the SAS tables included in your job. For example, you can click
 for the Select other columns to print
(VAR statement) to access the Select Data
Source Items window, as shown in the following display.
for the Select other columns to print
(VAR statement) to access the Select Data
Source Items window, as shown in the following display.
-
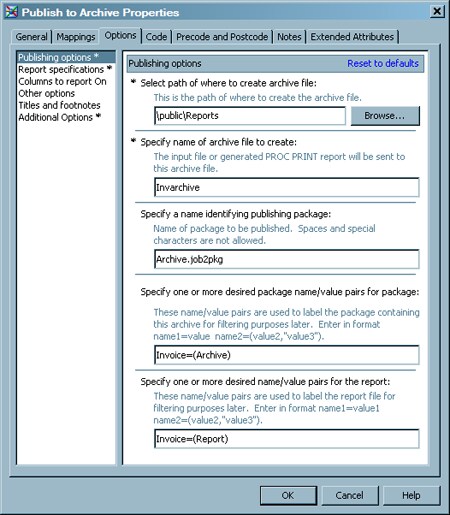
Set the remaining options for your report in the appropriate fields. For example, the path and filename for the report generated by the sample job are specified in the Specify path and filename for generated report field on the Report specifications page. (Make sure that you click Generate PROC PRINT from input table in the Generate PROC PRINT or send existing report field). A title for the sample job report is set on the Titles and Footnotes page.

Copyright © SAS Institute Inc. All rights reserved.