Processing a WebSphere Queue

Problem

You want to write rows from a source table into a WebSphere message queue. Then, you need to read the messages back from the queue and write them into a target table.

Solution

You can use the Websphere Queue Writer transformation in SAS Data Integration Studio to write the data to the message queue. Then, you can use the Websphere Queue Reader transformation to read the messages from the queue and populate them into a target table. Perform the following tasks to process the queue:
Text and file transfers are also supported in message queues, but these transfers are not covered in this example.

Tasks

Create the Websphere Queue Writer Job

Perform the following steps to create and populate the job:
  1. Create an empty job.
  2. Select and drag the Websphere Queue Writer transformation from the Access folder in the Transformations tree into the empty job in the Diagram tab in the Job Editor window.
  3. Drop the source table for the queue in the Diagram tab.
  4. Connect the source table to the input port of the Websphere Queue Writer transformation.
  5. Drop the queue from the Message queue folder in the Inventory tree in the Diagram tab.
  6. Connect the queue to the output port of the Websphere Queue Writer transformation. The job resembles the sample shown in the following display.
    Write Records from Table to Queue Job
    Write Records from Table to Queue Job

Configure and Run the Websphere Queue Writer Job

Perform the following steps to configure the job:
  1. Open the Queue Options tab of the properties window for the Websphere Queue Writer transformation.
  2. Select Table in the Message Type group box. Save the setting and close the properties window.
  3. Run the job. If you are prompted to do so, enter a user ID and password for the default SAS Application Server that generates and runs SAS code for the job. The server executes the SAS code for the job.
  4. If the job completes without error, go to the next section. If error messages appear, read and respond to the messages.

Verify the Websphere Queue Writer Job

Perform the following steps to verify the results of the queue writer job:
  1. Open the IBM WebSphere Queue Explorer application.
  2. Select the queue that you created and ran. Then, verify that the expected messages are sitting on the queue.

Create the Websphere Queue Reader Job

Perform the following steps to create the Websphere Queue Reader Job:
  1. Create an empty job.
  2. Select and drag the Websphere Queue Reader transformation from the Access folder in the Transformations tree into the empty job in the Diagram tab in the Job Editor window.
  3. Drop the queue that you created and ran on the Diagram tab.
  4. Connect the queue to the input port of the Websphere Queue Reader transformation.
  5. Because you want to have a permanent target table to contain the output for the transformation, right-click the temporary work table that is attached to the transformation and click Replace in the pop-up menu. Then, use the Table Selector window to select the target table for the job. The target table must be registered in SAS Data Integration Studio. (For more information about temporary work tables, see Working with Default Temporary Output Tables.)
  6. After these steps have been completed, the process flow diagram for this example resembles the following display.
    Read Records to a Table Job
    Read Records to a Table Job

Configure and Run the Websphere Queue Reader Job

Perform the following steps to configure the job:
  1. Open the Queue Options tab of the properties window for the Websphere Queue Reader transformation.
  2. Select Table in the Message Type group box. Save the setting and close the properties window. Remember that you verified that the message queue contained the messages from the source table in the Verify the Websphere Queue Writer Job section.
  3. Run the job. If you are prompted to do so, enter a user ID and password for the default SAS Application Server that generates and runs SAS code for the job. The server executes the SAS code for the job.
  4. If the job completes without error, go to the next section. If error messages appear, read and respond to the messages.

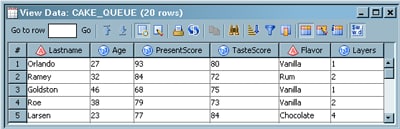
Verify the Websphere Queue Reader Job

Perform the following steps to verify the results of the queue reader job:
  1. Access the View Data window for the source table.
  2. Access the View Data window for the target table. A sample target table is shown in the following example.
    Sample Target Table Data
    Sample Target Table Data
  3. The source table and the target table contain identical data. This means that the data was transferred successfully through the Websphere message queue. If you do not see the data that you expected, check the Message Format column on the Columns tab in the Websphere Queue Reader properties window. To access this window, right-click Websphere Queue Reader and click Properties in the pop-up menu. Then, you can correct the formats as needed.